Whether or not it’s in a portfolio web page or a picture gallery, internet designers want to show off their designs for purchasers as a a very powerful a part of riding industry. And, again and again, those examples in their paintings come with photographs of whole internet web page designs which will take in numerous house. That’s why including a scroll down hover impact to those photographs can set your portfolio aside. This permits the person to peer a compact portion of the design to start with. But if the person hovers over the picture, the picture scrolls to slowly expose the remainder of the design as though they’re scrolling down a internet web page. You’ll see this sort of impact getting used on our very personal Divi Layout Packs page.
On this instructional, I’m going to turn you tips on how to use Divi so as to add a scroll down hover impact to photographs that may permit customers to preview internet web page designs. That is a sublime interactive component that I believe you will love.
Contents
- 1 Sneak Peek
- 2 Obtain the Scroll Down Hover Impact Structure for FREE
- 3 Obtain For Unfastened
- 4 You have got effectively subscribed. Please take a look at your e-mail cope with to substantiate your subscription and get get right of entry to to loose weekly Divi structure packs!
- 5 What You Want to Get Began
- 6 Growing the 3 Column Row
- 7 Growing the Symbol with Scroll Down Hover Impact
- 8 Including a Heading Above Every Symbol The usage of a Textual content Module
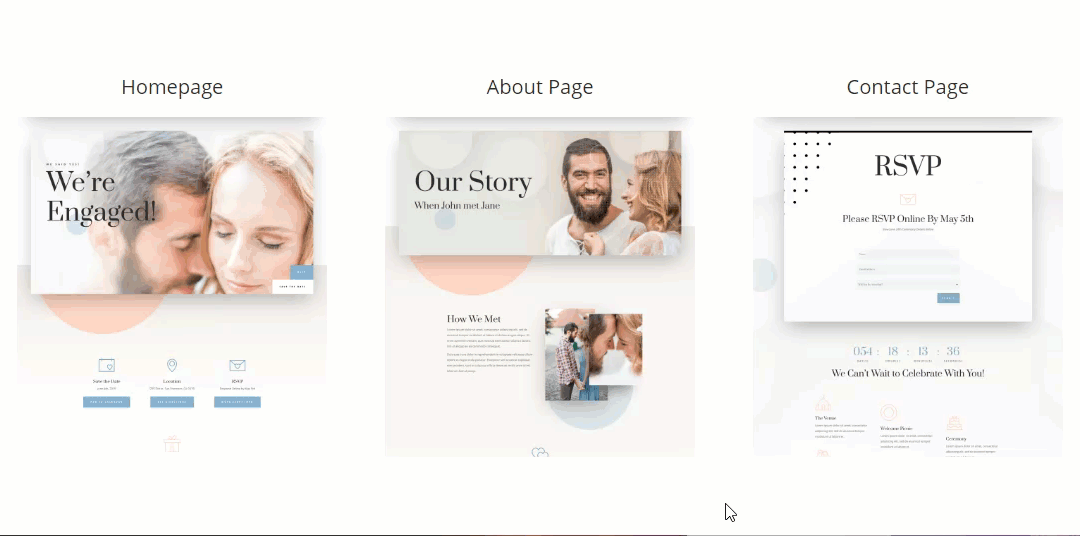
- 9 Homepage
- 10 Ultimate Consequence
- 11 Ultimate Ideas
Sneak Peek
Here’s a preview of the scroll down hover impact we will be able to construct in combination on this instructional.
Obtain the Scroll Down Hover Impact Structure for FREE
To put your arms on those instance scroll down hover impact designs, you’re going to first want to obtain it the use of the button under. To achieve get right of entry to to the obtain it is important to subscribe to our Divi Day-to-day e-mail record by way of the use of the shape under. As a brand new subscriber, you’re going to obtain much more Divi goodness and a loose Divi Structure pack each Monday! Should you’re already at the record, merely input your e-mail cope with under and click on obtain. You’re going to no longer be “resubscribed” or obtain additional emails.
@media handiest display screen and ( max-width: 767px ) {.et_bloom .et_bloom_optin_1 .carrot_edge.et_bloom_form_right .et_bloom_form_content:prior to, .et_bloom .et_bloom_optin_1 .carrot_edge.et_bloom_form_left .et_bloom_form_content:prior to { border-top-color: #ffffff !necessary; border-left-color: clear !necessary; }
}.et_bloom .et_bloom_optin_1 .et_bloom_form_content button { background-color: #f92c8b !necessary; } .et_bloom .et_bloom_optin_1 .et_bloom_form_content .et_bloom_fields i { colour: #f92c8b !necessary; } .et_bloom .et_bloom_optin_1 .et_bloom_form_content .et_bloom_custom_field_radio i:prior to { background: #f92c8b !necessary; } .et_bloom .et_bloom_optin_1 .et_bloom_border_solid { border-color: #f7f9fb !necessary } .et_bloom .et_bloom_optin_1 .et_bloom_form_content button { background-color: #f92c8b !necessary; } .et_bloom .et_bloom_optin_1 .et_bloom_form_container h2, .et_bloom .et_bloom_optin_1 .et_bloom_form_container h2 span, .et_bloom .et_bloom_optin_1 .et_bloom_form_container h2 robust { font-family: “Open Sans”, Helvetica, Arial, Lucida, sans-serif; }.et_bloom .et_bloom_optin_1 .et_bloom_form_container p, .et_bloom .et_bloom_optin_1 .et_bloom_form_container p span, .et_bloom .et_bloom_optin_1 .et_bloom_form_container p robust, .et_bloom .et_bloom_optin_1 .et_bloom_form_container shape enter, .et_bloom .et_bloom_optin_1 .et_bloom_form_container shape button span { font-family: “Open Sans”, Helvetica, Arial, Lucida, sans-serif; } p.et_bloom_popup_input { padding-bottom: 0 !necessary;}

Obtain For Unfastened
Sign up for the Divi Newlsetter and we will be able to e-mail you a replica of without equal Divi Touchdown Web page Structure Pack, plus lots of alternative superb and loose Divi assets, pointers and tips. Apply alongside and you’re going to be a Divi grasp very quickly. If you’re already subscribed merely kind to your e-mail cope with under and click on obtain to get right of entry to the structure pack.
You have got effectively subscribed. Please take a look at your e-mail cope with to substantiate your subscription and get get right of entry to to loose weekly Divi structure packs!
To import the structure in your web page, merely extract the zip document and drag the json document into the Divi Builder.
Now let’s get to the educational we could?
What You Want to Get Began
For this use case instructional, we’re going to construct our design from scratch the use of Divi. You’re going to additionally want some photographs/screenshots to make use of for the portfolio pieces. I might counsel the use of photographs which are a minimum of 1080px in width.
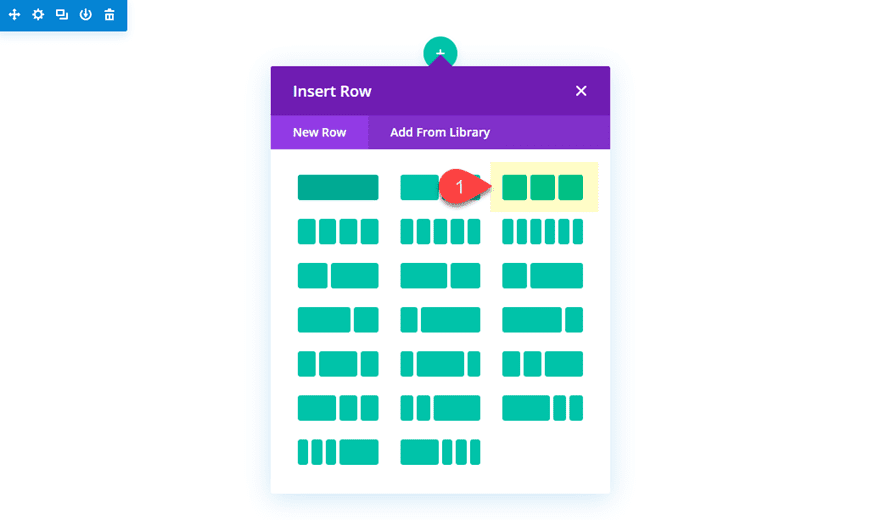
Growing the 3 Column Row
Should you haven’t already, create a brand new web page. Then give your web page a name and deploy the Divi builder at the entrance finish. Then create a brand new phase with a three-column row.
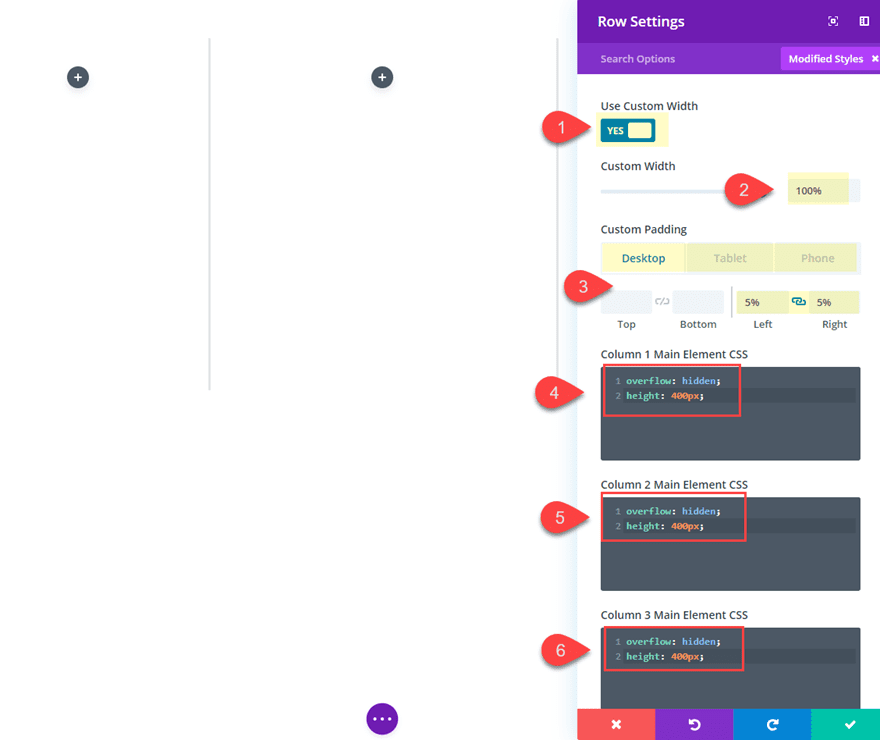
Replace the row settings as follows:
Customized Width: 100%
Customized Padding (desktop): 5% left, 5% proper
Customized Padding (pill): 25% left, 25% proper
Customized Padding (telephone): 15% left, 15% proper
Subsequent, we want to upload the next customized CSS snippets to every of the column primary parts. Below the complex tab, upload the next CSS:
Column 1 Primary Component CSS:
overflow: hidden;
peak: 400px;
Column 2 Primary Component CSS:
overflow: hidden;
peak: 400px;
Column 3 Primary Component CSS:
overflow: hidden;
peak: 400px;
Understand the peak of every of the columns is 400px. This may increasingly in the end function the peak of the viewport of the picture that may scroll on hover. The “overflow: hidden” assets will make certain the portion of the picture this is moved out of doors the column (on hover) stays hidden. This will have to make extra sense on every occasion we upload the grow to be hover impact to the picture.
Growing the Symbol with Scroll Down Hover Impact
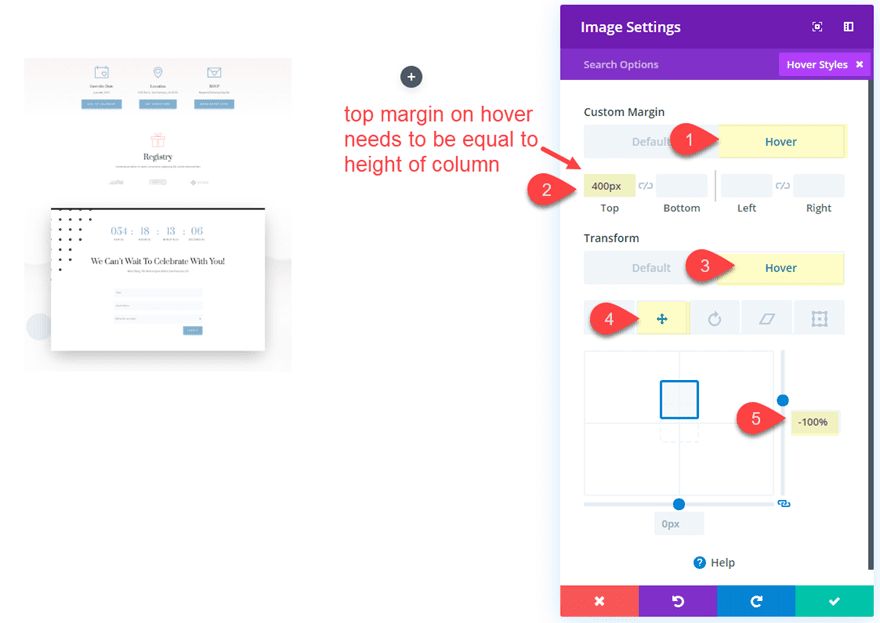
Now we’re in a position to begin developing our symbol with the scroll down hover impact. That is strangely easy if you know the way the impact works. Principally, all we’re going to do is upload a picture after which use the grow to be translate assets to transport the picture upward by way of 100% on hover. Then with the intention to make certain the picture stops on the proper place, we want to upload a height margin equivalent to the peak of the column on hover. This may increasingly make certain the picture stops scrolling on the precise level the ground of the picture is in view.
Right here’s tips on how to do it.
Upload a picture module to the column 1. Then upload the next hover choices:
Customized Margin (hover): 400px height
Become Translate Y-axis (hover): -100%
Ensure the customized height margin on hover is the same as the peak given in your column in customized CSS above.
Additionally, the grow to be translate Y-axis worth is a share (-100%), no longer pixels, so it is important to input this manually by way of typing the worth within the enter field of the grow to be translate controls.
How the Scroll Down Hover Impact Works
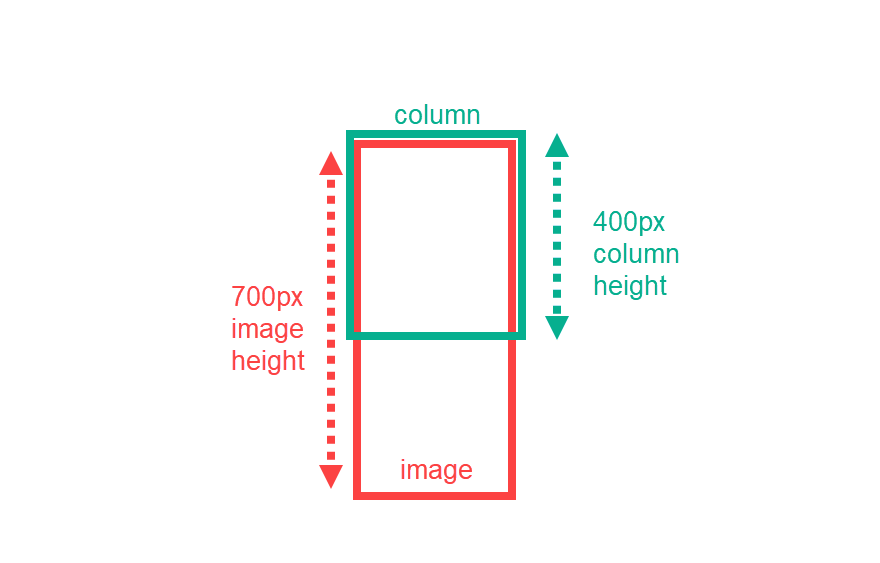
It will assist if I provide an explanation for the capability of this setup with a couple of visible illustrations. Let’s say that the picture you might be the use of has a peak of 700px. The column peak is handiest 400px. Which means Through default (prior to hover), the ground overflow of that symbol can be hidden because it extends out of doors the column.
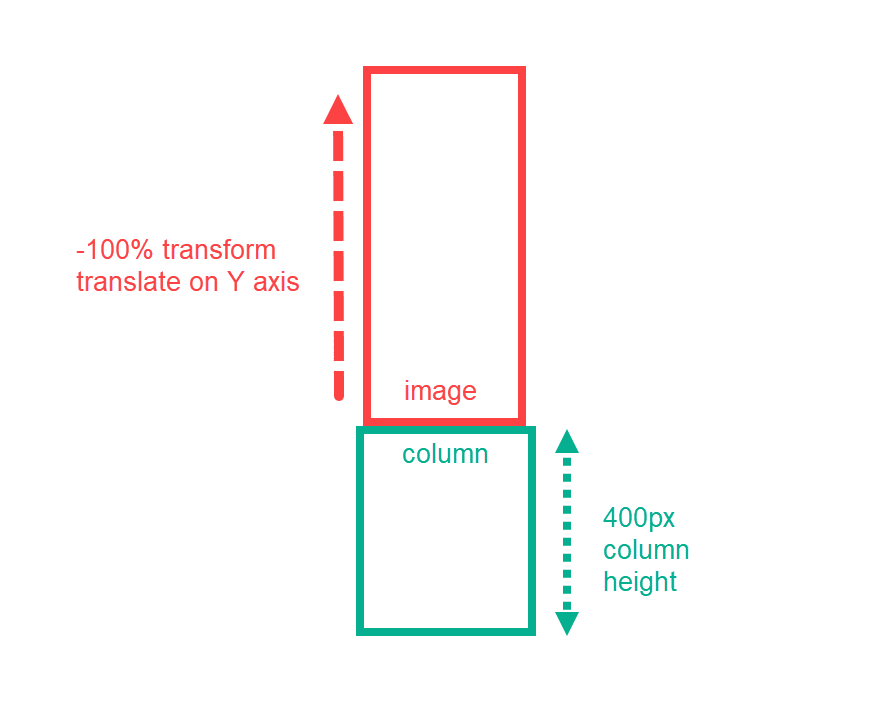
As soon as the person hovers over the picture, two issues occur.
First, the grow to be translate assets strikes the picture upward with a Y-axis worth of -100%. In different phrases, the picture strikes up 100% of regardless of the symbol peak is (700px).
Subsequent, the picture is given a height margin of 400px to convey the picture backtrack into the column viewport in order that its sits completely on the backside.
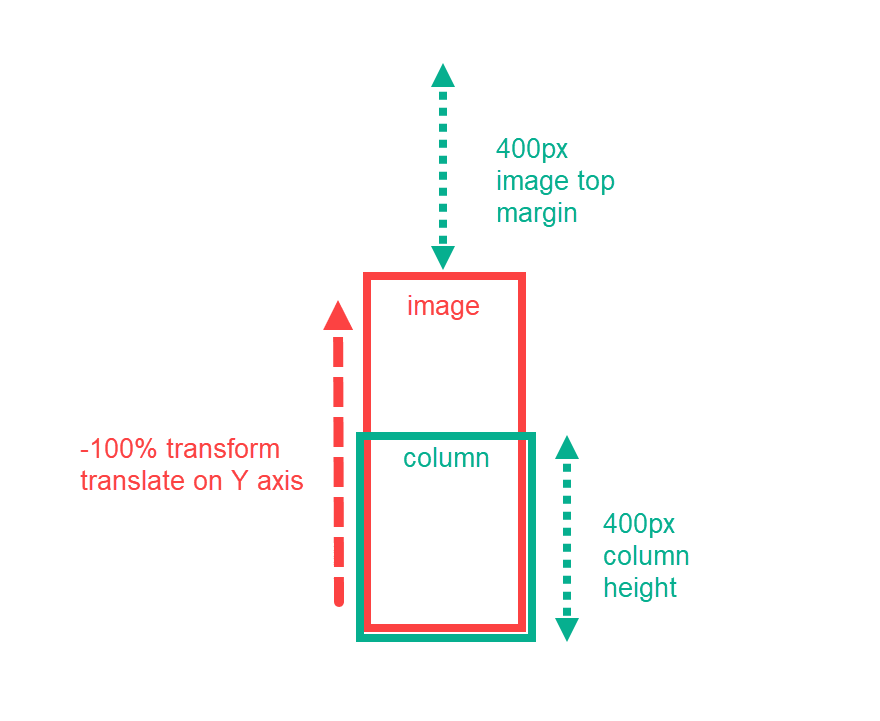
This occurs concurrently at the side of the grow to be hover impact so the result’s a clean scroll that leads to best placement.
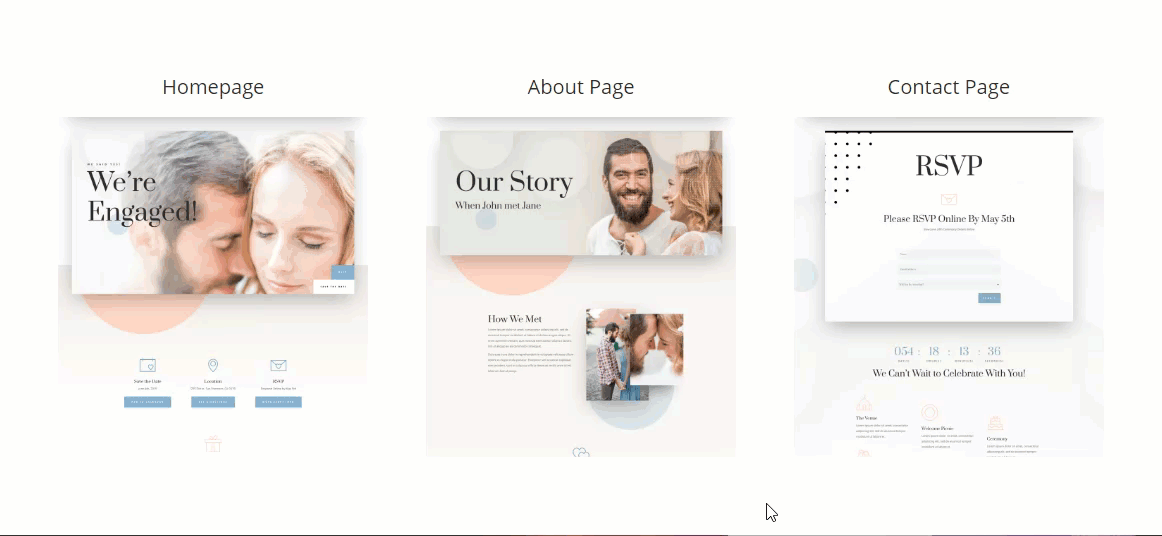
Here’s what the outcome looks as if at the are living instance.

Adjusting Transition Period and Velocity Curve
As you’ll be able to inform, the transition period is just too rapid for previewing the picture on hover. To gradual it down, you’ll be able to replace the transition period. You’ll additionally modify the velocity curve to modify the velocity all over the period.
Replace the next:
Transition Period: 4000ms
Transition Velocity Curve: Ease
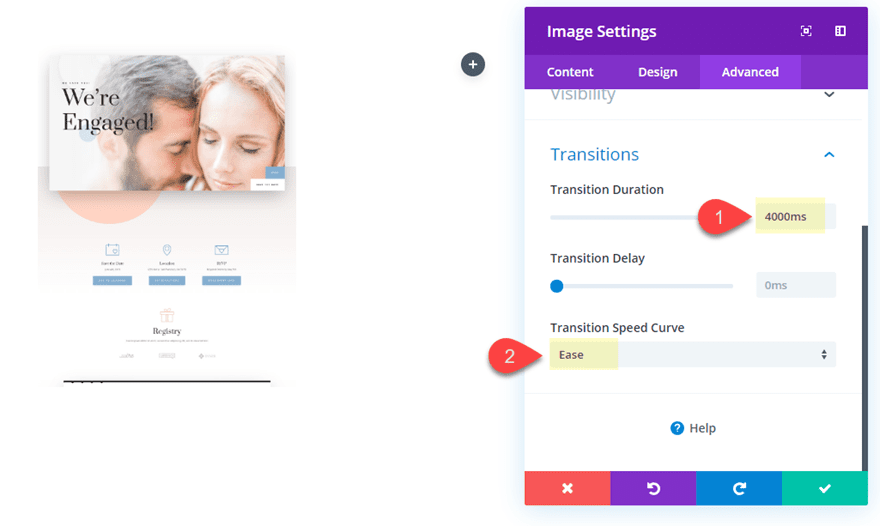
Typically, it would be best to build up the transition period for photographs with better peak to provide the person time to procedure the picture because the hover scroll impact happens.
Replica and Paste the Symbol Module into last columns
Now all it is important to do is reproduction the picture module and paste it into column 2 and column 3. Then replace the pictures for every to no matter new symbol you wish to have. That’s it!

Including a Heading Above Every Symbol The usage of a Textual content Module
If you need so as to add a heading to every of your photographs, you’ll be able to do that the use of the textual content module. On the other hand, we will be able to want to make some changes to the textual content module and the picture module to make it paintings.
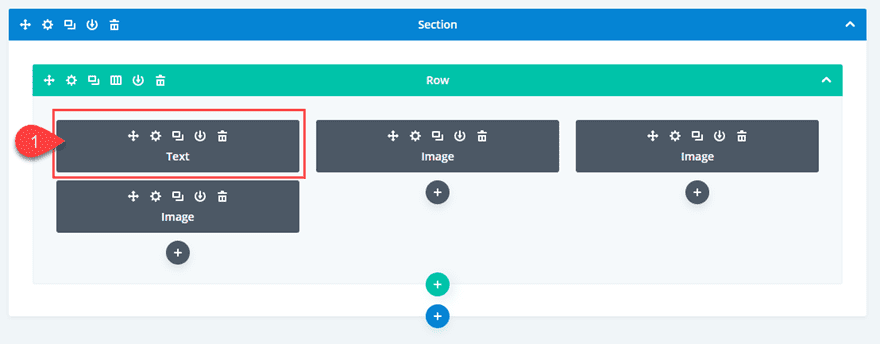
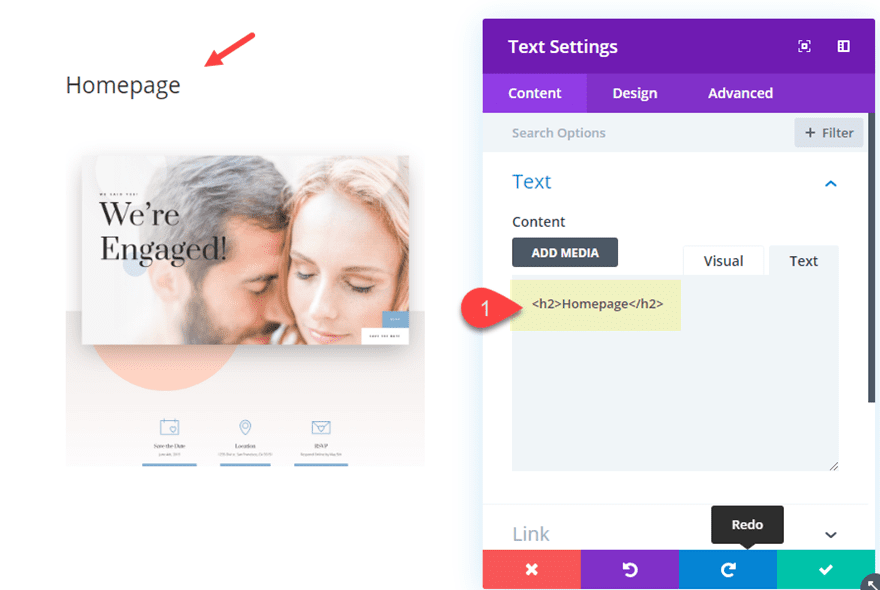
Pass forward and upload a brand new textual content module above the picture in column 1. You’re going to be more straightforward to make use of wireframe view mode since your column is about to a column peak.
Then replace the content material with an h2 heading as follows:
Homepage
Then replace the design settings as follows:
Background Colour: #ffffff
Textual content Orientation: middle
Heading 2 Textual content Dimension: 20px
Heading 2 Line Top: 2em
Customized Margin: 0px backside
Customized Padding: 10px height
Field Shadow: see screenshot
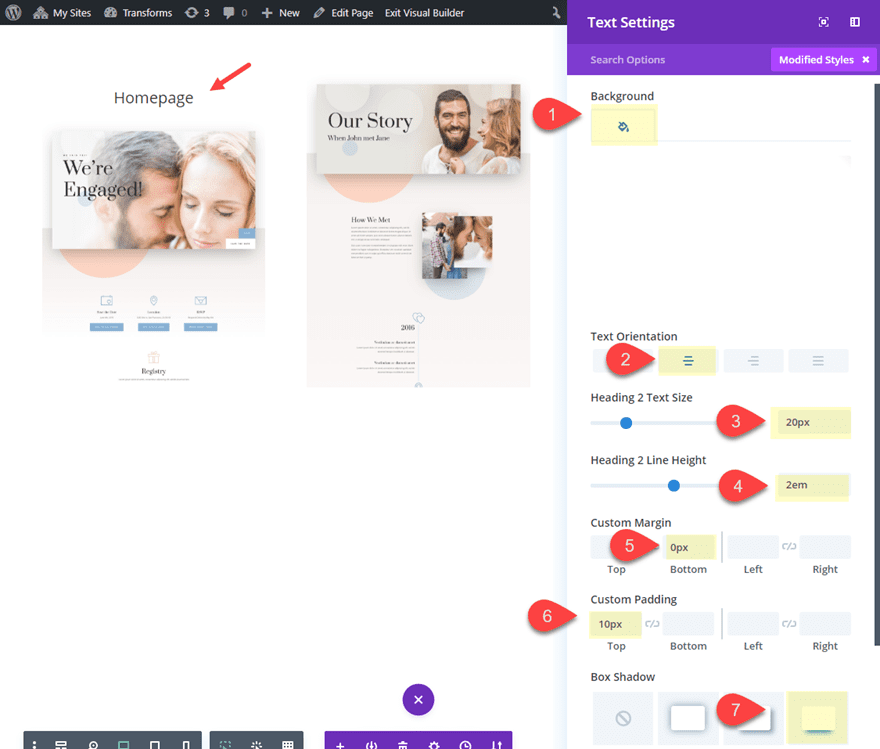
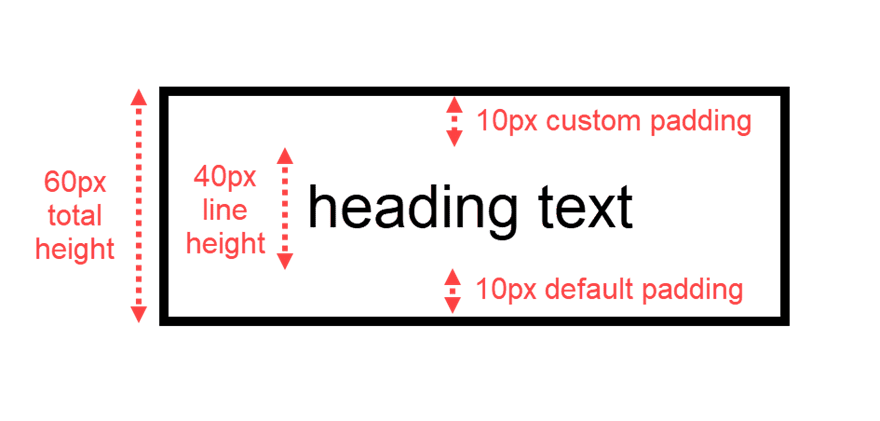
Those settings would possibly appear arbitrary, however they aren’t. Those values can are expecting what the peak of the textual content module can be which is necessary to grasp for later. As an example, I do know that the textual content module can have a peak of 60px. Let’s do the maths…
The road peak is 2em which is two occasions the heading 2 textual content dimension (20px). This implies my line peak goes to be 40px.
The customized height padding is about to 10px. And there may be hidden backside padding of 10px that exists already for all headings by way of default in Divi. The highest and backside padding mix for 20px of added peak.
So… 40px (of line peak) + 20px (of padding) = 60px
Now we all know the peak of the textual content module. In fact, you’ll be able to all the time investigate cross-check the component the use of dev gear simply to verify.
The customized backside margin of 0px is had to take out the default margin that exists under the module (added by way of gutter width).
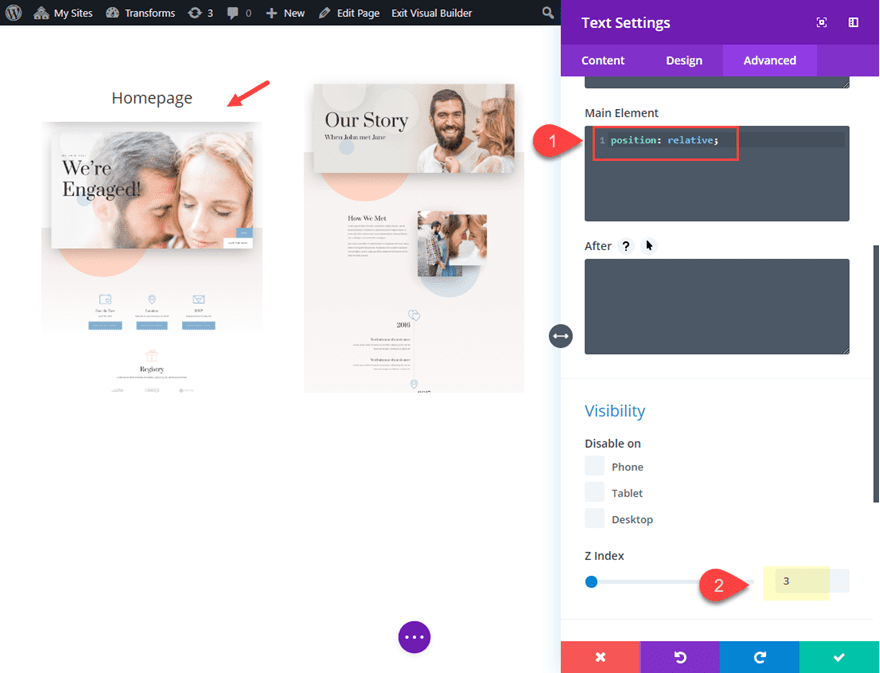
Since there can be some overlapping of the picture with the textual content module on hover, we want to make certain the textual content module remains layered above the picture. We will do that by way of giving the textual content module a relative place and converting the z-index worth as follows:
Upload the next customized CSS to the Primary Component:
place:relative;
Then replace the z index:
Z Index: 3
Replica and Paste the Textual content Module
Now that the textual content heading is completed, we will reproduction and paste it (the use of wireframe view mode) above the pictures in column 2 and three.
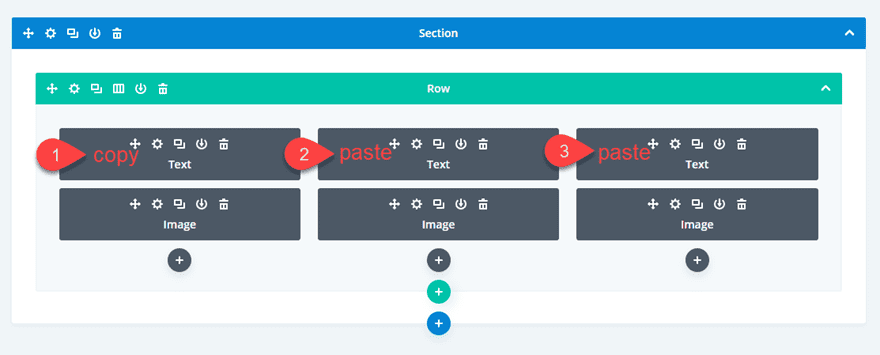
Then all you wish to have to do is replace the content material for every.
Replace the Most sensible Margin Worth on Hover for Every Symbol to Accommodate for the Textual content Module Top
These days, every of the pictures in columns 1, 2 and three have a customized height margin of 400px on hover. This was once set to equivalent the peak of the customized peak of the column. On the other hand, because the textual content module is now taking over one of the crucial column house (a peak of 60px), we want to modify the highest margin hover worth.
To try this, use the multiselect function to choose all 3 photographs. Then replace the component settings as follows:
Customized Margin (hover): 340px height

Now your photographs will forestall completely on the backside of the column on the finish of the hover state.
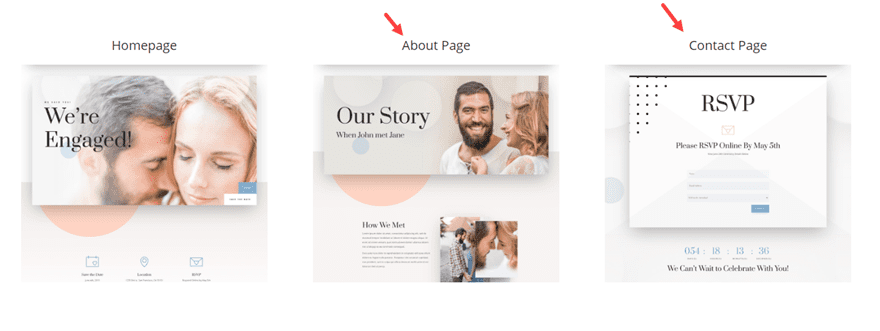
Ultimate Consequence
Here’s the general results of the design.
Be at liberty to copy the row and replace the pictures and heading textual content as wanted for extra portfolio presentations.

Here’s what it looks as if on pill and get in touch with.


Ultimate Ideas
Showcasing your internet web page designs with a customized scroll down hover impact no longer handiest provides a in reality cool interplay, but it surely additionally saves numerous house. This permits you to show numerous photographs in a compact and symmetrical structure. This sort of capability is most often one thing we’d get with a plugin. On the other hand, with Divi, you could have entire keep watch over over the design and capability with no need so as to add some other plugin. I am hoping this evokes you to create gorgeous portfolio galleries for you subsequent mission.
I look ahead to listening to from you within the feedback.
Cheers!
The publish How to Add a Scroll Down Hover Effect to Preview Web Page Designs in Divi seemed first on Elegant Themes Blog.
WordPress Web Design