
The Divi Gallery Module is excellent position to show off a picture gallery to your web page. By means of default, the gallery module will show the your pictures in a grid format with out a lot styling in any respect which is excellent for maintaining the pictures as the main design component. On the other hand, in case you are taking a look to get a bit of ingenious, you’ll body your pictures with other border designs to help in making your picture gallery standout. The Gallery module makes this procedure beautiful simple to do and the consequences might wonder you.
On this instructional, I’m going to turn you the way to create distinctive border designs to your picture galleries the use of the Divi Gallery module.
Let’s get began!
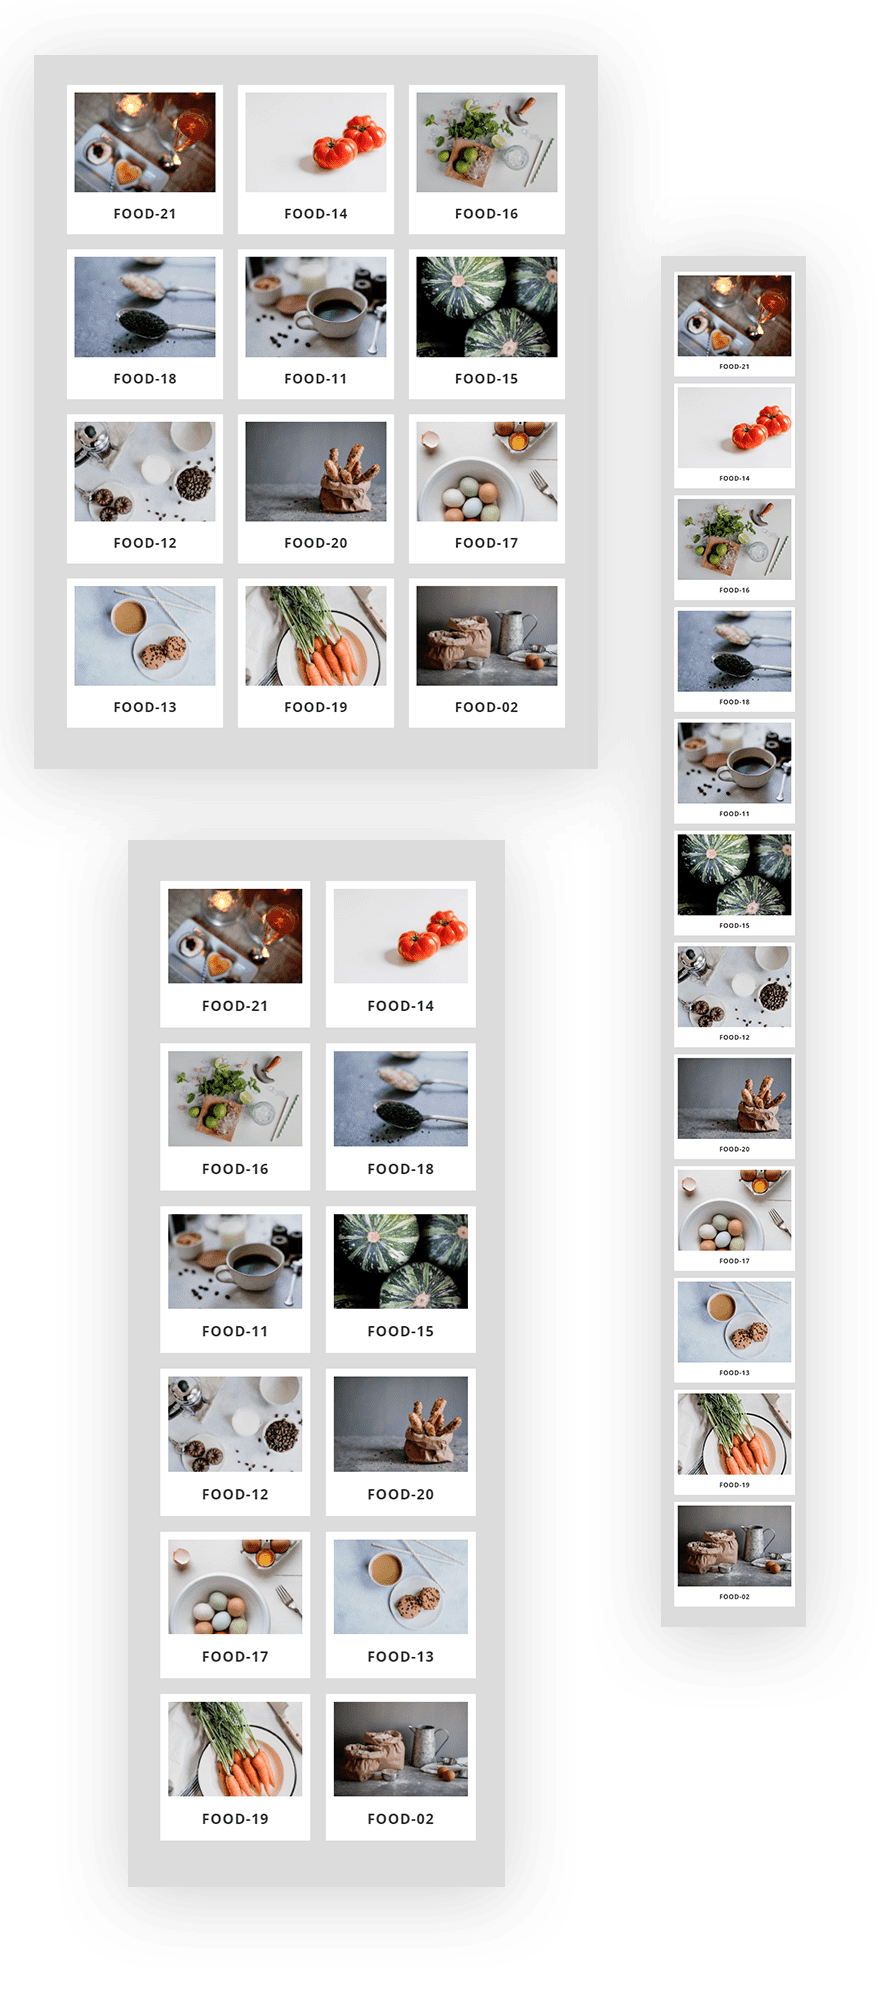
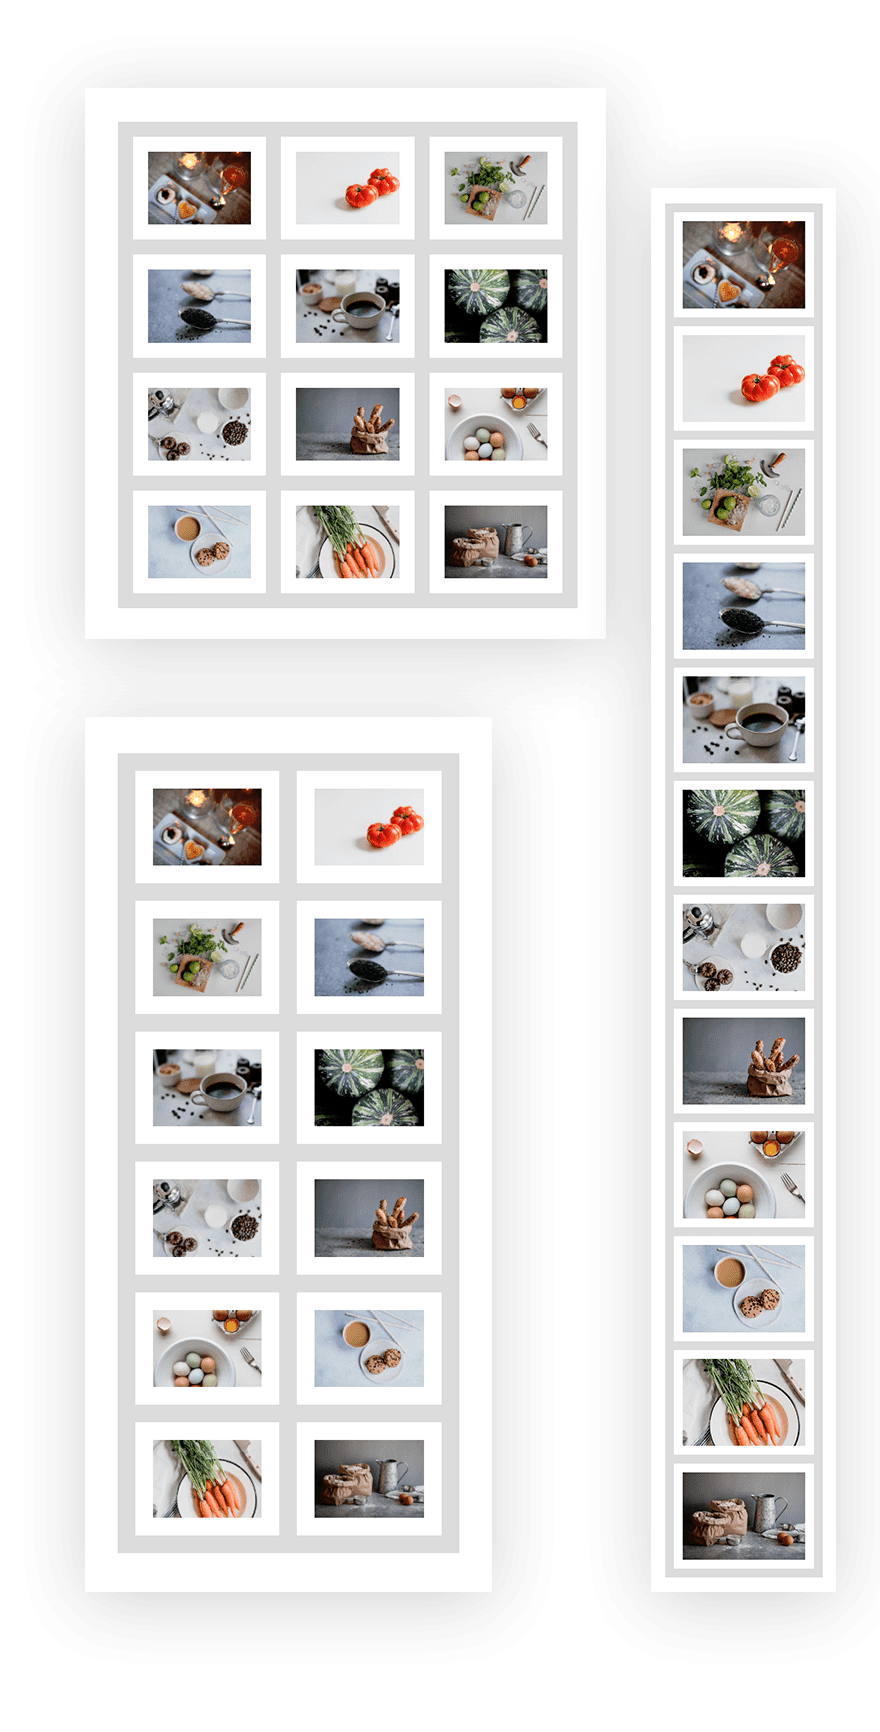
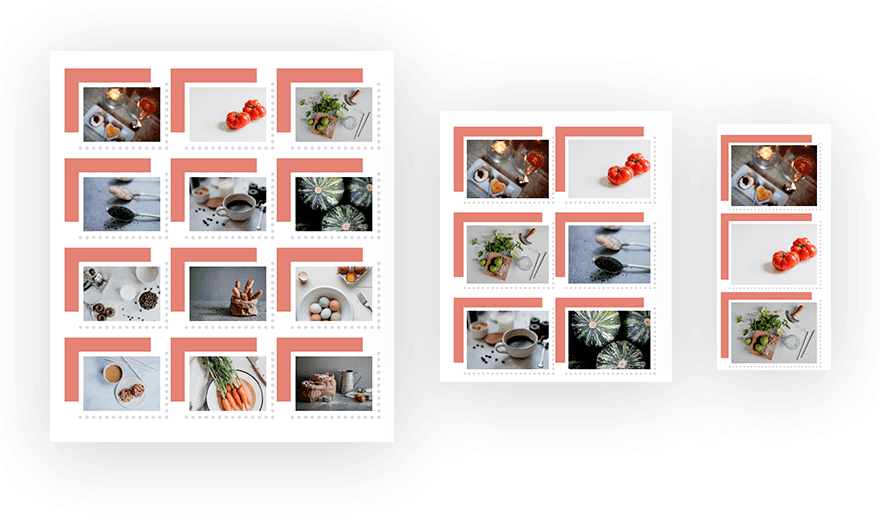
Sneak Peek
#1 Polaroid Symbol Gallery

#2 Blank Grid Design
#3 Customized Background Symbol In the back of the Whole Gallery
#4 Customized Background Symbol In the back of Every Gallery Merchandise
#5 Field Shadow and Border Combo
#6 Movie Strip Border Design
What You Want to Get Began
For this instructional, you’re going to want the Divi theme put in and lively. You are going to additionally want 12 pictures added in your media library for use for the construction the picture gallery. For a Divi gallery module the use of a grid format, the size of your images will have to be round 1500px by way of 800px when you plan to your pictures opening up in lightbox show in order that it fills the display screen effectively on maximum desktops.
Putting in your New Web page
For starters, it is important to create a brand new web page, give your web page a identify, and deploy the Divi Builder. Make a choice the choice “Construct from Scratch” after which put up your web page. Then click on to construct at the entrance finish.
Saving a Divi Gallery module Template
Since we’re going to be designing 5 other border kinds for the Divi Gallery module, it might be useful to have a fundamental gallery module template stored to our library in order that we don’t have to begin from scratch each and every time we design a brand new gallery.
Create a brand new phase with a one column row after which upload the Gallery Module to the row.
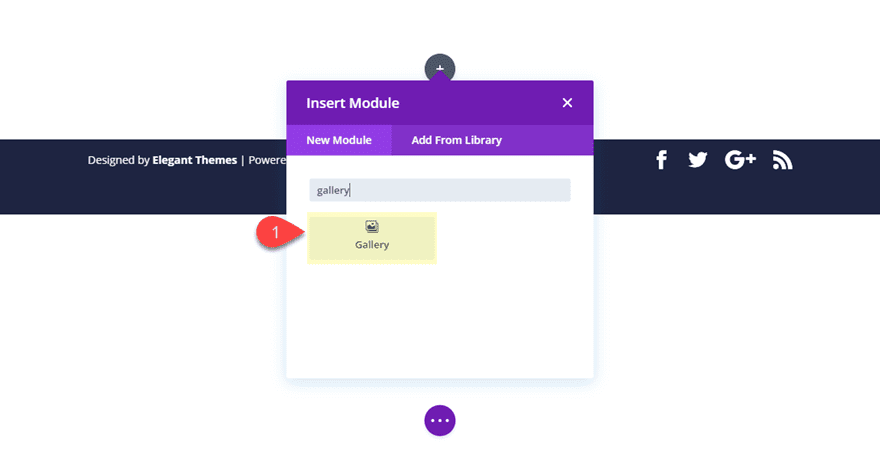
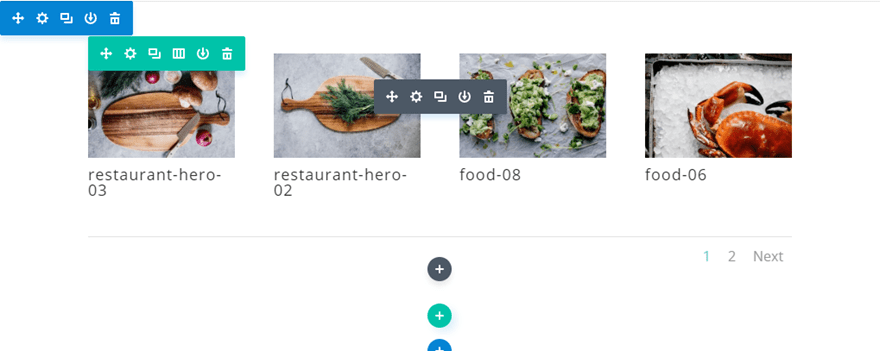
Divi will populate the gallery module with some pictures out of your media gallery in a grid show like the next:
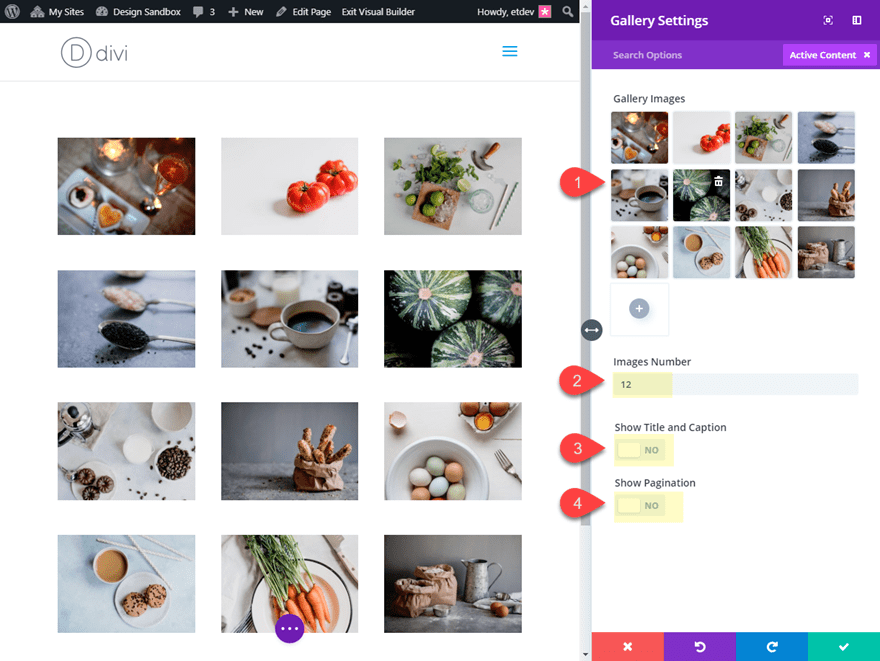
Within the gallery module settings, click on the grey plus icon so as to add 12 pictures to the gallery. I’m the use of pictures from the Restaurant Gallery Page Layout.
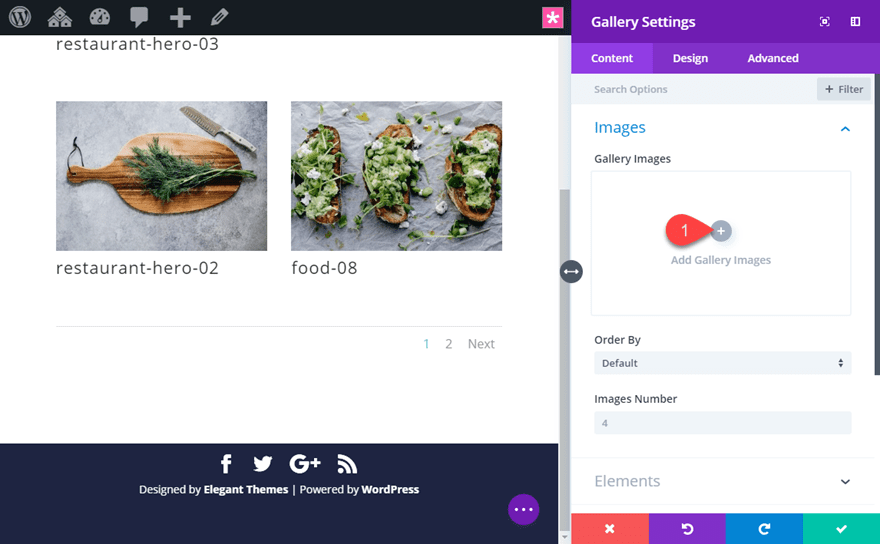
Then replace the Divi Gallery Module settings as follows:
Photographs Quantity: 12
Display Name and Caption: NO
Display Pagination: NO
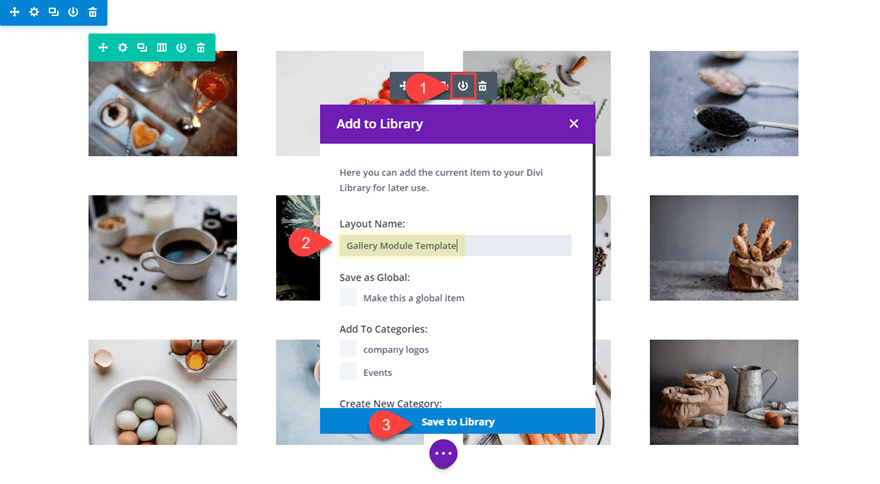
This may increasingly paintings as a just right template shifting ahead. To avoid wasting the Gallery module in your Divi Library, click on the Save to Library icon within the grey module menu when soaring over the module. Then title the template “Gallery Module Template” and reserve it to the library.
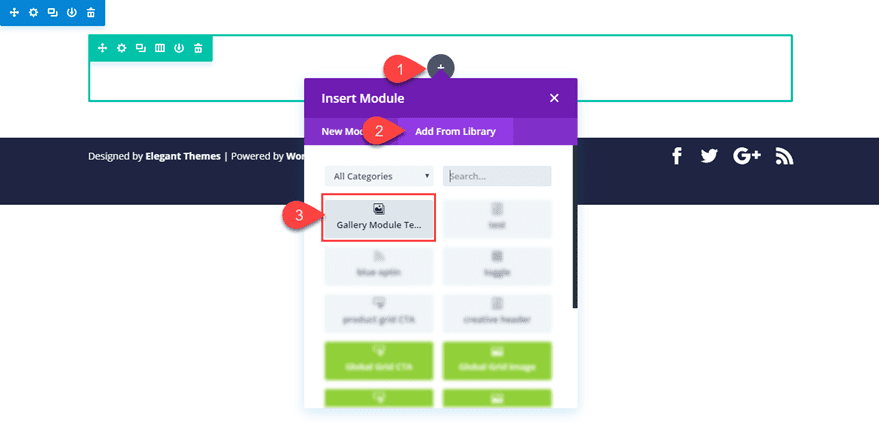
When you wish to have so as to add the stored gallery module in your web page, all you wish to have to do is click on so as to add a brand new module like customary. Then choose the Upload from Library tab within the popup and click on at the gallery module with the title “Gallery Module Template”.
That’s it. Now let’s get to these border designs!
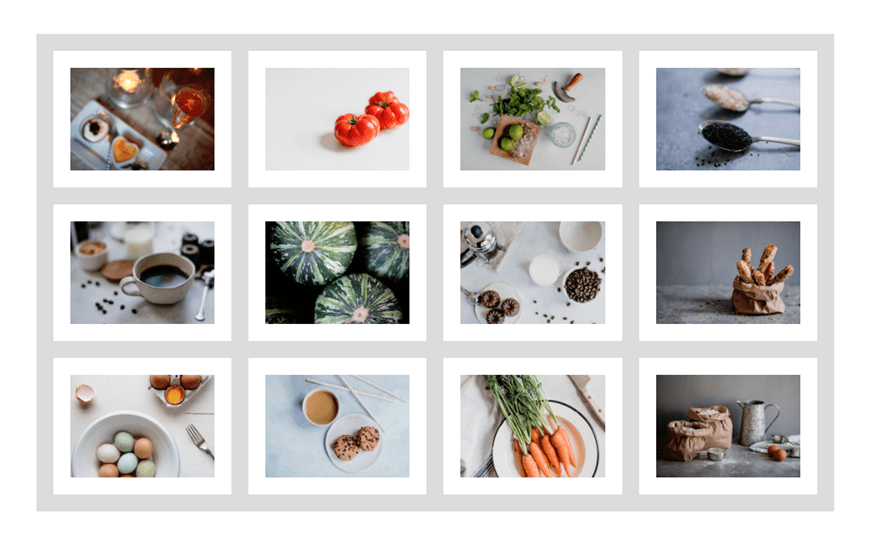
#1 Polaroid Symbol Gallery
This subsequent design is a well-liked border for pictures that appears like a polaroid image. It is a format particularly helpful if you wish to show your picture titles.
Right here’s the way to do it.
Segment Settings
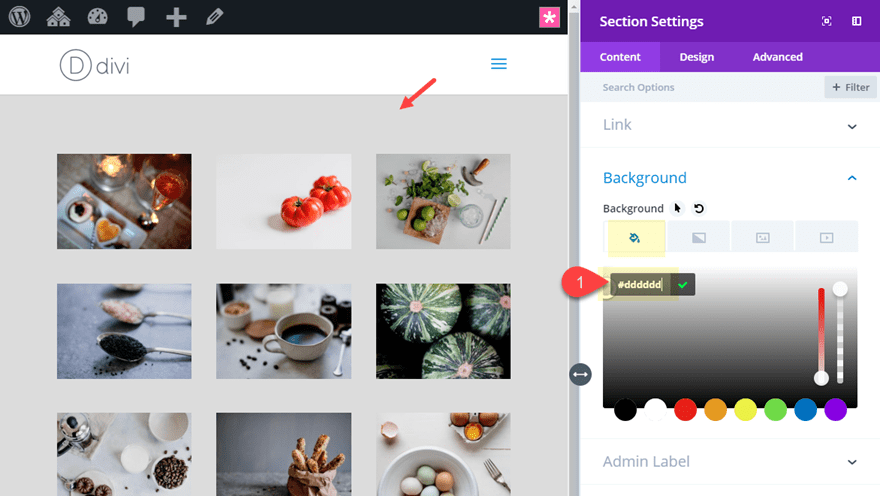
Create a brand new common phase with a one-column row. Then upload the stored Divi Gallery Module Template from the library (explained above). Sooner than modifying the Gallery module, open the phase settings and upload a grey background colour in order that our white borders will pop a bit of.
Background: #dddddd
Row Settings
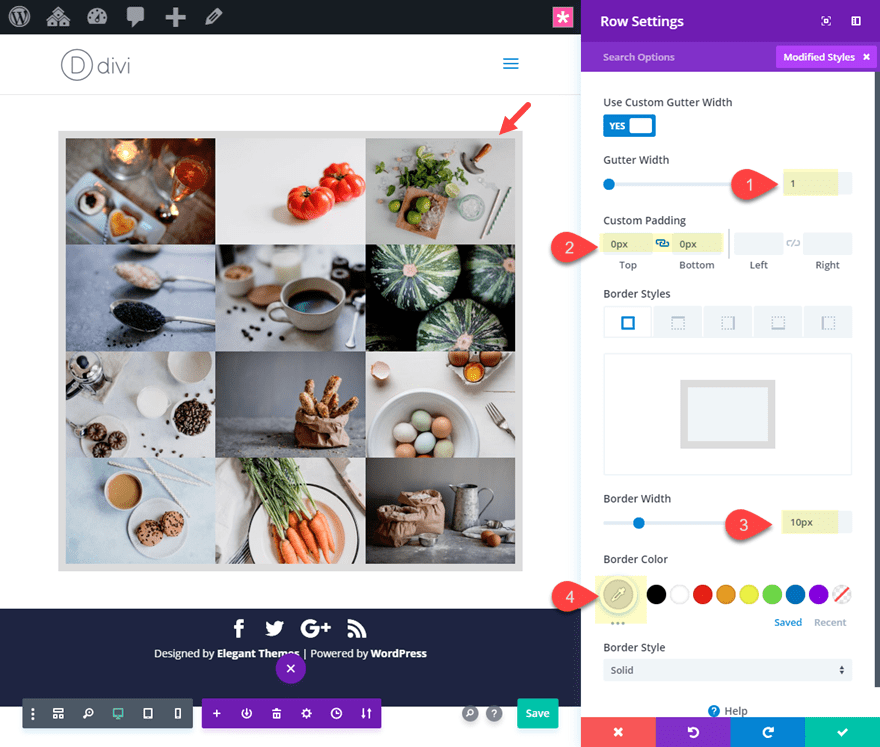
Subsequent replace the row settings with the next:
Gutter Width: 1
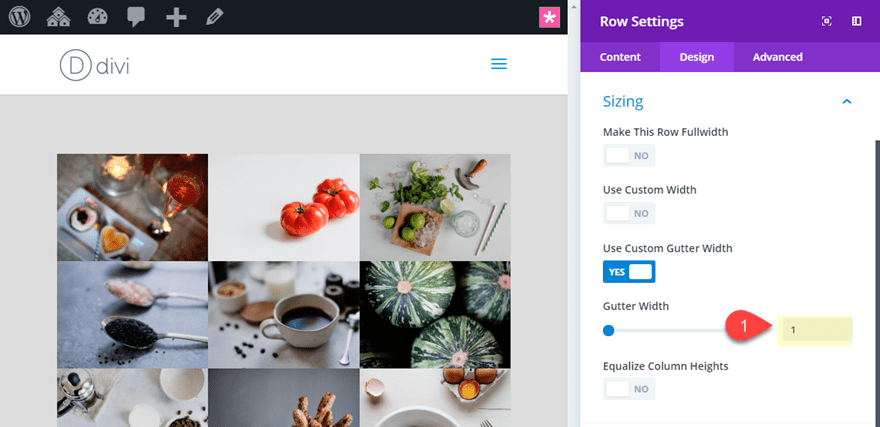
This may increasingly do away with the default margin spacing between the pictures. We can upload our personal customized spacing afterward.
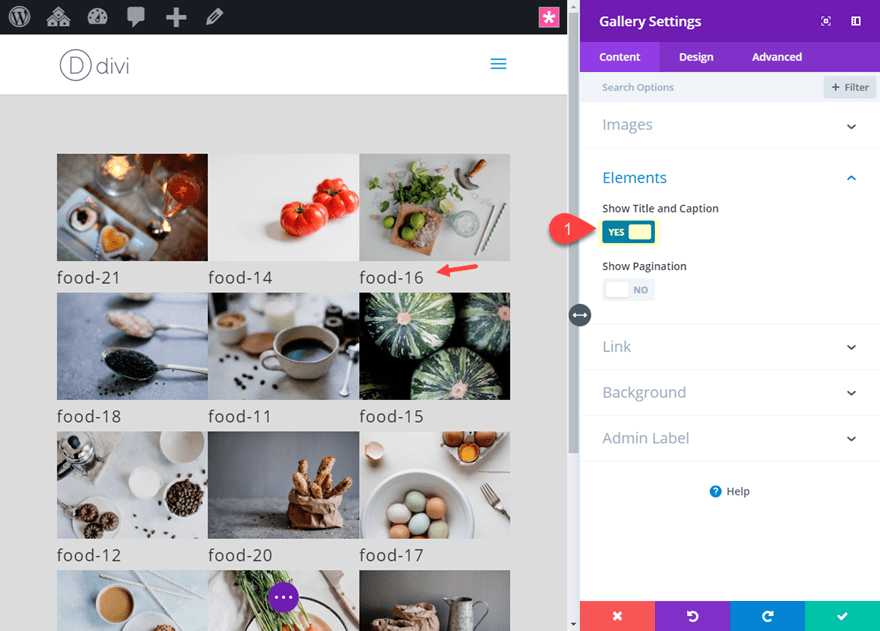
Gallery Module Settings
Open the Gallery module settings and replace the next:
Display Name and Caption: YES
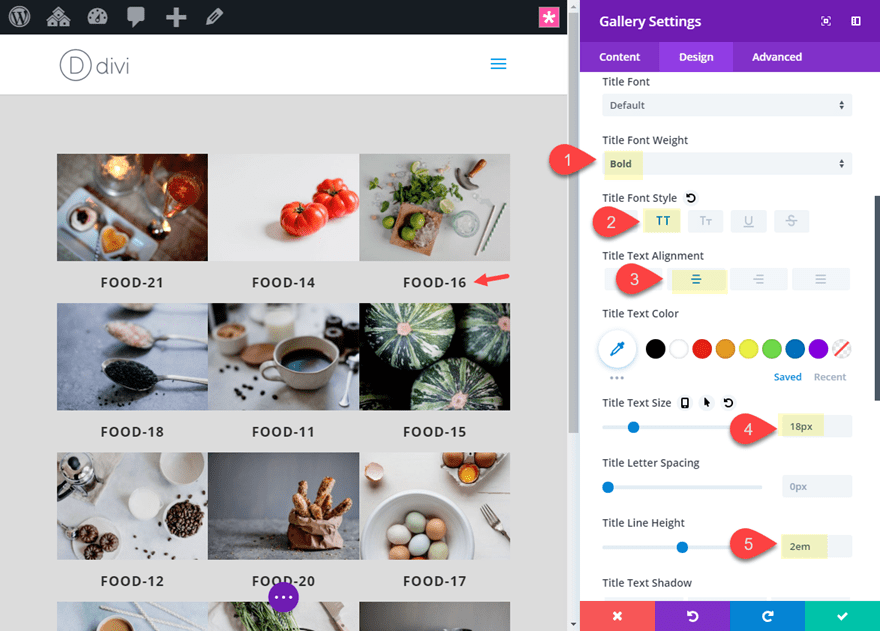
Name Font Weight: Daring
Name Font Taste: TT
Name Textual content Alignment: Heart
Name Line Peak: 2em
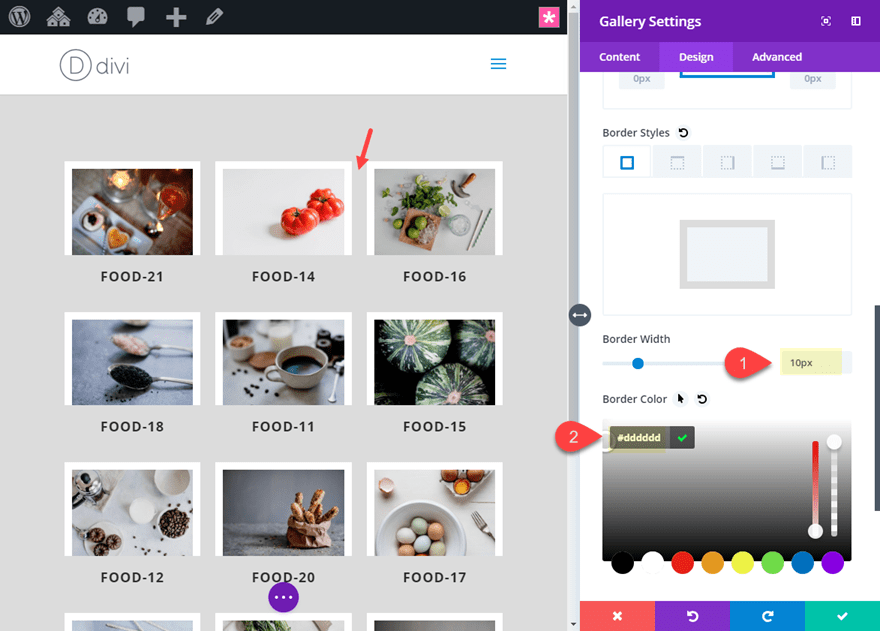
Symbol Most sensible border width: 10px
Symbol Most sensible border colour: #ffffff
Symbol Left border width: 10px
Symbol Left border colour: #ffffff
Symbol Proper border width: 10px
Symbol Proper border colour: #ffffff
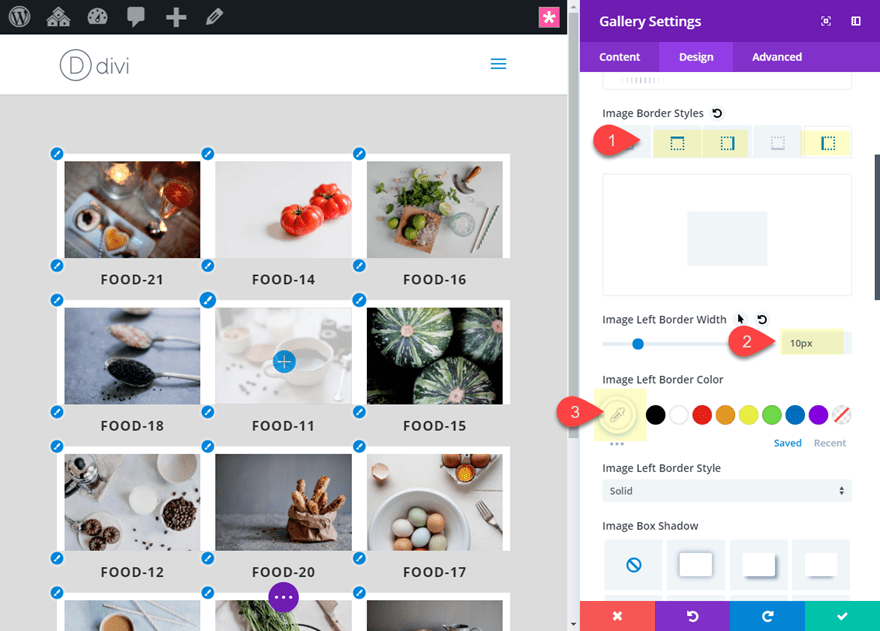
To create spacing between our pictures, upload the next border to the gallery pieces:
Border Width: 10px
Border Colour: #dddddd (fits the colour of the phase background)
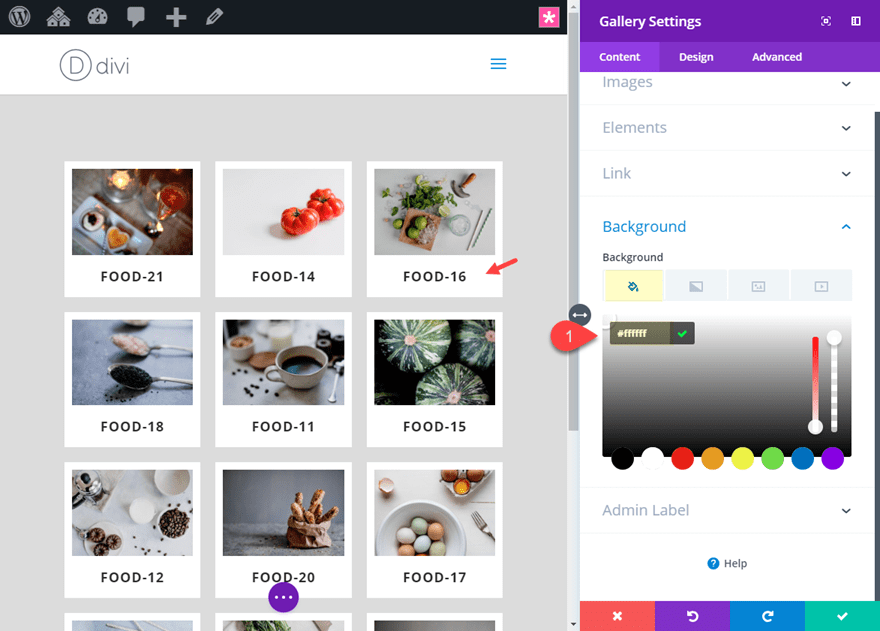
To paint the ground portion of our polaroid border design, we wish to upload a white background to the module.
Background Colour: #ffffff
Ultimate End result
This is the overall results of the polaroid border design.
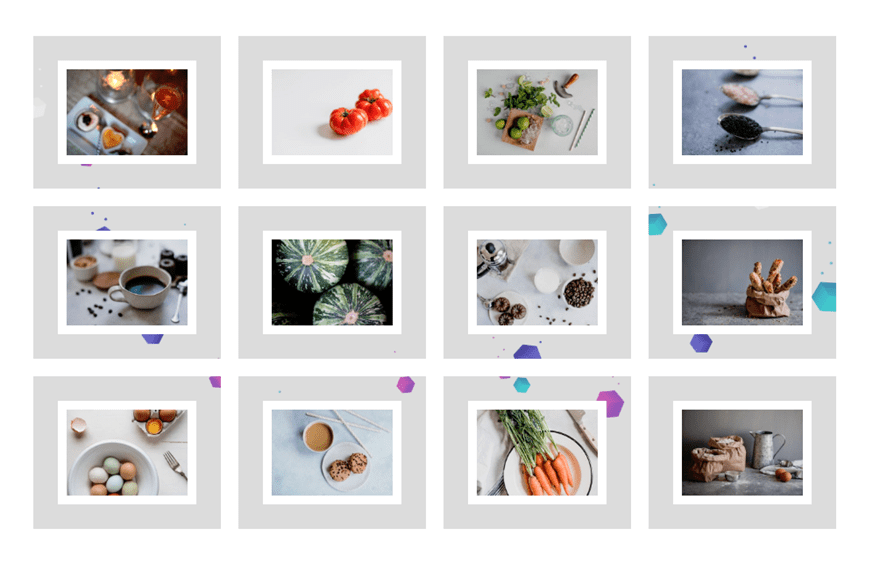
#2 Blank Grid Design
In case you are on the lookout for a easy and blank grid taste to your pictures, this border design is good choice. It’s smartly balanced and simple at the eyes.
Right here’s the way to do it.
Create a brand new common phase with a one-column row. Then upload the stored Divi Gallery Module Template from the library (explained above).
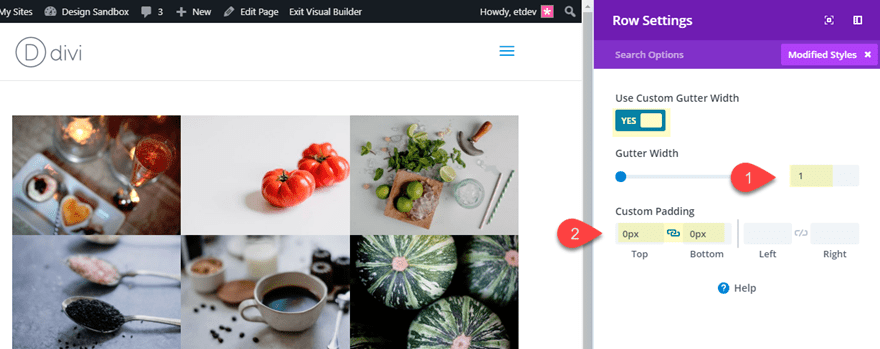
Row Settings
Sooner than modifying the Gallery module, open the phase settings and replace the next:
Gutter Width: 1
Customized Padding: 0px most sensible, 0px backside
Border Width: 10px
Border Colour: #dddddd
This row border is essential to check the outer spacing of our gallery with the spacing between the pictures.
Gallery Module Settings
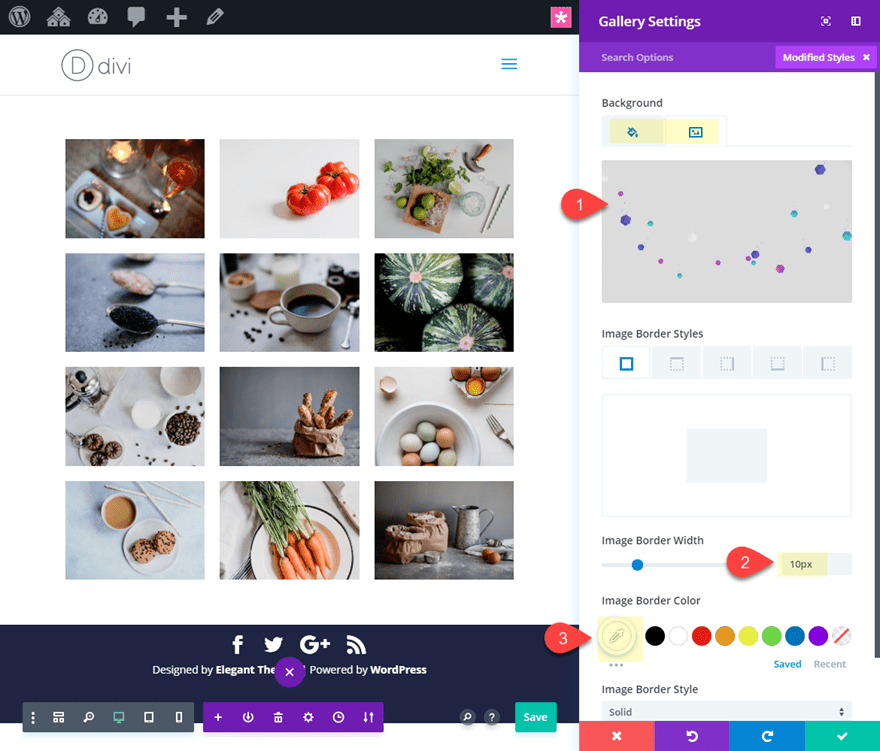
Now open the gallery module settings and upload a border in your gallery pieces and your gallery pictures by way of updating the next:
Symbol border width: 20px
Symbol border colour: #ffffff
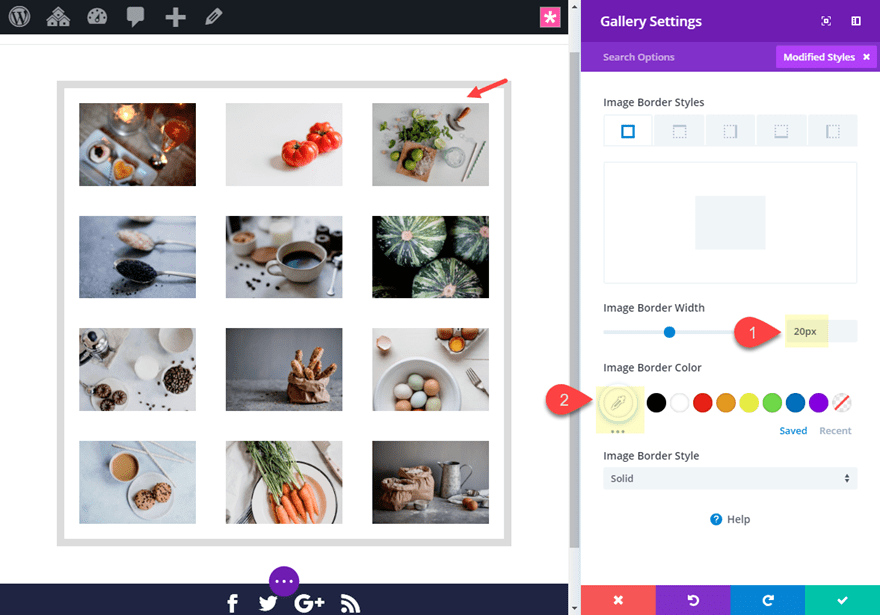
Border Width: 10px
Border colour: clear (that is necessary to turn the background colour)
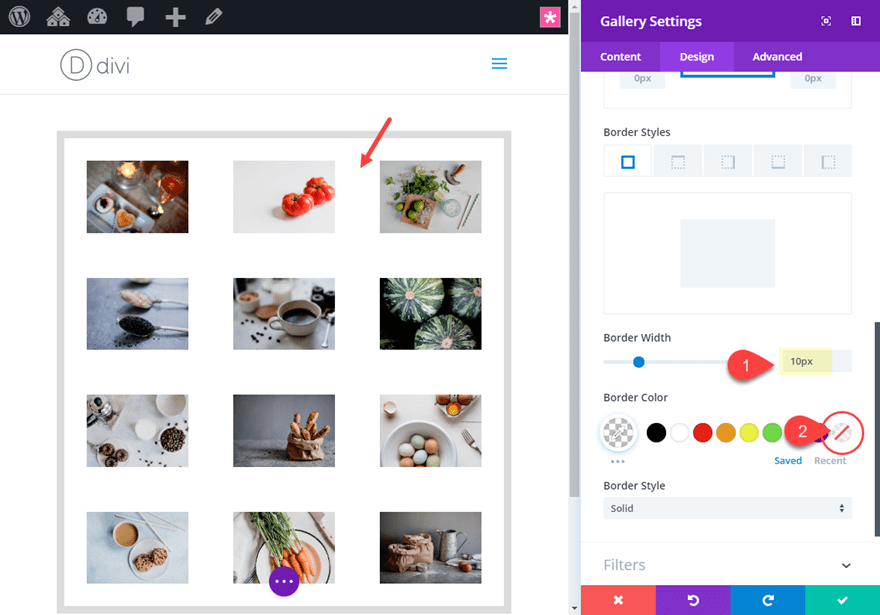
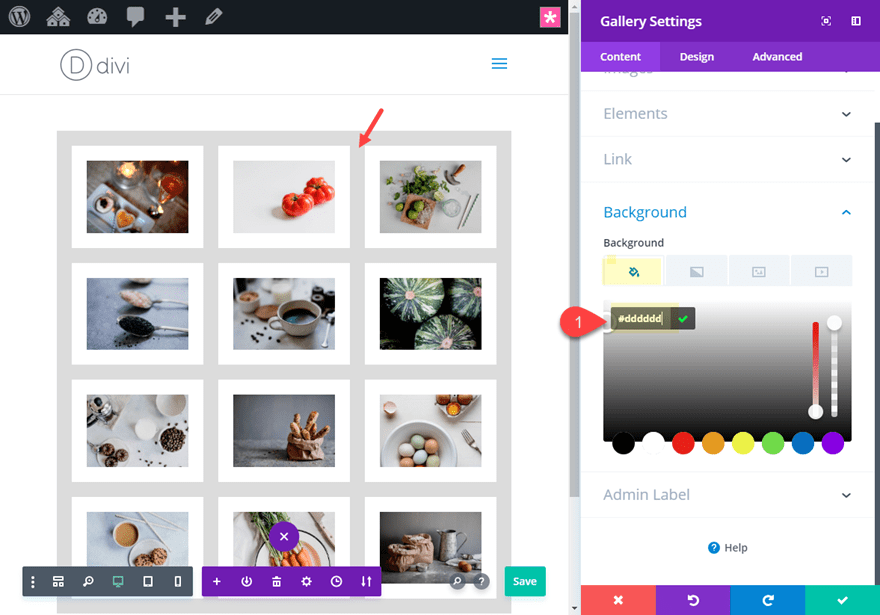
Now upload a background colour to the gallery module to finish the design.
Background colour: #dddddd (this fits the row border colour)
As a result of your gallery merchandise border is clear, it inherits the colour of the background.
Ultimate Design
Converting the Border Colours by way of Converting the Background Colour
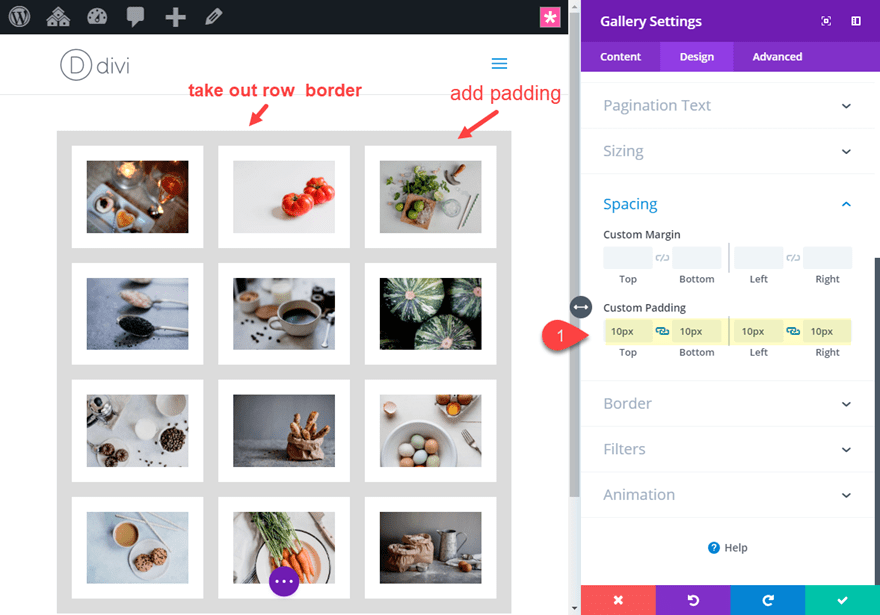
If you wish to mess around with other border colours, you’ll replace the background colour to no matter you wish to have. However, it is important to take out the row border upload the next spacing to the module:
Customized Padding: 10px most sensible, 10px backside, 10px left, 10px proper
Now you’ll regulate the background colour to no matter you wish to have:
#3 Customized Background Symbol In the back of the Whole Gallery
This design means that you can use a background picture to function more or less a texture background for the borders of your pictures. It is a great solution to make each and every picture border distinctive because it displays a particular space of the module background picture. The setup may be very similiar to the Blank Grid Design above.
Right here’s the way to do it.
Create a brand new common phase with a one-column row. Then upload the stored Divi Gallery Module Template from the library (explained above).
Row Settings
Sooner than modifying the Gallery module, open the phase settings and replace the next:
Gutter Width: 1
Customized Padding: 0px most sensible, 0px backside
Gallery Module Settings
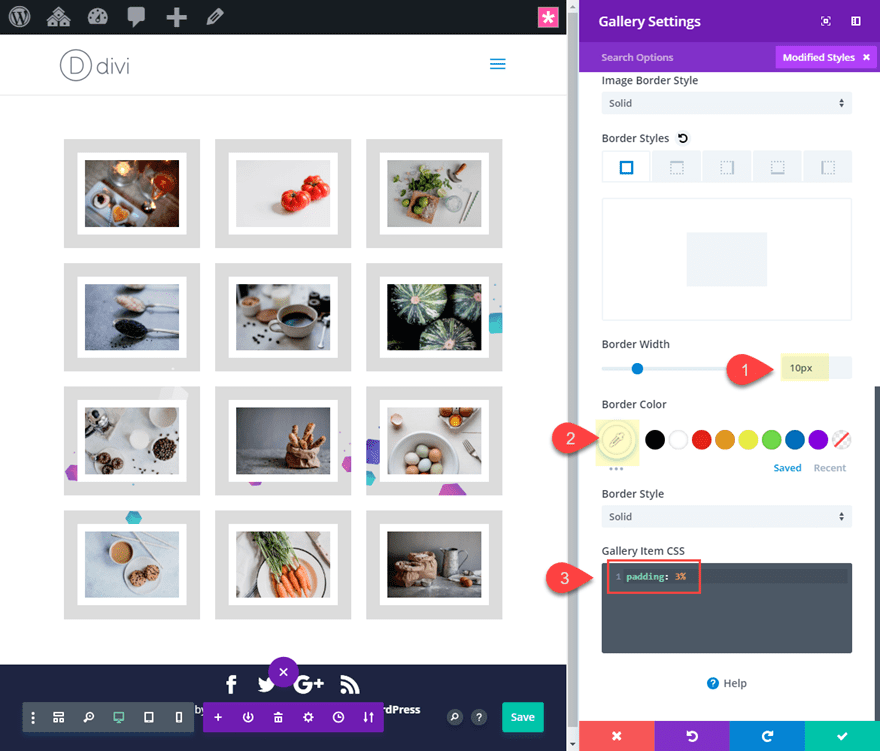
Now replace the Gallery Module settings as follows:
Background Symbol: [add image] (you gained’t have the ability to see it but)
Background colour: #dddddd (this handiest displays when you use a png background picture with transparency)
Symbol Border Width: 10px
Symbol Border Colour: #ffffff
Border Width (for module): 10px
Border Colour: #ffffff
Then upload the next Customized CSS to the Gallery Merchandise:
padding: 3%;
This creates the separation between the gallery pieces to finish the design.
Ultimate End result
#4 Customized Background Symbol In the back of Every Gallery Merchandise
This design means that you can use a background picture to function border for each and every of gallery pieces personally. You’ll be able to create any customized picture your need or use certainly one of background pictures incorporated in our premade layouts. I’m the use of one from the Meetup Landing Page Layout.
Right here’s the way to do it.
Create a brand new common phase with a one-column row. Then upload the stored Divi Gallery Module Template from the library (explained above).
Row Settings
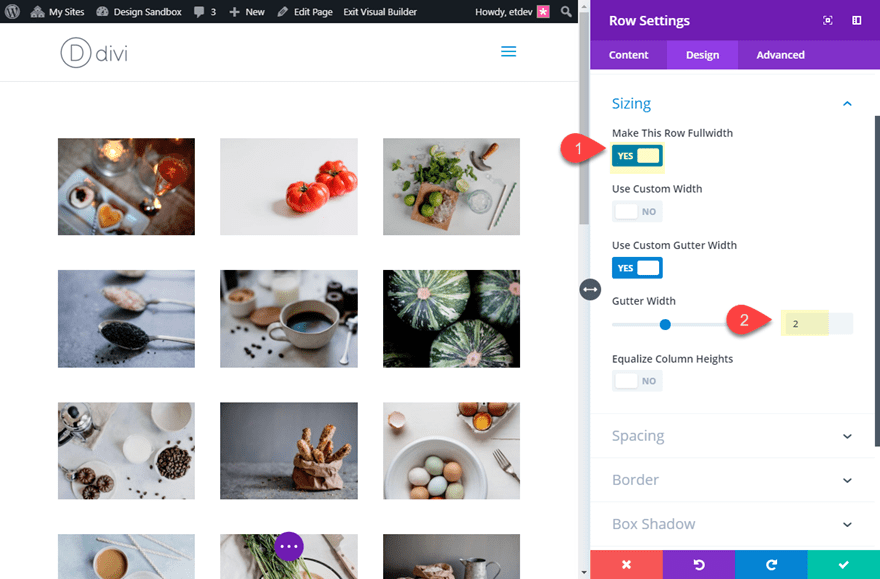
Sooner than modifying the Gallery module, open the phase settings and replace the next:
Make This Row Fullwidth: YES
Gutter Width: 2
Gallery Module Settings
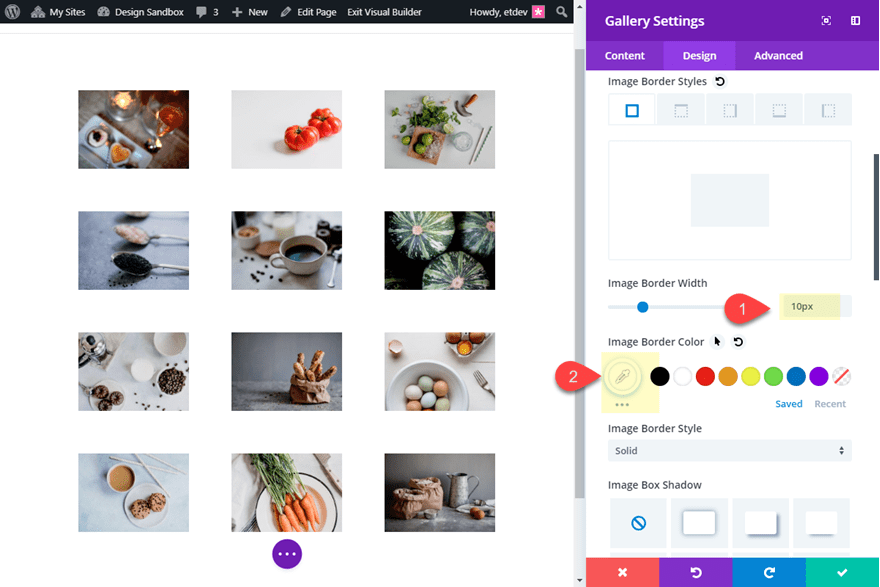
Now replace the Gallery Module settings as follows:
Symbol Border Width: 10px
Symbol Border Colour: #ffffff
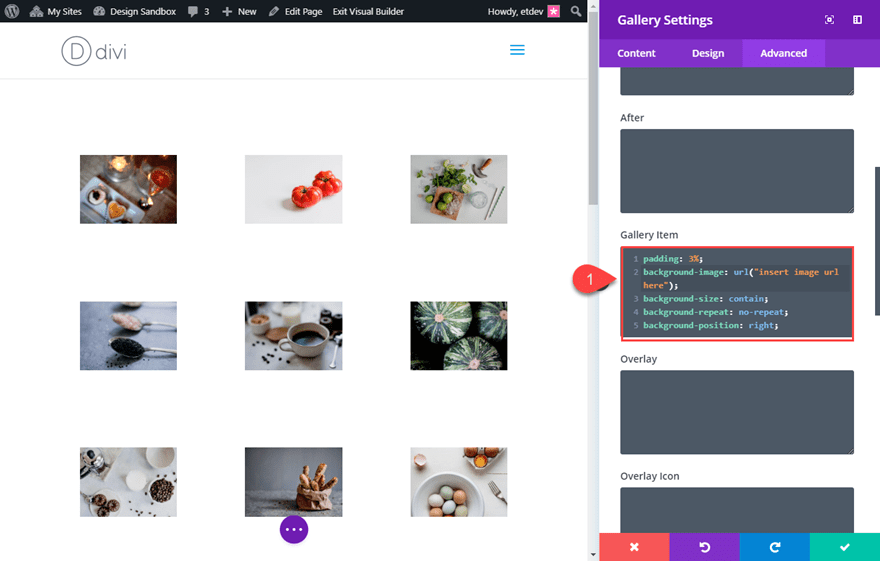
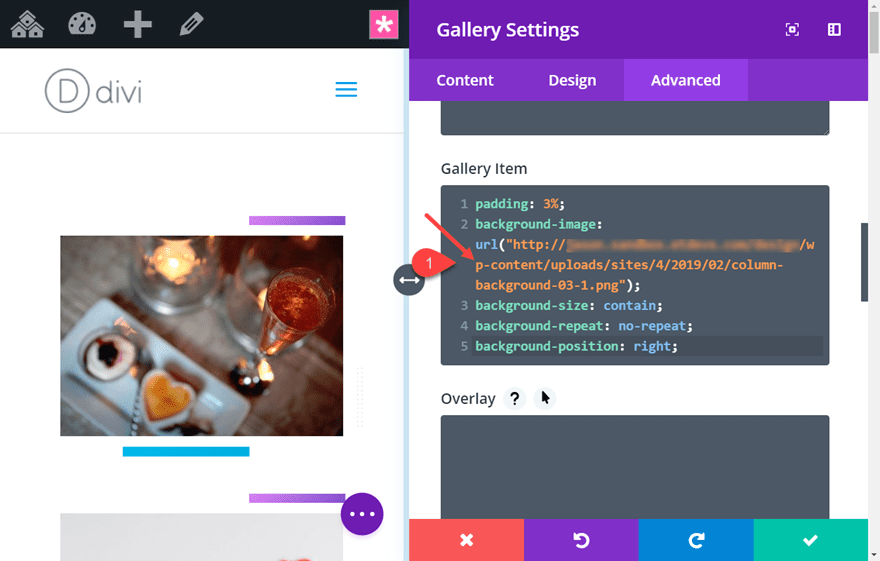
Then upload the next customized CSS to the Gallery Merchandise:
padding: 30px;
background-image: url("");
background-size: comprise;
background-repeat: no-repeat;
background-position: proper;
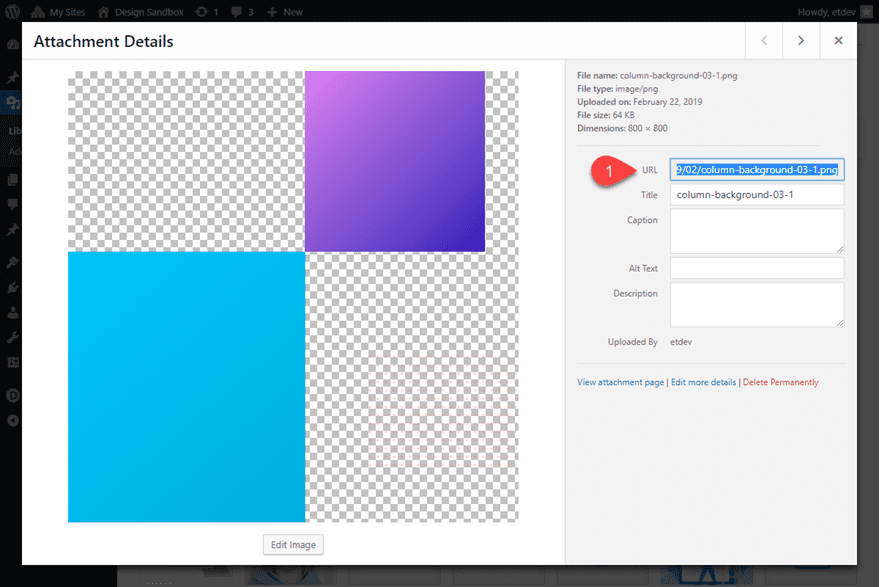
Subsequent it is important to add the customized background picture you wish to have to take a seat in the back of each and every of your gallery pieces. For this situation, I’m the use of a picture from certainly one of our premade format packs. As soon as the picture is uploaded to the WordPress Media gallery, replica the picture URL in your clipboard.
Now return and open the gallery module settings and paste the URL within the customized CSS the place it says “insert picture url right here”. Make sure to stay the url inside the quotations.
Ultimate End result
This is the overall outcome.

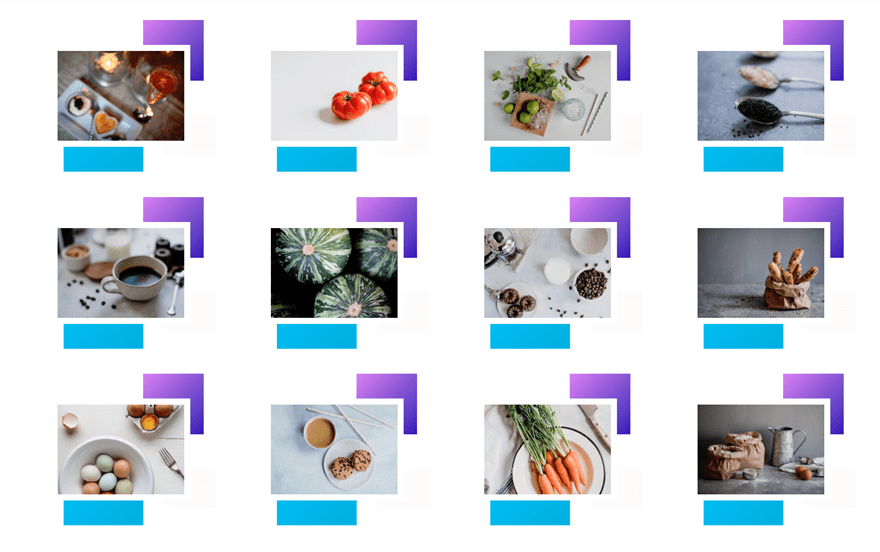
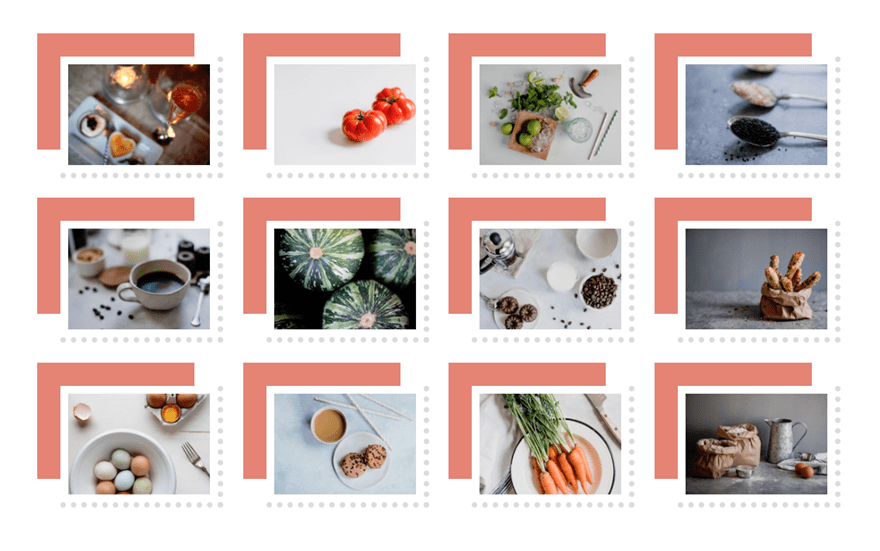
#5 Field Shadow and Border Combo
Field shadows are nice for giving your gallery a customized aptitude. You’ll be able to use field shadows at the Divi gallery module pictures to create a damaged grid design that frames the pictures in a novel approach. You’ll be able to additionally mix the field shadow with border designs for a wide variety of possibilites.
Right here’s the way to do it.
Create a brand new common phase with a one-column row. Then upload the stored Divi Gallery Module Template from the library (explained above).
Upload Symbol Border and Field Shadow
Open the Gallery settings and replace the next:
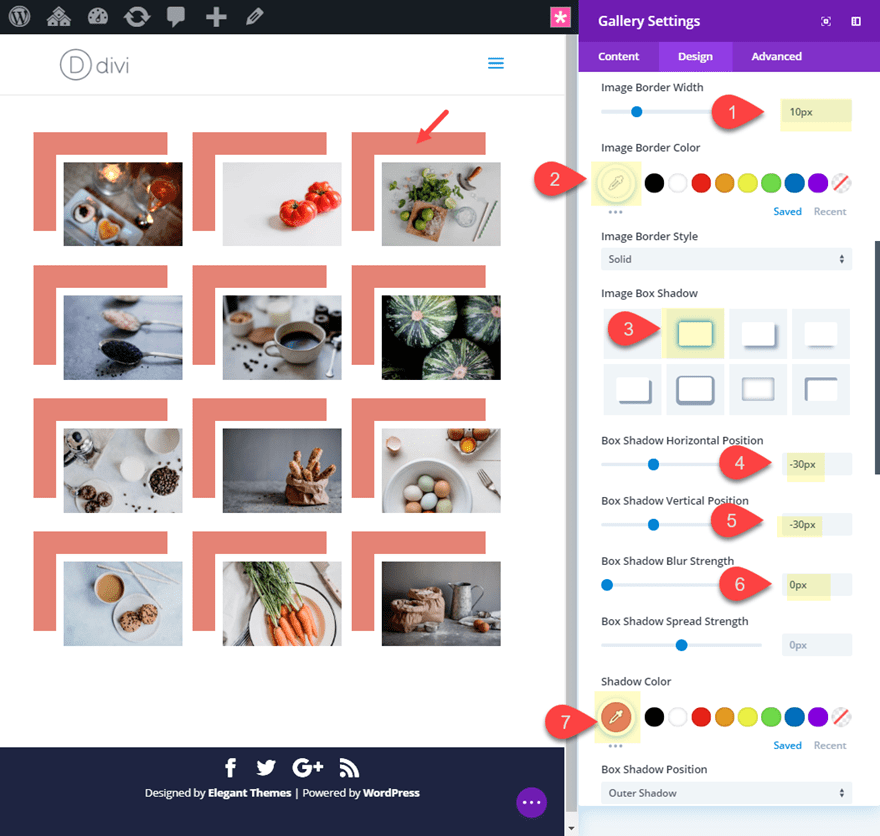
Symbol Border Width: 10px
Symbol Border Colour: #ffffff
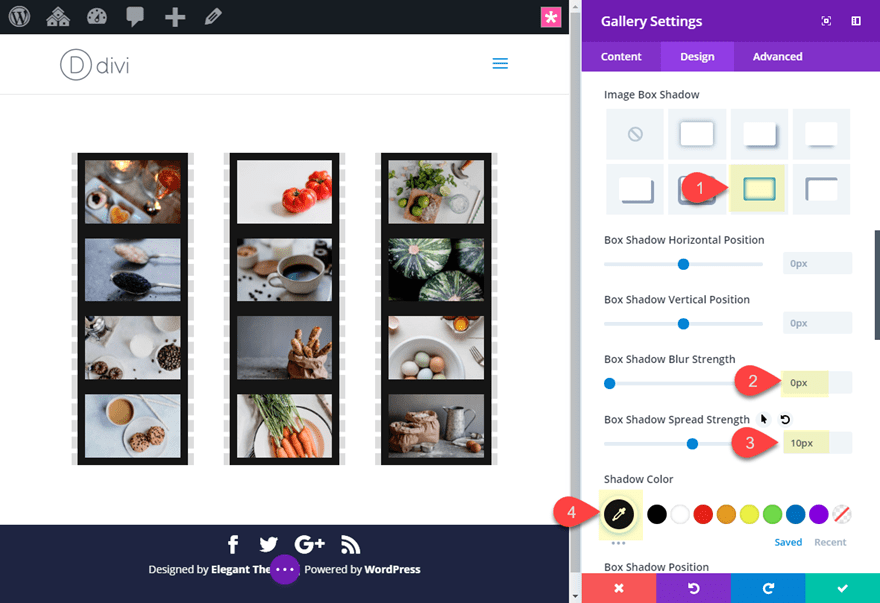
Symbol Field Shadow: see screenshot
Field Shadow Horizontal Place: -30px
Field Shadow Vertical Place: -30px
Field Shadow Unfold Energy: -10px
Shadow Colour: #e08474
Upload the Gallery Merchandise Border
The field shadow design appears just right as it’s now. However, you’ll additionally upload an extra border to your gallery merchandise by way of updating the next:
Proper Border Width: 7px
Proper Border Colour: #dddddd
Proper Border Taste: Dotted
Backside Border Width: 7px
Backside Border Colour: #dddddd
Backside Border Taste: Dotted
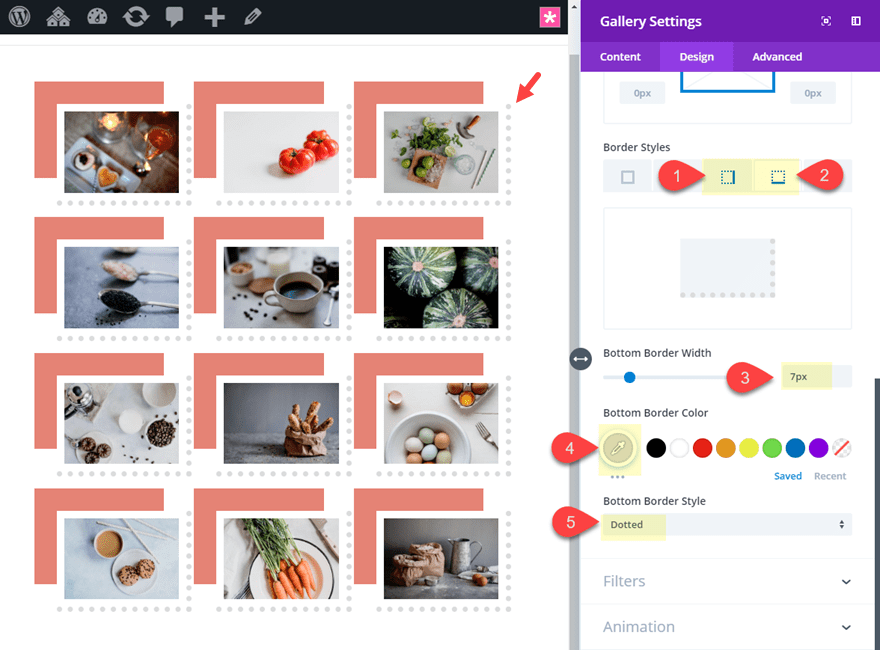
I added a dotted border taste simply to remind you of the other kinds to be had. Be at liberty to make use of different kinds (like forged or dashed).
Row Settings
To present your design more space, open the row settings and replace the next:
Make Row Complete Width: YES
Ultimate Design
This is the overall design.
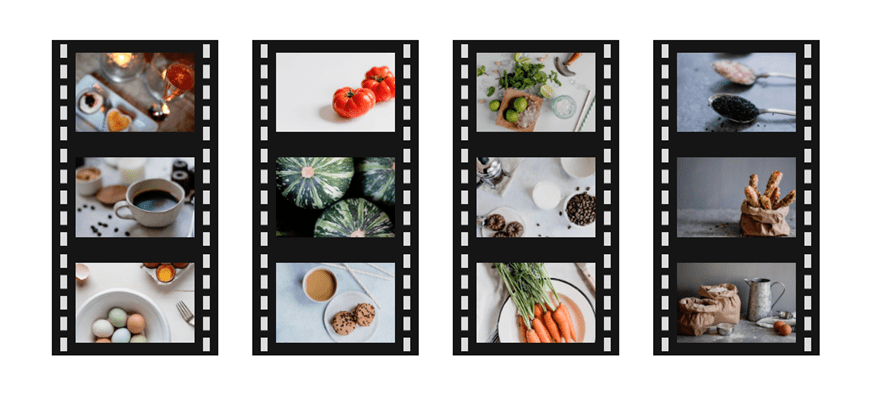
#6: Movie Strip Border Design
For this ultimate design, I assumed I’d display you one thing a little extra distinctive. This design makes use of a dashed border taste handiest at the proper and left aspect of the gallery pieces which divides each and every column of pictures in some way that resembles movie strips.
Right here’s the way to do it.
Create a brand new common phase with a one-column row. Then upload the stored Divi Gallery Module Template from the library (explained above).
Row Settings
Sooner than modifying the Gallery module, open the row settings and alter the gutter width to one.
Gutter Width: 1
This may increasingly do away with the default margin spacing between your pictures.
Gallery Module Settings
Subsequent, open the Gallery settings and replace the next:
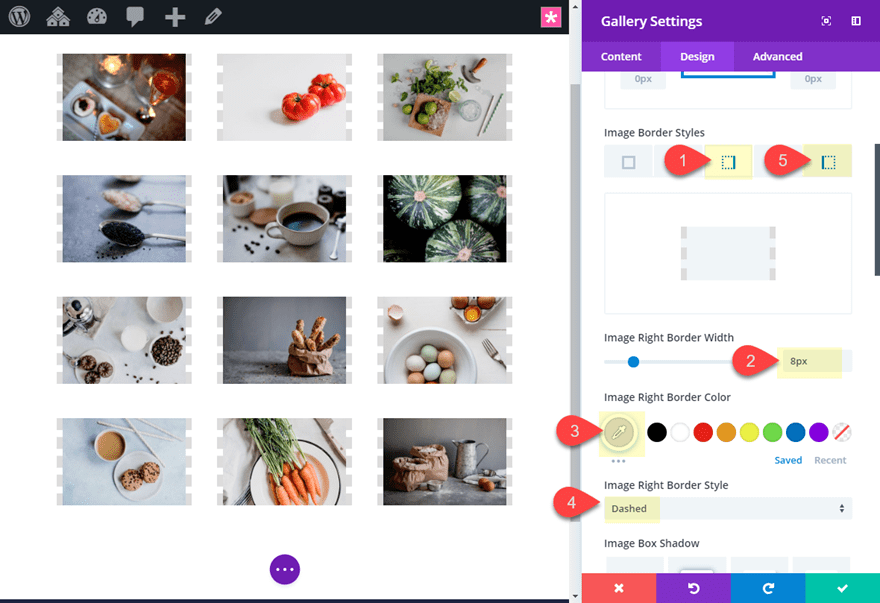
Upload Dashed Symbol Borders
Symbol Proper Border Width: 8px
Symbol Proper Border Colour: #dddddd
Symbol Proper Border Taste: Dashed
Symbol Left Border Width: 8px
Symbol Left Border Colour: #dddddd
Symbol Left Border Taste: Dashed
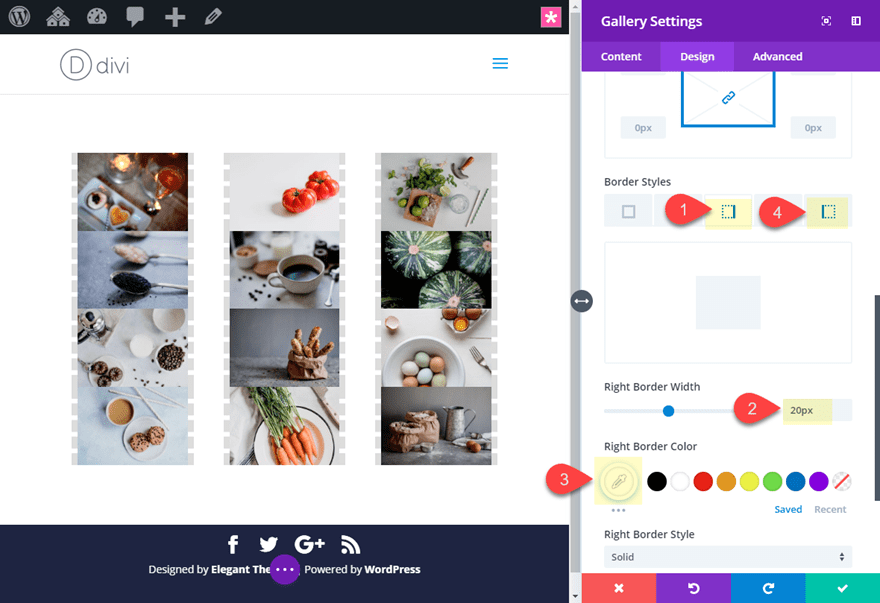
Upload Gallery Merchandise Border for spacing
Left Border Width: 20px
Left Border Colour: #ffffff
Proper Border Width: 20px
Proper Border Colour: #ffffff
Upload Symbol Field Shadow
Symbol Field Shadow: see screenshot
Field Shadow Blur Energy: 0px
Field Shadow Unfold Energy: -10px
Shadow Colour: #222222
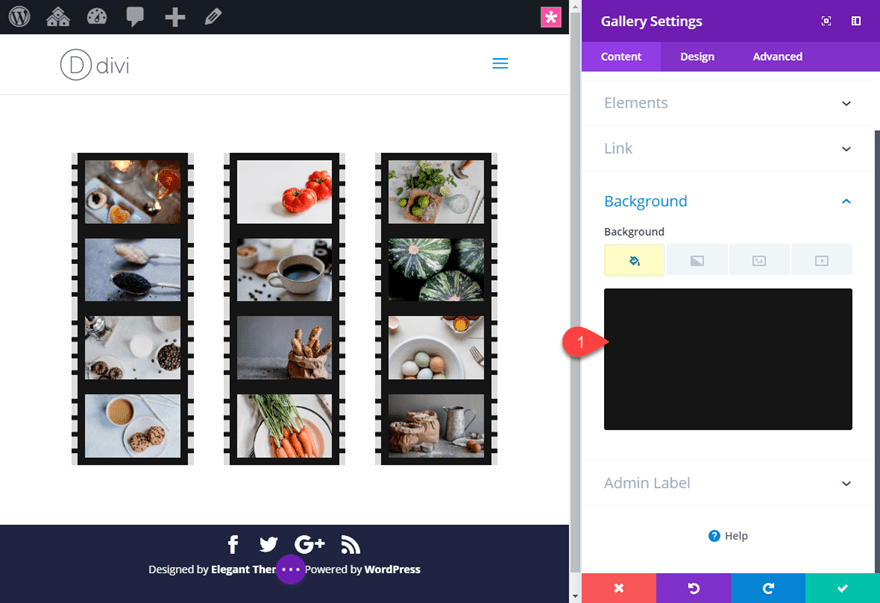
Upload Background Colour
Background Colour: #222222
Then upload the next customized CSS to the Gallery Merchandise:
padding: 5px 10px;
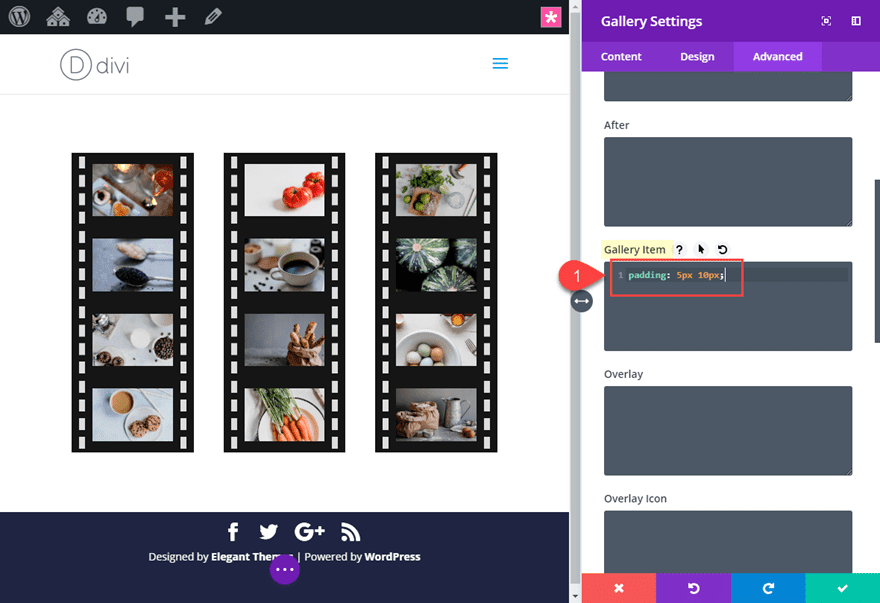
The Ultimate End result
Now take a look at the outcome.

Ultimate Ideas
I am hoping those six border design examples will supply some inspiration for developing some customized border designs to your pictures when the use of the Divi Gallery Module. While you get a care for the settings to be had with the Divi Gallery module, all it takes is a bit of creativity. So have some amusing exploring new design choices of your personal with other pictures, colours, and spacing.
I look ahead to listening to from you within the feedback.
Cheers!
The submit 6 Unique Border Designs for your Divi Gallery Module Images gave the impression first on Elegant Themes Blog.
WordPress Web Design