Stripe is a particularly versatile price processing resolution for on-line companies, particularly in case you are a tech savvy developer. However, in case you aren’t a developer, and nonetheless need to use Stripe to promote a couple of merchandise on-line, there are easy tactics to just do that. Actually, with a couple of snippets of code (or a easy plugin), you’ll upload Stripe price buttons for your site in a flash.
On this instructional, I’m going to turn you the way to upload Stripe price buttons for your Divi site the usage of Stripe Bills for WordPress Plugin. I’ll even display you the way to taste your buttons to compare your Divi format.
Let’s get began!
Contents
- 1 Sneak Peek
- 2 Getting Began
- 3 In regards to the Plugin
- 4 Putting in place Stripe bureaucracy with the Plugin
- 5 Developing Stripe Fee Paperwork
- 6 Including Stripe Fee Buttons to Your Divi Web page Format
- 7 Styling the Stripe Fee Buttons to Fit the Format
- 8 Customizing Your Fee Affirmation and Fee Failed Pages
- 9 Ultimate Ideas
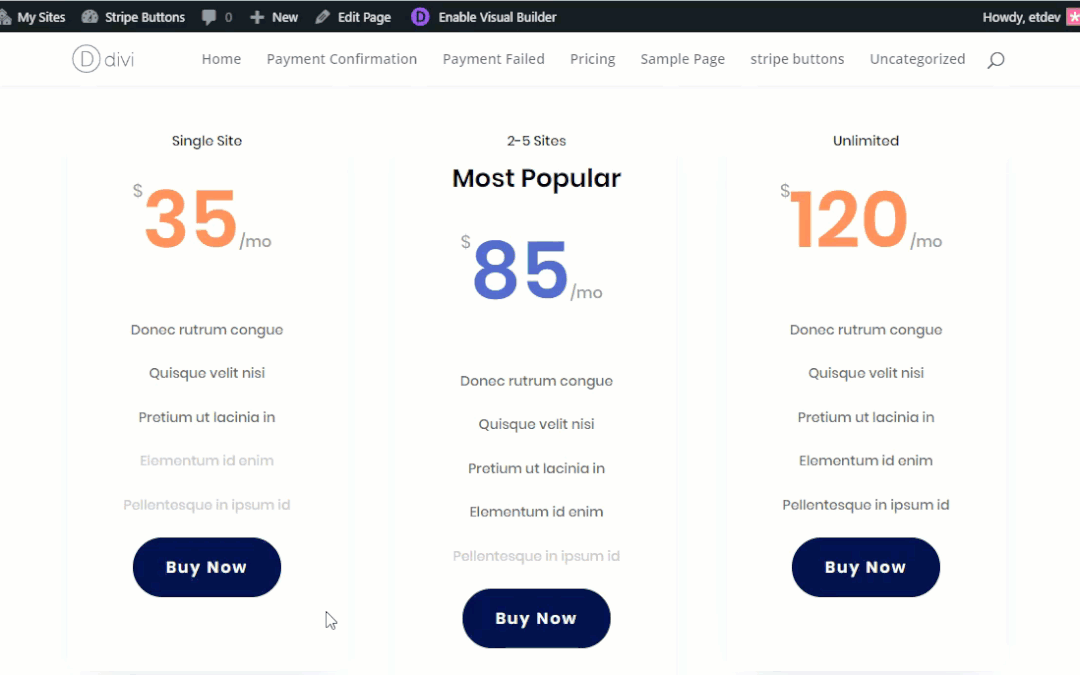
Sneak Peek
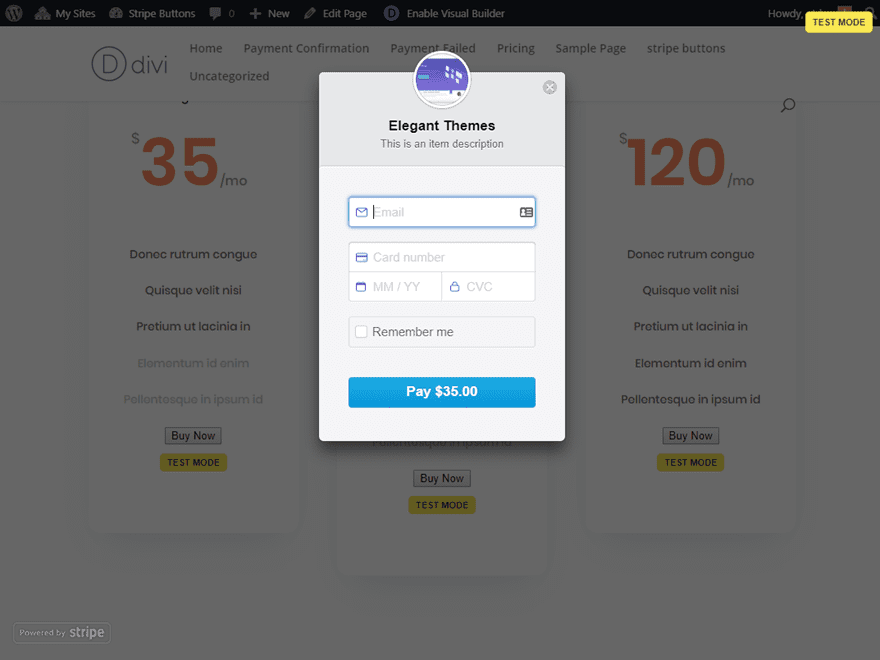
Here’s a sneak peek of the Stripe price buttons we can create on this instructional.
Getting Began
For this use case instructional, you’re going to want the next:
- The Divi Theme (put in and energetic)
- A Stripe Account
- The Stripe Payments for WordPress Plugin through WP Merely Pay (put in and energetic)
- We will be able to even be the usage of a the Digital Products Pricing Page Layout to be had for FREE inside the Divi Builder
In regards to the Plugin
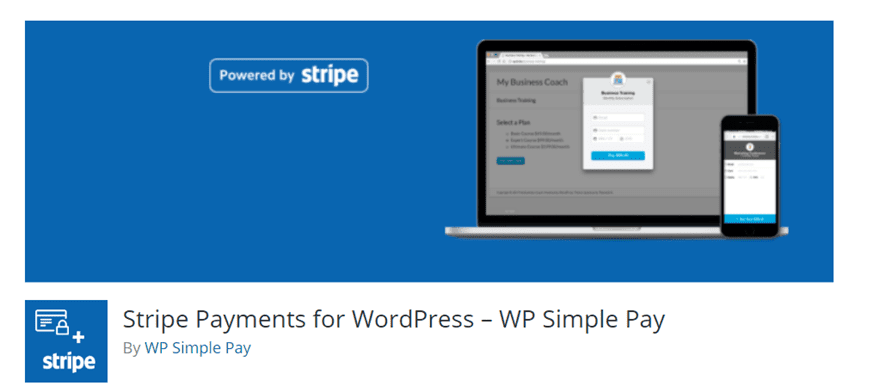
Stripe Payments for WordPress through WP Merely Pay is a plugin that permits you to get started amassing bank card price with Stripe the usage of a easy shortcode embed. You’ll be able to in reality create checkout forms and payment buttons manually with out using the plugin, however since this plugin makes issues simple and gives a couple of handy options (like price affirmation and price failure pages), I assumed it was once extra useful ultimately. I can be the usage of the FREE Lite model of the plugin for this instructional. The professional model of the plugin will provide you with extra keep an eye on over the manner of your bureaucracy at the side of give a boost to for such things as customized fields, customized quantities, and subscription options.
Putting in place Stripe bureaucracy with the Plugin
After you have the plugin put in and energetic, navigate to Easy Pay Lite > Settings. Then beneath the Stripe Keys tab, it is important to input your Stripe account API keys. For the sake of this instructional, I can be best the usage of the check keys, however it is important to be certain and turn on your Stripe account and generate some reside api keys if you wish to get started amassing actual cash.
You’ll be able to in finding your API keys through signing into your Stripe account and clicking Builders > API keys.
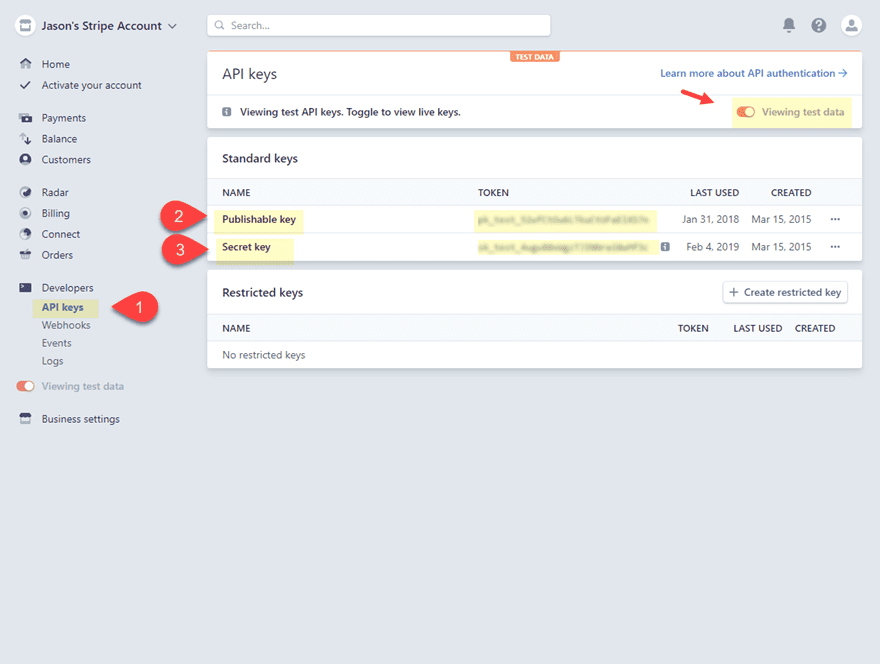
It is important to reproduction each the Publishable key and Secret key over to the plugin settings.
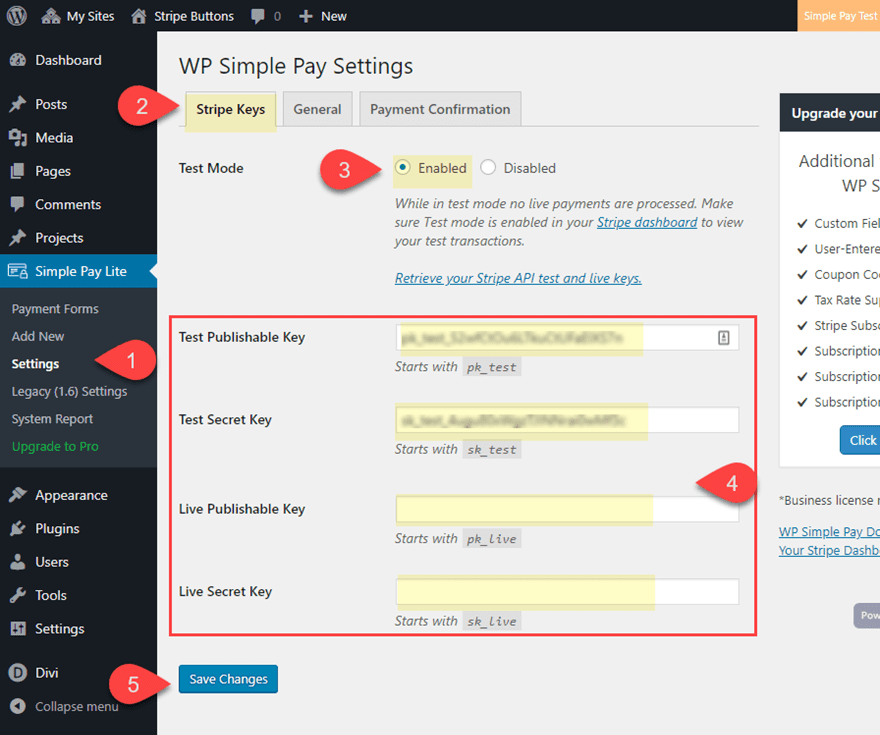
Now soar over to the overall tab. There it is possible for you to to designate a Fee Luck Web page and a Fee Failure Web page. You’re going to realize that the plugin has already created the ones pages for you. However because the web page content material is generated through a shortcode, you’ll in reality upload the ones shortcodes to any Divi module on any Divi format to create customized variations of the ones pages. For now simply stay the ones default pages in position and proceed the setup.
Set the price button taste to “none (inherit from theme)”. All this does is take out the css used to taste the default blue stripe button. This may increasingly make issues a bit bit cleaner for after we upload our personal customized CSS to taste the button in Divi.
Then save adjustments.
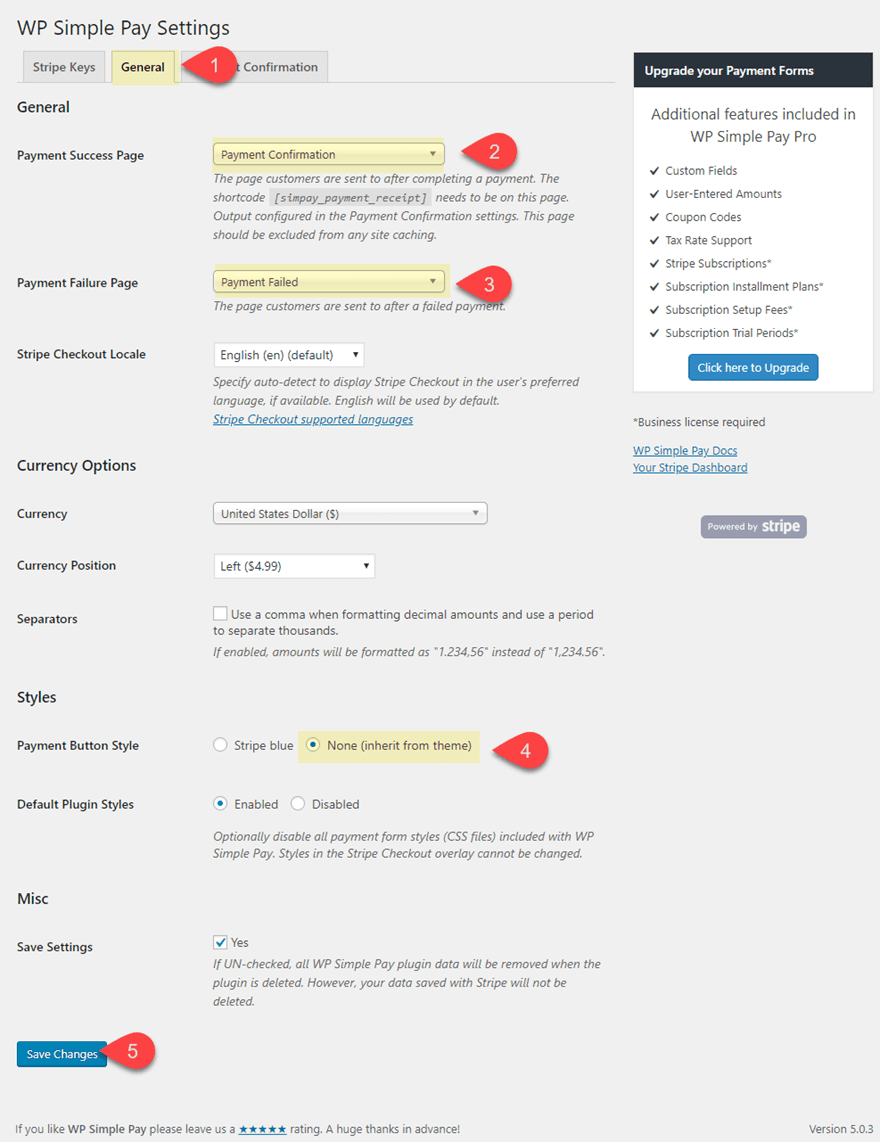
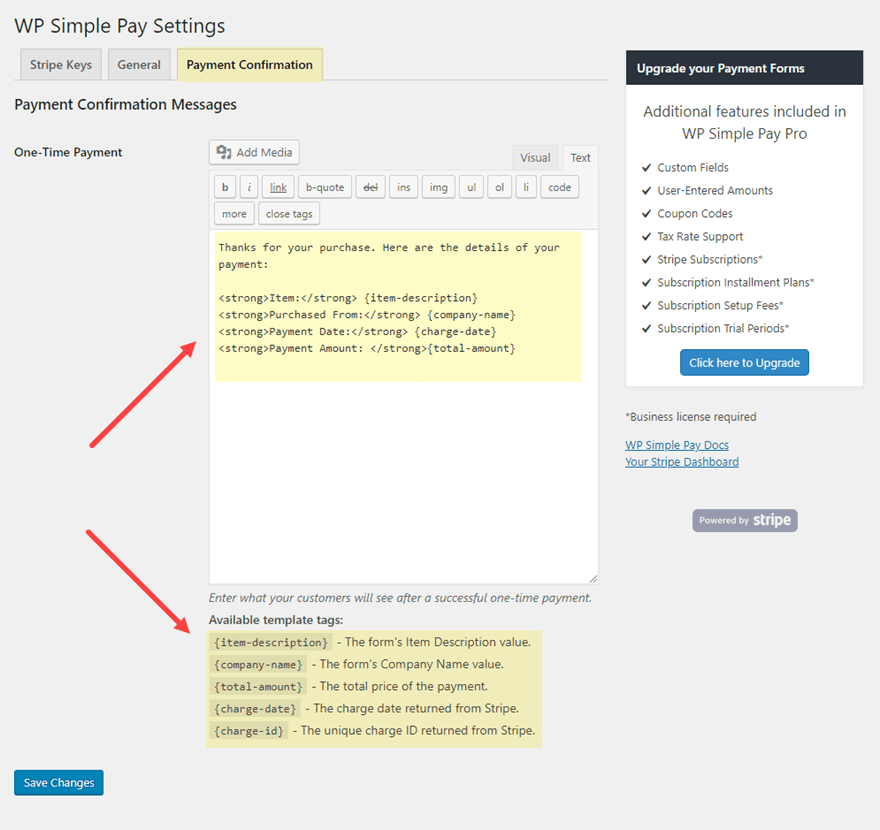
Beneath the price affirmation tab, you’ll use the to be had template tags to customise the message and knowledge this is displayed through the shortcode on your price affirmation web page. However for this instructional, I’m simply going to go away the default message.
Developing Stripe Fee Paperwork
The price bureaucracy are in reality Stripe price buttons that generate a popup price shape that permits customers to finish a purchase order with out ever leaving the web page. Subsequently it is important to create a brand new price shape for each and every services or products you might be promoting. On this use case, we’re going to create 3 price bureaucracy for 3 mock merchandise.
To create a brand new price shape, pass to the WordPress Dashboard and navigate to Easy Pay Lite > Upload New.
Give the Fee Shape a name (this name gained’t be proven at the entrance finish).
Then beneath the Fee Choices tab, input a One-Time Quantity.
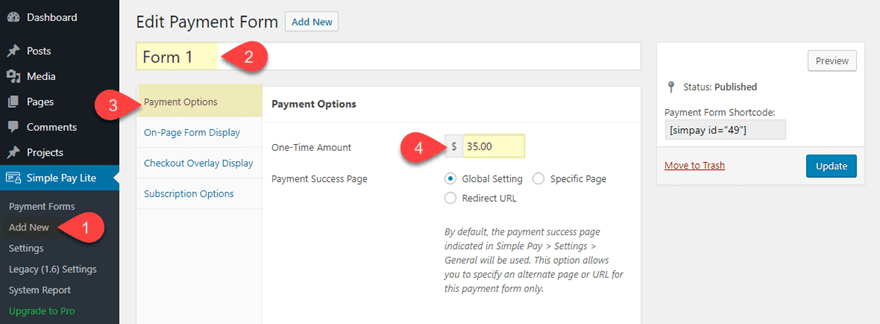
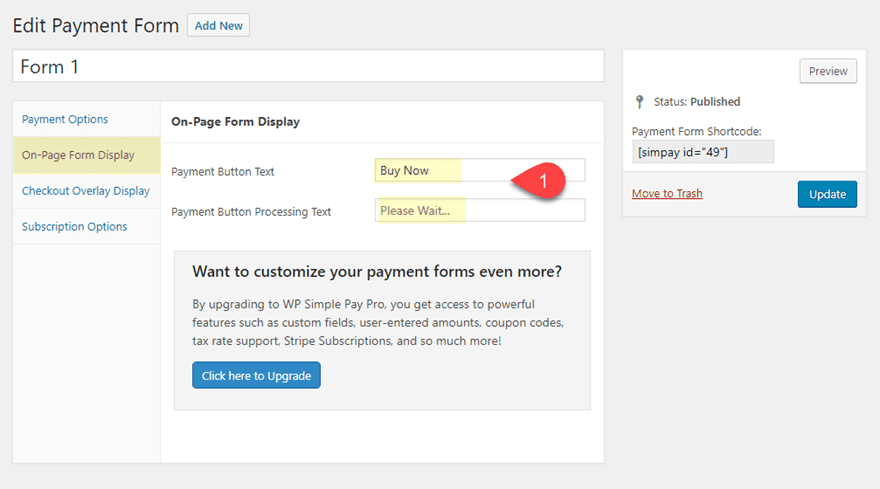
Subsequent, click on the On-Web page Shape Show tab and alter the default Fee Button Textual content to “Purchase Now” (or no matter you need). You’ll be able to additionally select the price button processing textual content as neatly.
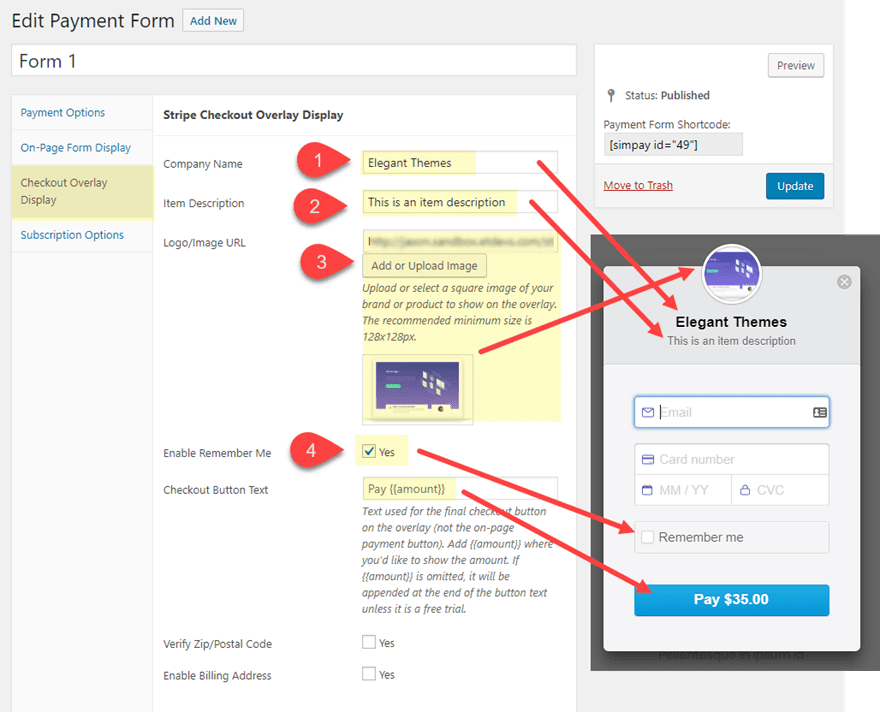
Beneath the Checkout Overlay Show tab, replace the next:
Corporate Title
Merchandise Description
Emblem/Symbol URL
Permit Have in mind Me: YES
Those choices resolve what’s proven within the checkout shape popup for this actual product.
As soon as you might be completed, be certain and submit/replace the price shape.
You’re going to sooner or later want to reproduction the Fee Shape Shortcode situated on the height appropriate of the Edit Fee Shape web page in an effort to paste it into your Divi web page format.
However for now, you’ll proceed the similar procedure to create two extra price bureaucracy each and every with their very own merchandise description, emblem/symbol, and quantity.
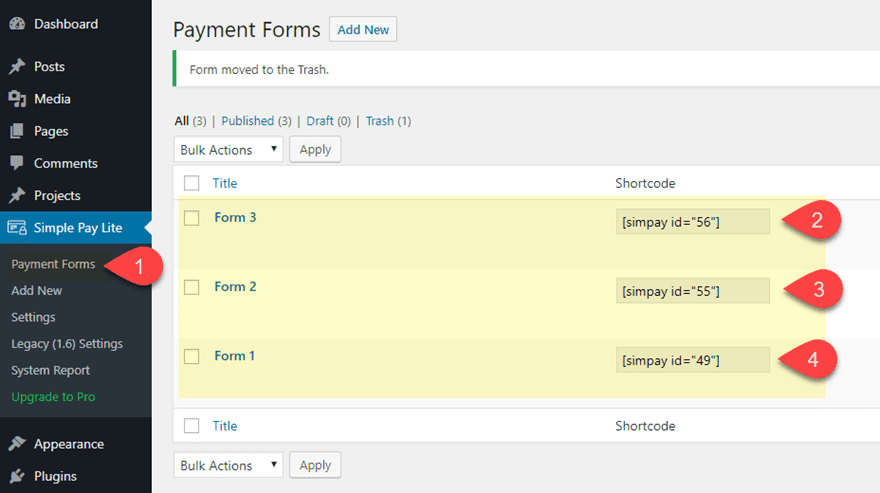
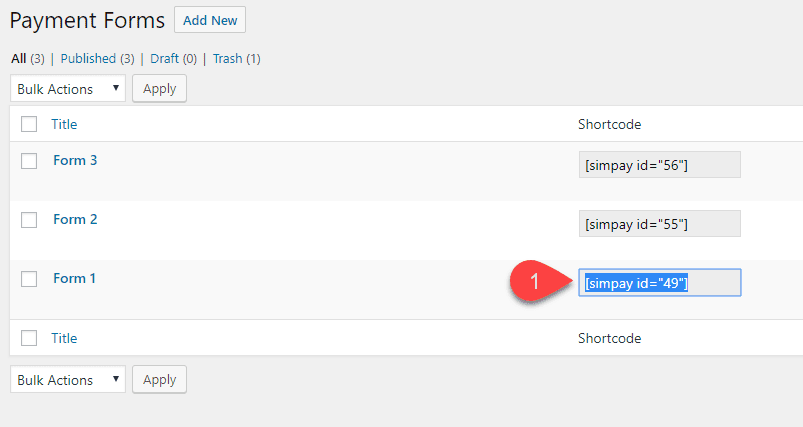
As soon as your whole price bureaucracy had been created, you’ll seek advice from your price bureaucracy through navigating to Easy Pay Lite > Fee Paperwork. There you’re going to have simple get admission to to the shortcodes.
Including Stripe Fee Buttons to Your Divi Web page Format
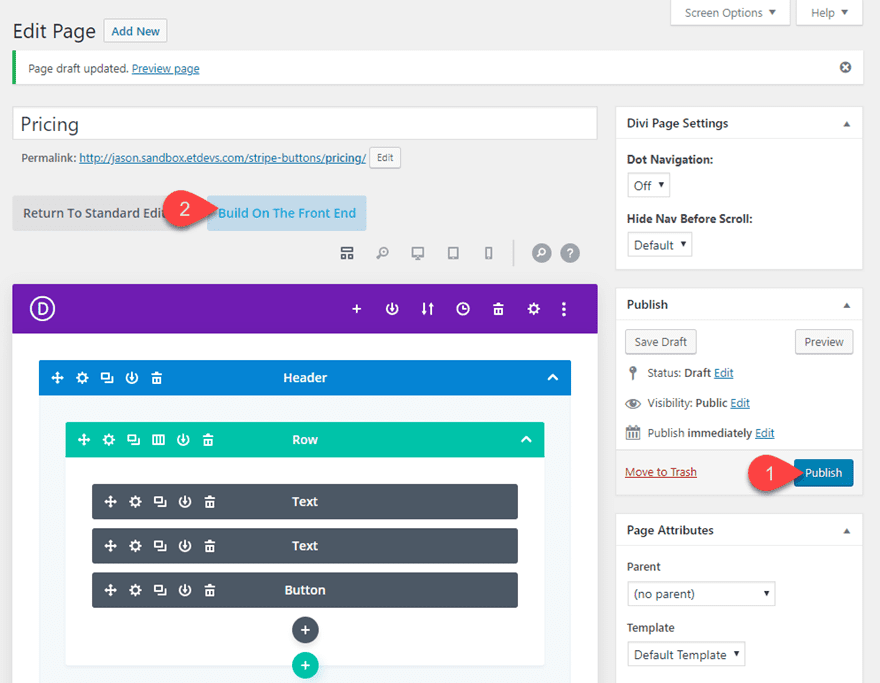
Without stripe price shape shortcodes able to move, now we want to get our Divi web page format up and operating. To try this, create a brand new web page, give your web page a name, and click on to make use of the Divi Builder.

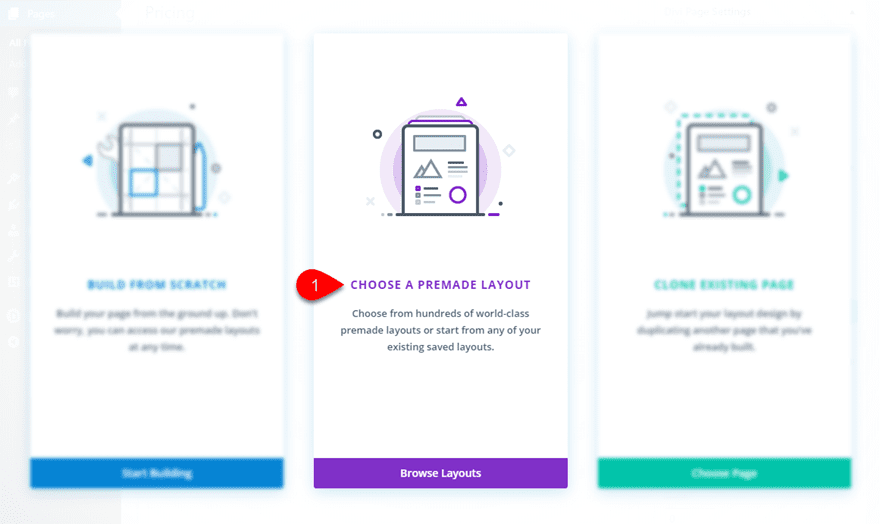
Then choose the choice “Make a selection a Premade Format”.
Open the Virtual Product Format pack and click on to make use of the Virtual Product Pricing web page.

As soon as the format is loaded to the web page, submit the web page after which click on to construct at the entrance finish.
In a separate tab, return to the price bureaucracy web page and grasp the shortcode that you need so as to add to the pricing desk.
Then return for your pricing web page format and open the pricing desk settings for one of the crucial pricing tables within the format.
Take out the button textual content (you don’t want it because the shortcode will function the button) after which paste the shortcode beneath the content material within the content material field.
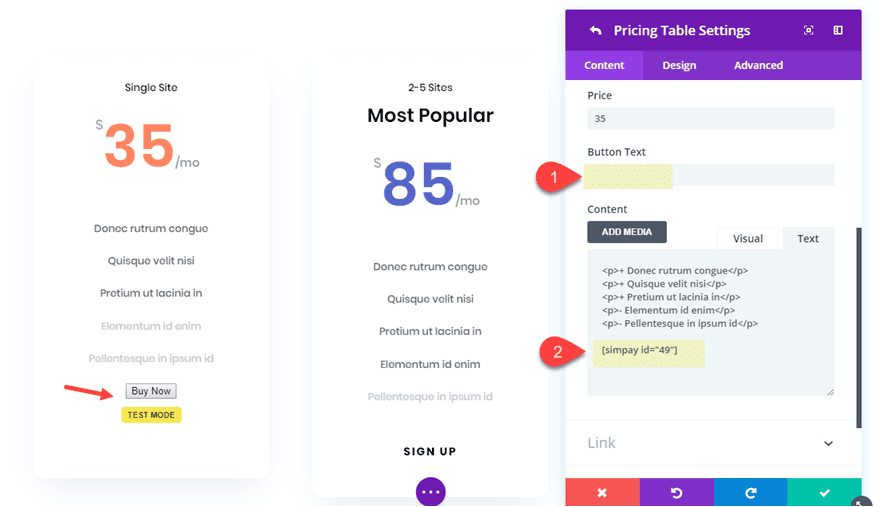
You’re going to see an unstyled button with the textual content “check mode” highlighted beneath the button. The button in unstyled as a result of we decided on the choice to make use of the theme types for the button as an alternative of the default blue button. The check mode textual content is just there to remind you that you’re not the usage of a reside stripe price shape. The check mode textual content will clearly disappear as soon as the reside API keys are used.
Subsequent, proceed the similar means of copying and pasting the opposite two price shape shortcodes in the remainder two pricing tables.
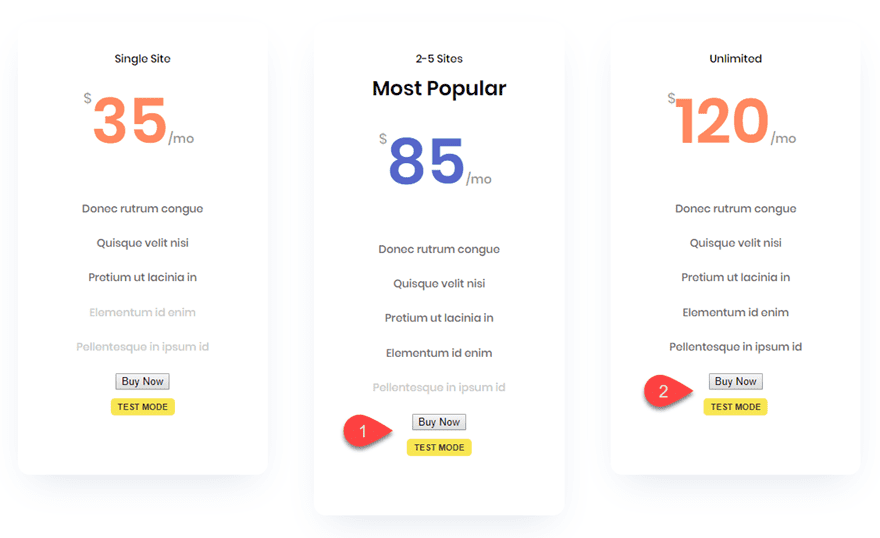
Check out one of the crucial buttons to verify the price shape overlay is operating correctly. It will have to seem like this…
Sadly, this model of the plugin doesn’t assist you to customise the price shape overlay past the default taste that you just see. However the capability is there and in lots of instances, you gained’t want that additional styling. Then again, you’ll taste the ones buttons!
Styling the Stripe Fee Buttons to Fit the Format
To taste the Stripe price buttons, we’re going to upload some customized CSS to our web page settings. First, we want to work out what selector we’re going to use to taste the button. You’ll be able to in finding this through the usage of your browser developer gear. Proper click on at the Stripe button and choose “Check out”. Within the html code you’ll see that the button has a css magnificence “simpay-payment-btn”.
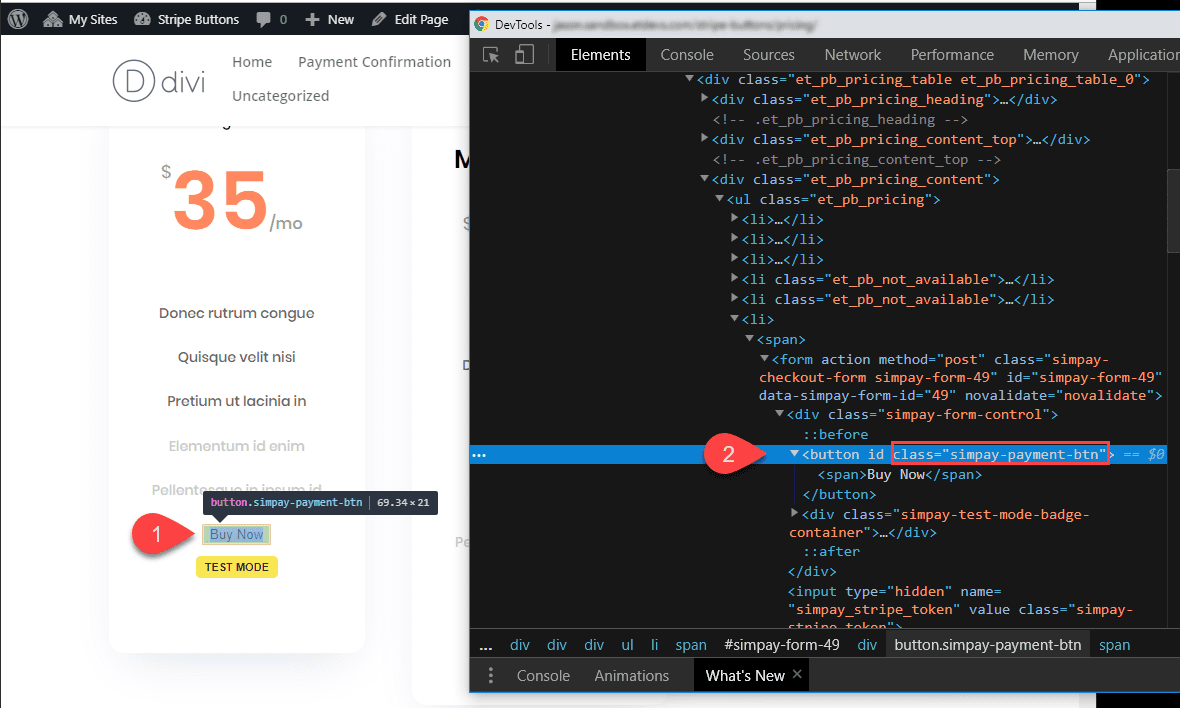
That is the selector we want to goal the manner of the button.
If we need to fit the manner of our Stripe price buttons with the buttons used on our premade format, we will check out one of the crucial Divi buttons already styled at the web page to get the CSS code we’d like.
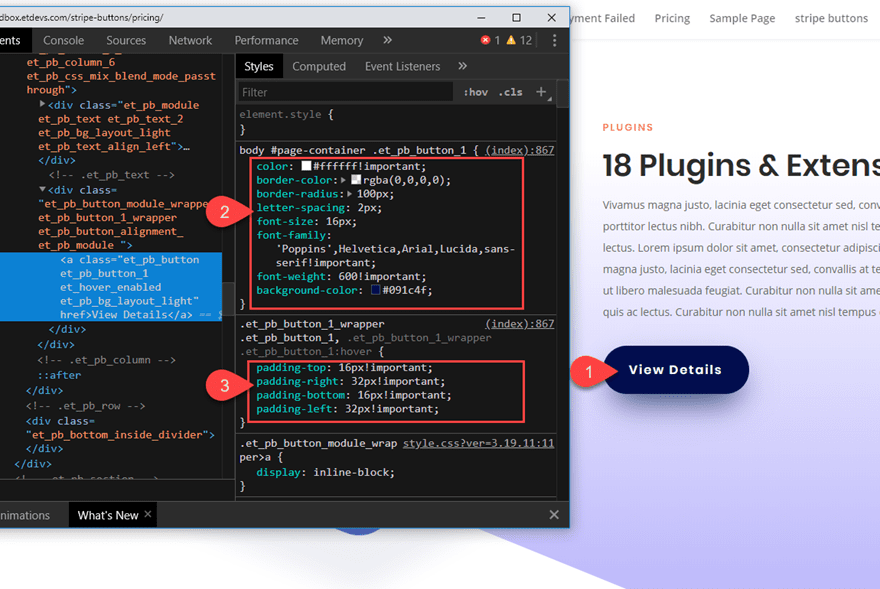
Now open the web page settings and upload the next Customized CSS beneath the Complicated tab:
.simpay-payment-btn {
    coloration: #ffffff!essential;
    border-color: rgba(0,0,0,0);
    border-radius: 100px;
    letter-spacing: 2px;
    font-size: 16px;
    font-family: 'Poppins',Helvetica,Arial,Lucida,sans-serif!essential;
    font-weight: 600!essential;
    background-color: #091c4f;
    padding-top: 16px!essential;
    padding-right: 32px!essential;
    padding-bottom: 16px!essential;
    padding-left: 32px!essential;
}
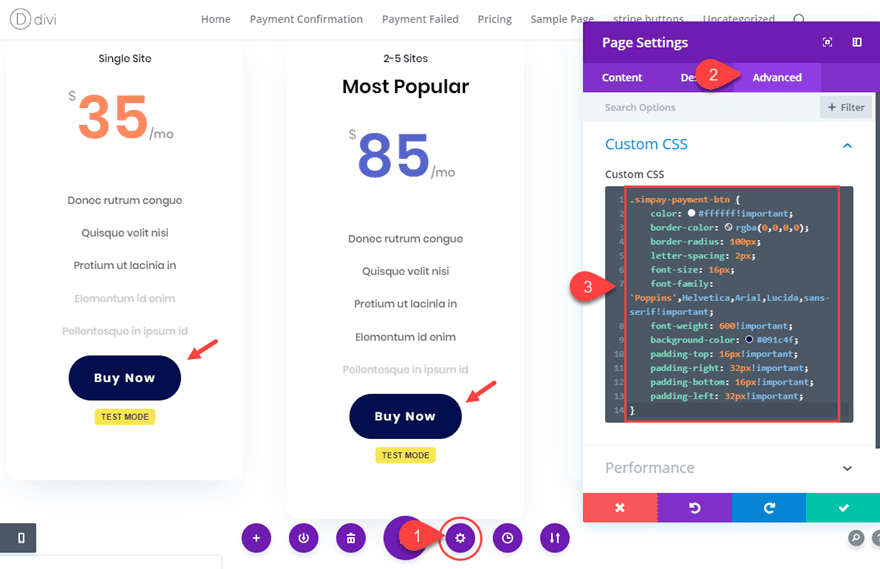
That’s it! Let’s take a look at the overall outcome.
Customizing Your Fee Affirmation and Fee Failed Pages
Don’t disregard that because the plugin generates your price affirmation and price failed web page content material the usage of a shortcode, you’ll upload that shortcode to any Divi format after which use Divi’s inbuilt settings to taste the textual content how you need.
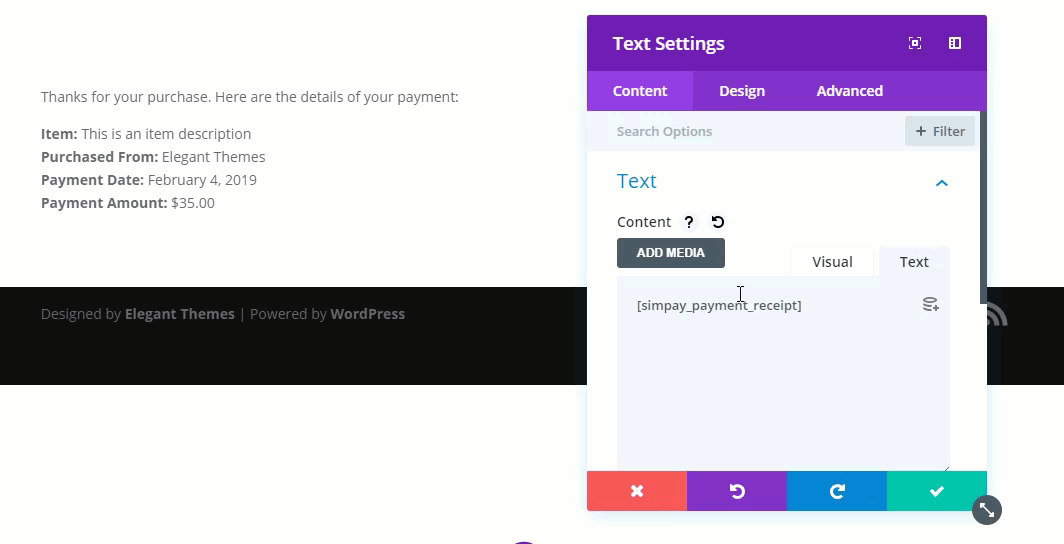
That is useful for matching the types of those pages with you site with out need to hotel to customized CSS.
Ultimate Ideas
Stripe may also be a particularly handy resolution for amassing on-line bills. And, with the Easy Bills for WordPress plugin, you’ll get the elemental Stripe Checkout capability up and operating to your Divi website in mins. Additionally, in case you benefit from Divi’s premade layouts, you’ll upload and elegance your Stripe price buttons to compare your format just by copying and pasting CSS code already created for you. The result’s a completely practical and protected price processing device that may gather bills from guests with out them ever having to go away the web page.
Be happy to discover extra tactics to accept Stripe payments on your WordPress website.
I’m hoping you in finding this instructional useful and I sit up for listening to from you within the feedback.
Cheers!
The submit How to Add Simple Stripe Payment Buttons to Your Pricing Tables in Divi seemed first on Elegant Themes Blog.
WordPress Web Design