
This put up is a part of a chain on React construction for WordPress builders. In my closing put up, I lined unit testing React components using Jest. Jest, when used for fundamental assertions and snapshot exams can quilt numerous the capability of a React element.
The “React Means” of growing interfaces requires composing interfaces, which might be themselves parts, out of smaller parts. Jest shall we us take a look at every element in isolation, however we’ll additionally want to be sure that element paintings as meant when nested inside of of one another.
This text additionally covers looping thru React parts — as an example, a Posts element that renders an array of posts the use of a Publish element for every one — the use of array iterators. With a view to accelerate construction even additional, I’ll quilt how I take advantage of a command line application to intelligently replica current parts to new parts.
Trying out Nested Elements In A React App
As I wrote previous, passing props all the way down to a couple of parts is the place React apps get difficult. Should you cross all the way down to many layers, you find yourself with the “props drilling drawback.”
Prop drilling (also referred to as “threading”) refers back to the procedure you must undergo to get knowledge to portions of the React Element tree.
I will have to point out that the brand new React context API is an alternate method to this drawback. Context API is robust, however I’d be informed this manner first, then watch Wes Bos’ video on the context API and take into consideration which issues you could have could also be higher solved with context API then “props drilling.” However for a couple of layers, this technique is unassuming and prop-types and Jest can catch the issues it introduces.
Let’s create an element that loops thru an array of posts after which use prop varieties to soundly cord it to the present Publish element.
The usage of Generact To Replica A Element
At this level, we’d like an element this is nearly the similar as our current one. One method to cut back the volume of repetitive typing we need to do is lower and paste the present element after which do strategic to find and change. That’s uninteresting and error-prone. As an alternative, let’s use Generact.
Generact is a module that does mainly that, however is constructed with React parts in thoughts. It’s truly neat and saves a ton of time. Generact will have to be put in globally, which means that you handiest need to do it as soon as, in keeping with pc:
View the code on Gist.
Now, we will be able to run the “generact” command in our app to replicate any element:
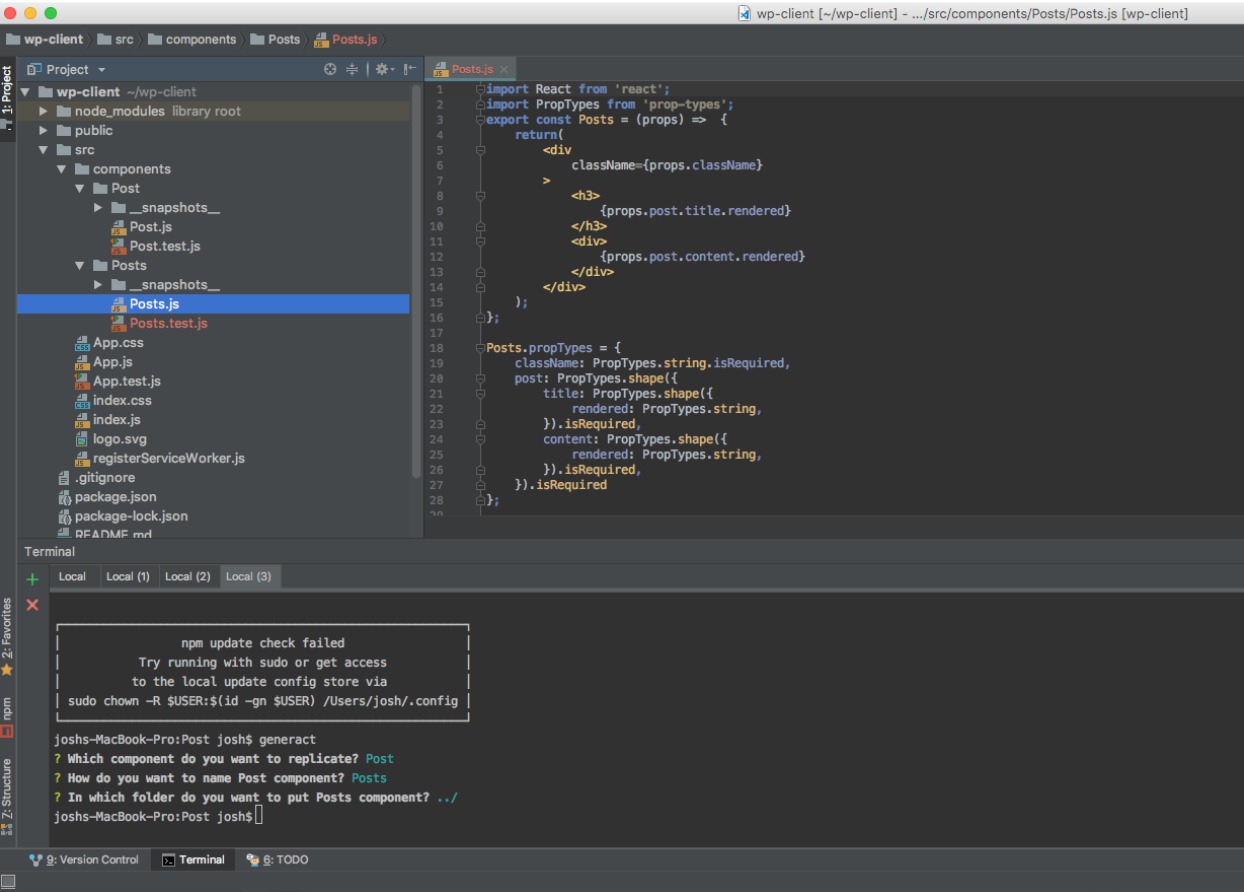
On this screenshot of my IDE, you’ll be able to see that I switched to the listing with Publish, advised Generact to replicate that element and to place it one listing above. That creates the Posts listing, containing the element Posts and its exams. Neato.
One essential word. The truth that it copied the exams could be very helpful. The truth that it copied the snapshots isn’t and can reason mistakes as Jest will get puzzled about document paths. I normally delete the snapshots folder after which let Jest recreate it. The ones snapshots are invalid anyway.
Looping In A React Element
Now now we have a get started for our element, however it’s the similar as the primary one. This one will have to loop posts and move them to Publish. The very first thing to do is replace the propType for put up to be “posts” and include an array.
Whilst I may just use PropTypes.array to specify an array, that’s no longer what I truly need. I don’t need any array. I need an array containing gadgets with the form of a WordPress put up. So I used PropTypes.arrayOf. I may just use this to specify, as an example, an array containing handiest strings. On this case, I used the put up form I already had:
View the code on Gist.
This displays the PropType. As soon as I’ve my exams operating and no longer ahead of, I can upload the loop. Jest shall we me paintings iteratively. First make the element paintings, then upload options. I will be able to do iterate safely figuring out what the results of my adjustments are as a result of I’ve the exams first.
I then changed the exams shape the Publish element to hide this element. Along with converting from Posts to Publish, I modified from a ridicule put up object to a ridicule array of put up gadgets:
View the code on Gist.
Now that my element works, shall we upload the loop. One primary growth from ES5 to ES6 and past is stepped forward iterators for arrays. Array.forEach() and Array.map() make it simple to iterate over an array like php’s foreach control structure or jQuery’s each method.
The adaptation between map and forEach is that forEach doesn’t go back a price for every iteration. Its helpful for validating or mutating every or some pieces in a set. Then again map, does go back a price for every iteration. Due to this fact forEach is quicker than map(), however map() can be utilized after we want to say go back a React element for every merchandise in an array.
That’s precisely what we’d like — iterate thru every put up and go back a rendered Publish element. Here’s the loop:
View the code on Gist.
I zoomed in right here to have a look at the loop because the “key” prop is a essential, however no longer evident step. Key is a special prop. React is designed to simply replace the DOM when wanted. That will get difficult with loops.
How does React know if merchandise 3 within the array modified? You might imagine that React analyzes the array for all of its deeply nested gadgets and compares them to the closing time it noticed that array. Should you assume this, you’ll be pissed off, like I used to be after I began finding out React and adjustments in state didn’t re-render. Why? React is NOT evaluating the deeply nested homes of an array. We use the “key” prop to indicate to React that it is a distinctive merchandise within the array. The usage of put up ID on this context is superb, as its a singular identifier, since that’s what it’s.
Here’s the entire element:
View the code on Gist.
The exams I already had failed since the snapshot modified after I added the loop. Once more, I inspected the exchange, determined it was once what i sought after after which authorised the brand new spec.
Reusing Prop Varieties
I do know have two parts with equivalent prop varieties. I’ve an identical code doing very equivalent issues in two puts. That smells dangerous. I knew it was once an issue after I did it, however I didn’t wish to deal with it straight away. Too many adjustments without delay way take a look at screw ups don’t seem to be significant. However, it is a drawback I wish to repair.
As a result of I’ve exams in position, after I make the exchange, I can know that neither element has damaged.
To perform this, I copied the form to its personal document:
View the code on Gist.
I will be able to then use this as-is for my put up prop within the Publish element:
View the code on Gist.
I will be able to additionally use it within PropTypes.arrayOf() for the posts prop within the Posts element:
View the code on Gist.
Should you’re paying shut consideration, I added an ID prop to the postShape prop. My description of the put up was once no longer entire and remains to be no longer. Now, as I amplify on it, I want to make a transformation in a single position. By way of assigning the only duty of managing put up form to this consistent, I’ve a maintainable method to exchange that form.
What About TypeScript or Waft?
In my closing put up on this collection, I lined putting in place prop-types for prop variety checking in React. I discussed why frequently I believe Waft or Typescript isn’t essential on account of this software. I do assume it’s value noting that the closing step I confirmed — making a repeatable form for a put up — that’s mainly re-creating TypeScript. TypeScript permits you to outline the form — like PHP interface in OOP PHP — for gadgets.
I’m lately growing npm modules for to percentage React parts between the internet app and plugin. For the API shopper I did use Waft. Since I that module isn’t the use of React, and all of my HTTP exams are the use of mock knowledge, variety checking was once truly essential to me.
Since go with the flow and TypeScript are compiled to JavaScript, the kind checking occurs then. Excellent for extra inflexible initiatives like API shoppers or CRUD. For UI, I just like the simplicity of prop-types. Additionally, its one much less factor for brand new builders to be told.
Trying out Occasions In React Elements
Thus far, we’ve handiest checked out parts that render content material, however no longer replace it. What if we would like a kind? Let’s have a look at how that works. First, let’s discuss tasks. We wish to stay this element “dumb” — the common sense of updating state isn’t its worry. It is going to be handed props and a serve as to keep in touch a transformation in a price to its dad or mum. How its dad or mum works will have to stay inappropriate to the element.
Conserving your exchange handlers decoupled is tremendous essential for reuse. In case your element may just get utilized in a small app the use of one element to control state, with Redux or within a Gutenberg block, you want to stay the element decoupled from the ones 3 techniques. Once more, the main of dependency injection applies. The exchange handler is a dependency from every other a part of this system, so we move it into the element.
To start, I used Generact, the similar approach as closing time, to create a duplicate of the Publish element and referred to as it PostEditor. I then added one new prop-type – onChange.
View the code on Gist.
I used the prop-type for a serve as and made it required. My snapshot exams right away created mistakes as they didn’t have this prop. To mend this, I up to date the exams so the onChange prop was once equipped a serve as that does actually not anything.
View the code on Gist.
Those unit exams now end up that the element renders correctly when supplied the right kind parts. That’s god, however I might no longer accept as true with that this implies the element can edit a put up. We want to take a look at it via simulating the exchange tournament at the inputs of the editor.
Shape Inputs And Exchange Handlers For Practical React Elements
Personally, an element is accountable for shaping the worth it passes to its dad or mum by means of the exchange handler serve as. I don’t wish to need to create a transformation handler for the identify and the content material and the writer and the taxonomies of the put up. That’s an excessive amount of. I wish to move within the put up and a serve as to name when the put up updates.
Because of this the element is accountable for taking the development object, extracting its worth, and merging that with the unique put up. That’s a couple of considerations. This isn’t the place I transfer to a category. Sure, I want a couple of closures, I will be able to do this right here.
First, this is our exchange handler serve as — interior to the element — this is accountable for merging the replace and the present values:
View the code on Gist.
The PostEdit element began as replica of Publish. Let’s replace it to have an enter for the put up identify, the similar regulations of HTML inputs follow right here, together with passing a serve as to be referred to as at the inputs exchange tournament to the onChange characteristic.
Right here’s the enter:
View the code on Gist.
Right here I take advantage of a closure to take the development, get its worth and create the enter for my interior exchange handler. Now this is the entire element:
View the code on Gist.
This manner is beautiful easy and it utterly isolates the fear of updating the article of the put up within this element after which passes all of that out by means of the changeHandler. That procedure is black-boxed, however nonetheless testable and I don’t need to handle binding state in a category element and its nonetheless easy to learn.
As a result of a JavaScript elegance is syntactical sugar and no longer browser-friendly, that is similar to what Babel would collect given a category extending React.Element. I shouldn’t have anyway to make use of React lifecycle occasions. That’s no longer an issue within the slightest and I’ve no longer but wanted that further complexity as a result of those are easy “dumb” parts which can be ignorant of the place their knowledge comes from.
You’ll want to upload extra inputs to this element, following the similar development. That’s the speculation, you will have to take a look at it. Display us what you created with a pull request to the example plugin.
Josh Pollock
Josh is a WordPress developer and educator. He’s the founding father of CalderaWP, makers of superior WordPress equipment together with Caldera Forms — a drag and drop, responsive WordPress shape builder.
The put up Testing Nested Components In A React App gave the impression first on Torque.
WordPress Agency