
Let’s discuss Cricut Print Then Lower calibration.
Have you ever ever revealed a design, aligned it completely together with your Cricut gadget, simplest to seek out that it doesn’t reduce correctly?


Possibly it cuts one of the vital design off or creates an imbalance of offsets across the corners. Or most likely, whilst you attempt to calibrate the gadget, it simply gained’t calibrate correctly? You’re now not by myself.
Many Cricut crafters, together with myself, face this factor. It may be irritating, but it surely’s solvable. On this put up, I’ll proportion all of the imaginable causes for imperfect cuts and how you can unravel them in keeping with my enjoy.
Contents
First, Take a look at Your Mat
The very first thing maximum folks would most likely do is bounce proper into calibration, however I’d recommend now not relatively but. First, take a look at your mat. In truth, take a look at the following couple of issues, and get them proper:
- You should definitely are the use of the proper mat dimension.
- You should definitely are laying your paper at the most sensible proper of the mat.
- Be sure the mat isn’t bent or wavy on each the left and proper aspects.
- Be sure the mat isn’t crooked when loaded into the Cricut gadget.


Takeaway: Use the right kind mat dimension and make sure it’s completely flat.

Do a System Calibration
In case your mat is all k, let’s continue to accomplish a calibration. This guarantees your gadget cuts exactly alongside the threshold of your revealed symbol.
Cricut supplies a detailed information on how you can calibrate your gadget, so I gained’t repeat the directions right here. I recommend you learn and observe it to check out to calibrate your gadget.
The purpose is to stay calibrating till the whole lot is best. Alternatively, right here are some things I’d like to show that you simply must bear in mind of when doing calibration.
Perceive Commonplace Cuts and Large Offsets
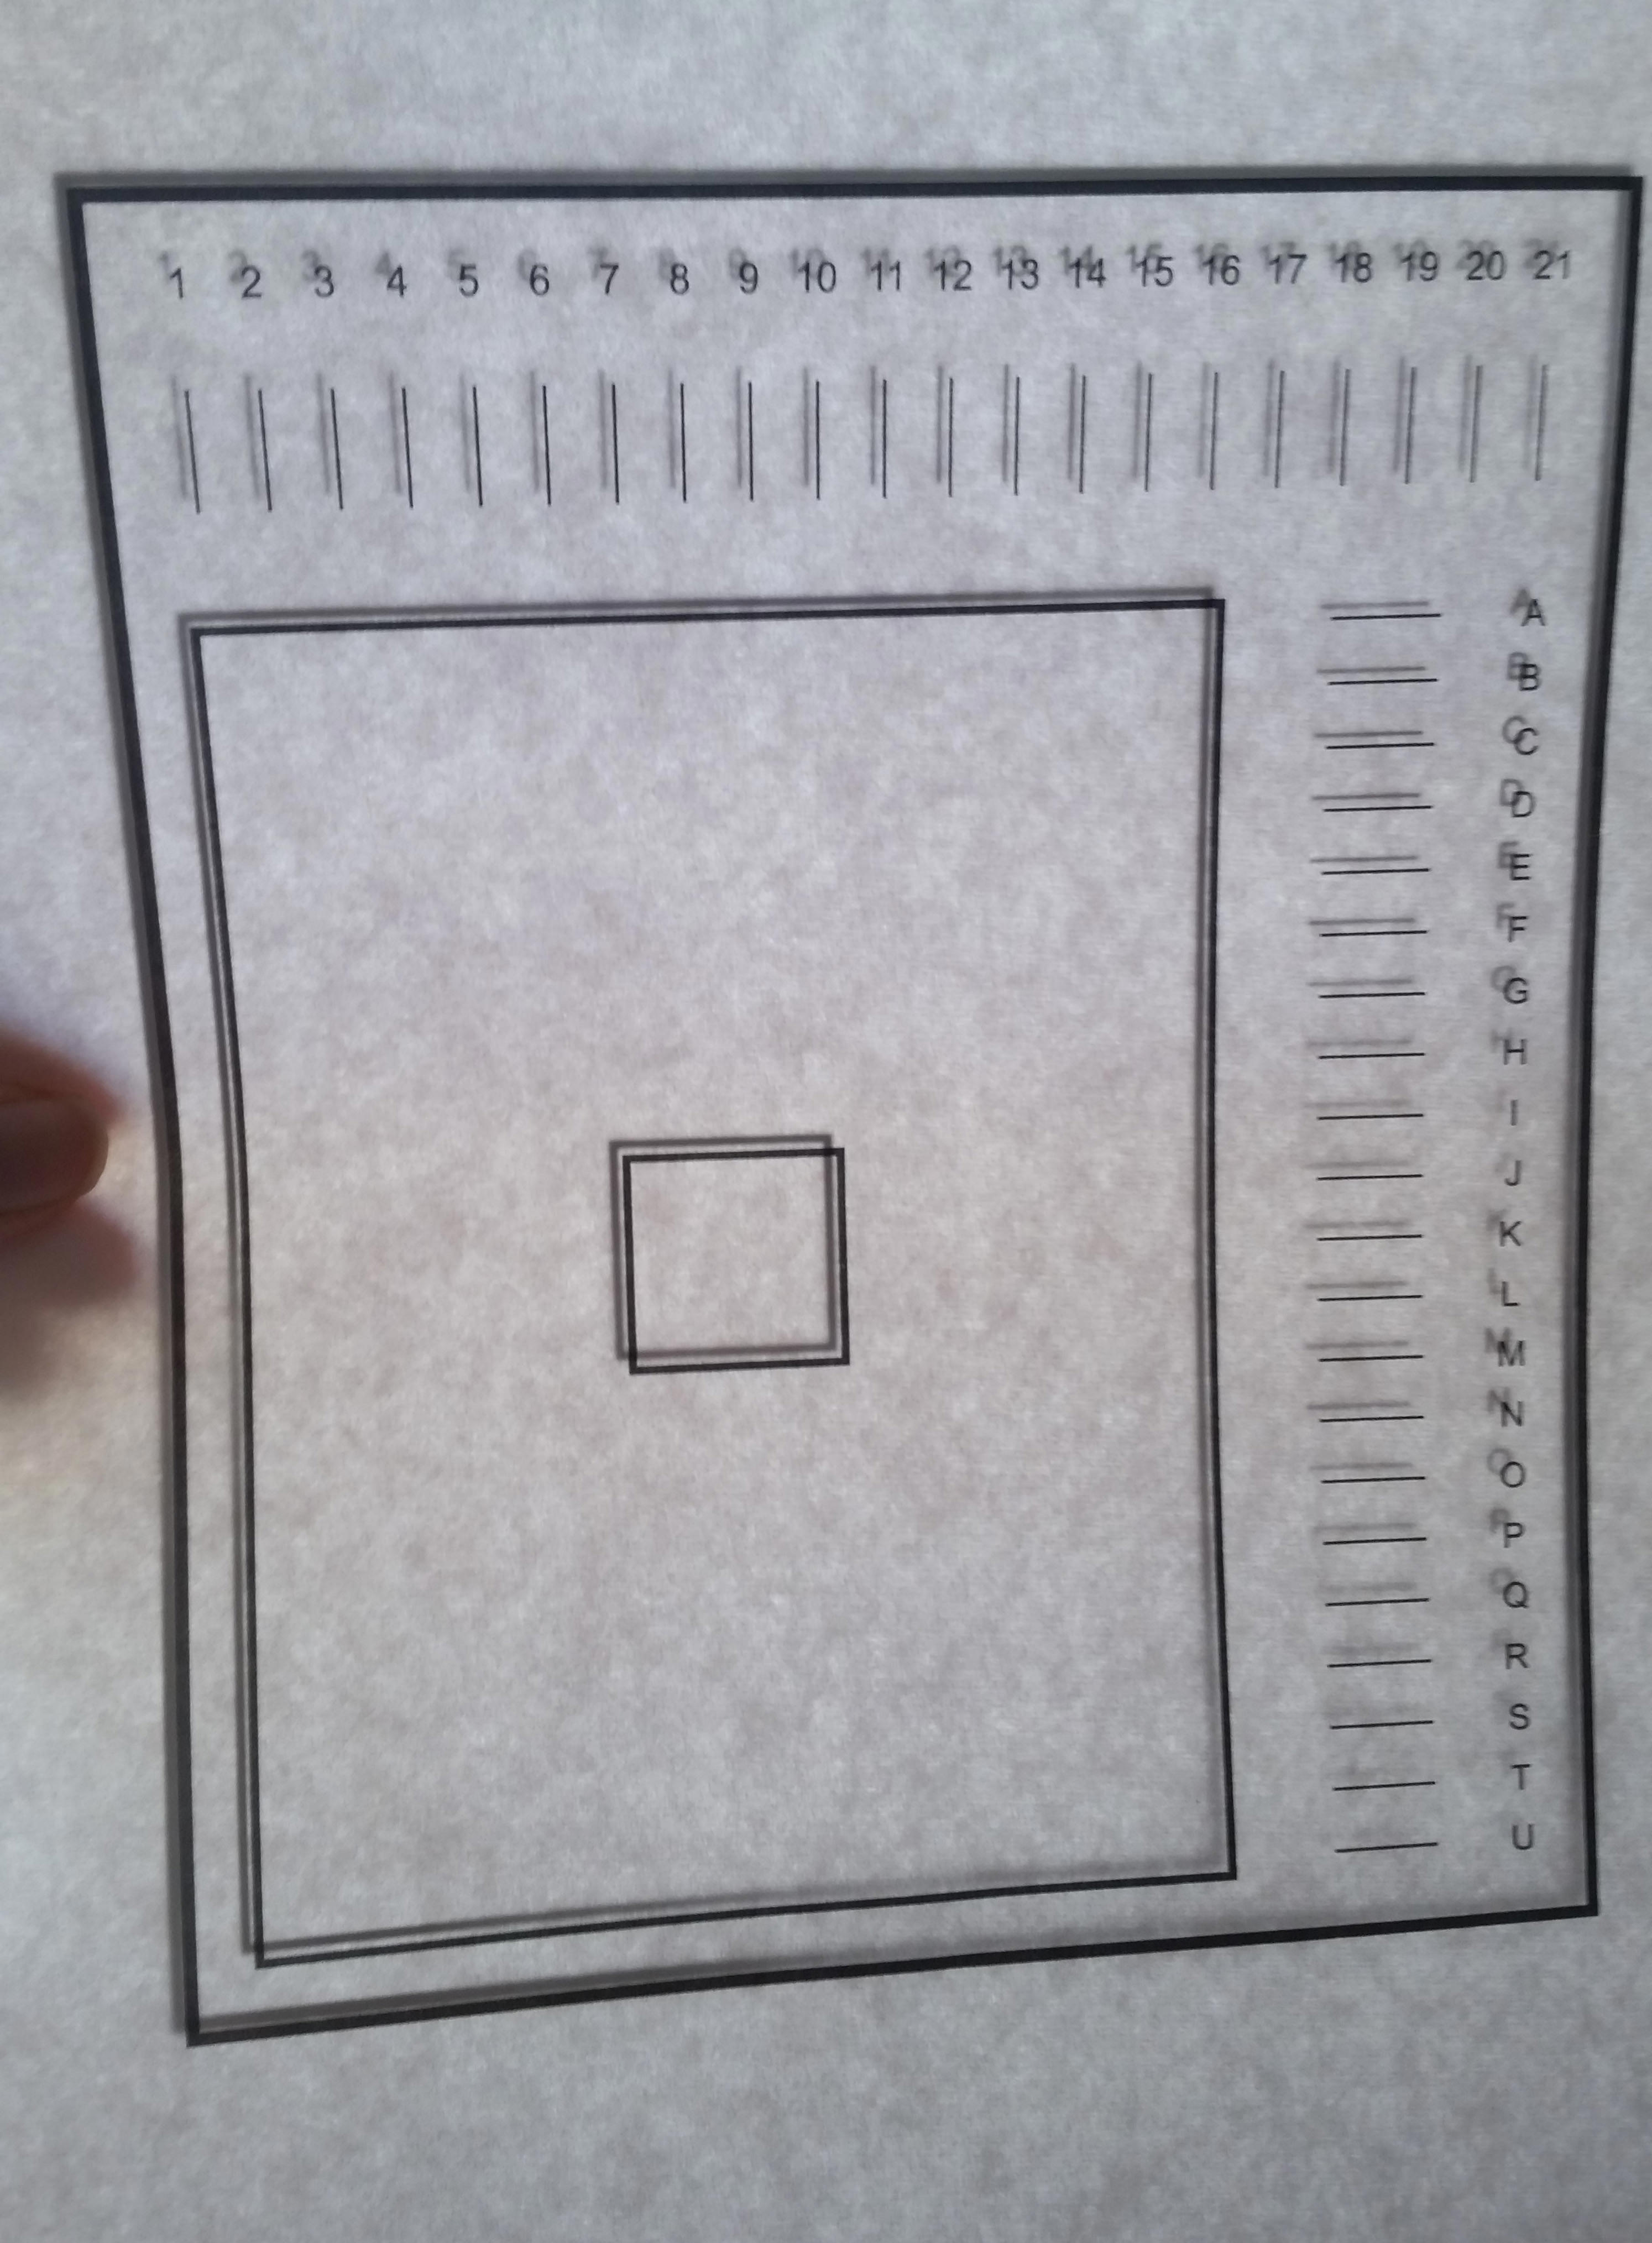
In the second one step of the gadget calibration, the Cricut gadget will reduce vertical and horizontal traces at the numbers 1-21 and A-U. You are meant to to find which reduce line falls at once on or closest to the broadcast line.
However sooner than you do this, right here’s something you want to bear in mind of: you want to understand if the reduce traces are standard cuts or large offset cuts.
Commonplace Cuts
A standard reduce approach it meets the next prerequisites:
- The primary reduce is sooner than 1, and the final reduce is after 21.
- The primary reduce is sooner than A, and the final reduce is after U.
If those prerequisites don’t seem to be met, it is regarded as a large offset reduce. Learn beneath to be informed extra about large offset cuts.


In case you are getting a regular reduce, then cross forward and determine which traces fall maximum focused at the revealed line and enter them within the discussion field within the calibration procedure for your design area.
Large Offset Cuts
If the cuts don’t seem to be inside the boundary of standard cuts, then they’re most likely massive offset cuts. Massive offset cuts can happen in any of the next situations:
- The primary reduce is after 1.
- The final reduce is sooner than 21.
- The primary reduce is after A.
- The final reduce is sooner than U.
Listed below are some examples of large offset cuts:


What to Do with Large Offset Cuts?
It’s necessary that if any of those situations happen, you don’t make a selection which traces fall maximum focused at the revealed line.
As a substitute, for every of those situations, make a selection the next as your solution, after which repeat calibration:
- First horizontal reduce is after 1 – Make a selection 1.
- Closing horizontal reduce is sooner than 21 – Make a selection 21.
- First vertical reduce is after A – Make a selection A.
- Closing vertical reduce is sooner than U – Make a selection U.
Repeat the calibration procedure. You may want to do it a couple of instances, most likely greater than 5-8 instances, till it’s completely calibrated. That is standard. If this doesn’t paintings, proceed studying beneath.
Takeaway: Perceive reduce sorts, calibrate many times, use the PDF sheet if wanted, and print at 100% scale.
Use the PDF Calibration Sheet
Whilst you do calibration, you might be requested via Cricut Design House proper within the app to print the calibration sheet. Alternatively, many have reported that the calibration sheet at once revealed from Design House isn’t precisely correct, a minimum of when in comparison to the PDF model downloaded and revealed manually.
Right here’s a picture of a person evaluating calibration sheets at once revealed from Cricut Design House and the opposite from the PDF model.
As you’ll inform, there’s some distinction between the 2. So if calibration isn’t running for you, it’s your decision to check out going to the professional Cricut lend a hand information, scroll all of the approach all the way down to the top of the object, and obtain the PDF model of the calibration sheet.

Bear in mind, for your printing settings discussion, all the time make a selection to print at 100% scale and not print to suit.
Takeaway: The PDF calibration sheet would possibly vary somewhat in dimension from the only revealed at once from Cricut, which is able to motive imperfect cuts.
Lower Sensor Marks May Be the Perpetrator
If all of the above don’t paintings, the following factor you must believe is most likely the reduce sensor marks don’t seem to be correctly learn via the gadget. Those are the marks/traces intentionally revealed via Design House for the Cricut gadget to learn to understand the precise place of the place to chop correctly.

If the gadget fails to learn section or all of the reduce sensor marks, it’ll now not reduce correctly.
Listed below are a few issues that can intrude with the gadget’s talent to learn the sensor marks correctly:
Take a look at Atmosphere and Lighting fixtures
Direct daylight, overhead studying lamps, or glare directed against the sensor would possibly intrude with the gadget’s sensor mild. To verify there’s no interference, it is advisable do the next when the gadget’s sensor is scanning for the reduce sensor mark:
- Shut the Cricut gadget’s lid.
- Flip off any lighting fixtures that can intrude.
Is the System’s Sensor Mild Blocked or Grimy?
Be sure that the reduce sensor mild of the gadget is blank, or else it’ll additionally impact its talent to locate the reduce sensor mark. To wash the reduce sensor mild for your Cricut Discover or Cricut Maker gadget, sweep gently with a small, blank, dry watercolor paintbrush.
Take a look at the Sensor Marks on Revealed Paper
In case you are chopping stickers with paper that has a shiny movie or different forms of movie on it, that can impact the accuracy of the gadget studying the sensor mark as neatly. It’s best to make sure the movie does now not duvet the sensor mark or use matte clear Scotch tape at the sensor marks.
Takeaway: Be sure the Cricut gadget’s sensor mild can correctly learn the sensor marks for your paper for correct chopping.
A Erroneous Cricut Design House Replace
The Cricut Design House app will get auto-updated at all times. In case your cuts had been best and all at once they aren’t, it is probably not your fault. There’s an opportunity {that a} Cricut Design House replace is the perpetrator. That is one thing I’ve skilled in my view.

What Came about?
My gadget used to be chopping completely, then out of nowhere, it turned into inconsistent. Now and again it reduce neatly, different instances it didn’t.
I attempted all of the calibration strategies discussed previous, however not anything labored—it used to be all the time hit and miss. I spotted this began going down after an replace to the Cricut Design House app. Whilst I used to be nonetheless troubleshooting, some other replace got here thru, and all at once, the whole lot used to be again to standard.
I consider the inconsistency used to be because of the replace, and a handy guide a rough seek on X (formerlly twitter), i discovered few cricut customers sharing equivalent experrience.
there is a international error the place the Print Then Lower characteristic in Cricut Design House is wrong. No quantity of calibration will repair it. talked to buyer make stronger for six hrs and its one thing to do with their tool engineer staff pushing out an replace that made Print&Lower faulty
— POGGY ✿ Store Release July sixteenth!! 4/16 pogpals.com (@pogpals) September 23, 2020
i swear cricut has an replace each week and ruins my calibration -_-;;
— Phiphi ʕ·ᴥ·ʔ (@misoandtofuu) April 12, 2022
WAH I’VE BEEN FRUSTRATED AT MY CRICUT BUT TURNS OUT THE CALIBRATION WAS OFF BC I HAD THE “BAD VERSION” UPDATES WHERE THEY MOVED THE REGISTRATION MARKS UGHHHHHH
— birb ᓚᘏᗢ (@birbyatta) August 17, 2023
@cricut Your newest replace wrecked the calibration on my cricut maker, and recalibration is not solving it. This isn’t the primary time this has came about. Please get your stuff in combination, I’ve buyer orders to fill.
— JuniCat Designs (@JuniCat81) August 10, 2023
Takeaway: If cuts all at once turn out to be imperfect, take a look at if the app has been up to date lately. Touch Cricut make stronger or look forward to the following replace.
Ultimate Ideas
So there you cross, the imaginable the explanation why your gadget isn’t calibrating neatly or now not chopping completely. Calibration is the important thing to perfection, however a very powerful factor is to ensure the whole lot is in the appropriate position sooner than you get started calibrating. This contains making sure the mat is flat and not anything is affecting the gadget’s talent to learn the registration marks.
Calibration generally must be executed a couple of instances, or most likely greater than 8-10 instances. If all else fails, touch Cricut make stronger for lend a hand. Just right good fortune and satisfied crafting!
The put up Cricut Print Then Lower Calibration Guidelines (2024) seemed first on Hongkiat.
WordPress Website Development Source: https://www.hongkiat.com/blog/cricut-calibration-tips/