
Putting in a WooCommerce website online in WordPress is an engaging procedure, with many web page developers, topics, and blocks to be had. You will have to be aware of designing your retailer’s format, writing the easiest product description, and the usage of the most productive product symbol.
Then again, we steadily disregard essential such things as putting in place taxes. Due to WooCommerce and lots of plugins to be had as of late, putting in place gross sales tax on your on-line retailer is simple.
As soon as you realize the right kind charges, this information will mean you can use local WooCommerce options to manually upload gross sales tax calculations for your on-line retailer in 4 steps.
Contents
- 1 Why will have to you place up gross sales tax on your on-line retailer?
- 2 Easy methods to arrange gross sales tax in WooCommerce (4 steps)
- 3 Abstract
Why will have to you place up gross sales tax on your on-line retailer?
We aren’t accountants or tax practitioners. The ideas on this article is supposed to lead on-line retailer house owners in putting in place gross sales taxes for his or her on-line shops.
We recommendation that sooner than you place up tax on your on-line retailer, be sure you perceive the tax laws for your area, and it’s really useful to fulfill with a tax skilled referring to the most productive practices on your particular state of affairs.
Putting in gross sales tax on your on-line retailer would possibly look like a trouble, but it surely’s a an important step you’ll’t skip. As you realize, those taxes give a contribution to public products and services equivalent to schooling, healthcare, and neighborhood infrastructure. Listed here are 3 main explanation why it’s so essential:
- Criminal compliance — At the beginning, you will have to arrange gross sales tax to conform to the legislation. Other areas have other tax necessities, and failing to stick to those may end up in hefty fines and felony hassle for your small business.
- Development buyer agree with — Consumers be expecting a clear and seamless buying groceries enjoy. Correctly managing gross sales tax is a part of that. Showing and dealing with gross sales tax displays consumers you run a certified and devoted trade.
- Monetary accuracy — Correct gross sales tax setup is helping deal with monetary accuracy for your accounting. By means of accurately calculating and accumulating gross sales tax, you keep away from discrepancies that may purpose accounting complications.
- Warding off long term headaches — It’s higher to arrange gross sales tax accurately from the beginning relatively than looking to repair errors later. Erroneous tax settings may end up in problems with refunds, audits, and buyer dissatisfaction.
Easy methods to arrange gross sales tax in WooCommerce (4 steps)
WooCommerce makes it really easy to arrange taxes on your retailer. This educational walks you via all of the strategy of putting in place taxes in WooCommerce.
It’s believed you have already got a WooCommerce website online, however assume you don’t. Kinsta makes it simple to create WordPress websites both in the neighborhood the usage of DevKinsta, on our MyKinsta dashboard, or programmatically by the use of the Kinsta API.
Any choice you select, additionally it is essential you realize that pace and safety are key to any ecommerce website online. We all know this, which is why we provide the highest website hosting to spice up your WooCommerce retailer’s pace via as much as 200%.
As soon as your website online is in a position, be sure you set up the WooCommerce plugin and arrange your retailer sooner than you continue with the stairs under.
Step 1: Allow WooCommerce taxes
To get began, you wish to have to permit taxes on your WooCommerce retailer. Right here’s how:
- Pass for your WordPress dashboard and navigate to WooCommerce > Settings.
- Underneath the Normal tab, in finding the choice categorized Allow taxes.
- Take a look at the field subsequent to Allow taxes.
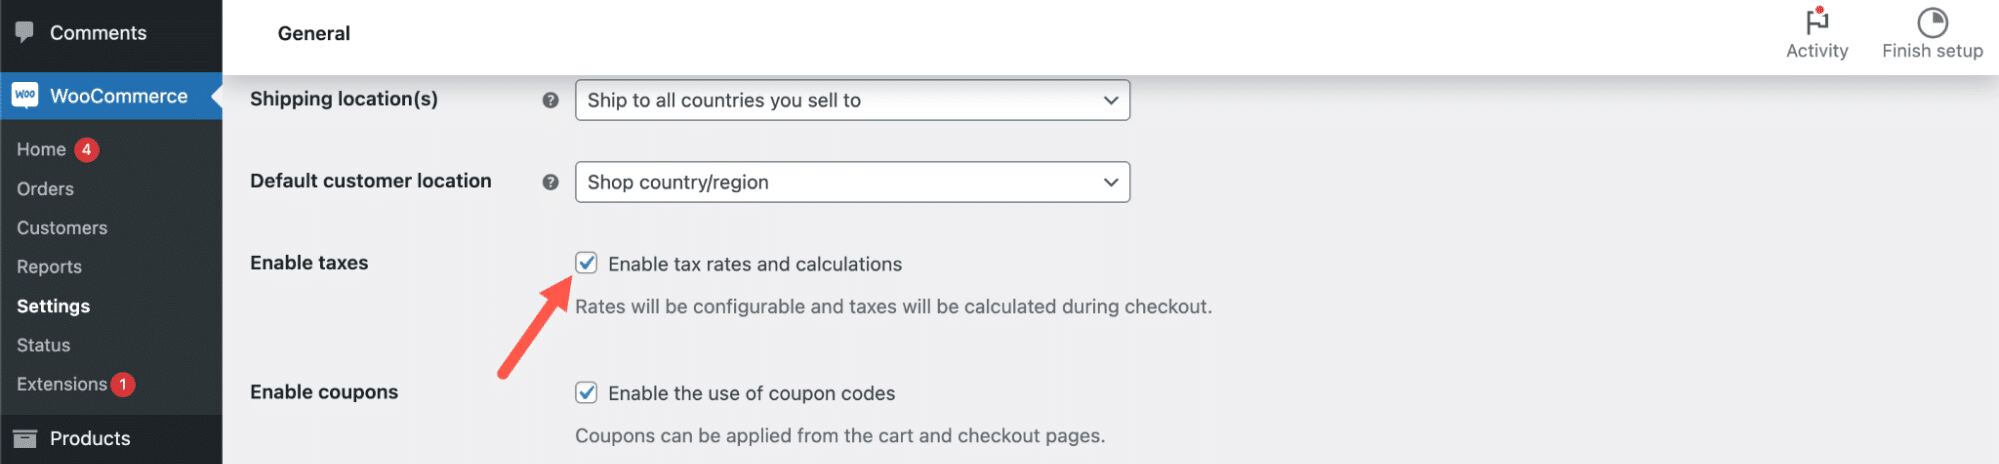
Allow tax charges and calcluations in WooCommerce. - Click on on Save adjustments.

If you’ve accomplished this, a brand new Tax tab will seem for your WooCommerce settings.
Step 2: Configure your tax choices
Now that taxes are enabled, you’ll configure your tax choices via heading to the brand new Tax tab for your WooCommerce settings:

Within the Tax choices menu, there are tax choices that you wish to have to know sooner than you’ll choose. Here’s a detailed clarification of all choices.

Costs entered with tax
This feature determines whether or not the costs you input on your merchandise in WooCommerce are inclusive or unique of tax.
If you select Sure, I will be able to input costs inclusive of tax; it implies that, as an example, should you set a product value at $100 and your tax fee is 10%, WooCommerce assumes that the $100 value already contains the ten% tax. So, the product’s base value is $90.91, and the tax portion is $9.09.
It’s the opposite direction round if you select No, I will be able to input costs unique of tax. As an example, For those who set a product value at $100 and your tax fee is 10%, WooCommerce will upload the ten% tax to the bottom value. So, the product’s ultimate value shall be $110.
Calculate tax in accordance with
This atmosphere lets in you to make a choice the deal with WooCommerce will use to decide the tax fee for an order. You have got 3 choices to make a choice from:
- Buyer transport deal with — This feature calculates taxes in accordance with the place the client needs the product shipped. As an example, should you run an internet retailer in California, USA, and a buyer from New York puts an order and desires it shipped to their deal with in New York, WooCommerce will follow the New York tax fee to the order.
- Buyer billing deal with—This feature calculates taxes in accordance with the billing deal with supplied via the client. As an example, if a buyer from Texas puts an order however requests it’s shipped to another deal with in Nevada, WooCommerce will follow the Texas tax fee in accordance with the billing deal with.
- Store base deal with—This feature calculates taxes in accordance with your retailer’s location. As an example, in case your retailer is in California, USA, without reference to the place your buyer is positioned or the place the product is distributed, the tax fee is in accordance with your retailer’s deal with. WooCommerce will follow the California tax fee to all orders.
Delivery tax elegance
This atmosphere permits you to specify which tax elegance applies for your transport fees. You have got at all times a minimum of those two choices to make a choice from:
- Delivery tax elegance in accordance with cart pieces — This default choice applies the tax elegance of the pieces within the buyer’s cart to the transport price. If the cart comprises pieces with other tax charges, the transport tax elegance shall be decided as follows:
- If any product within the cart is assigned the Usual fee tax elegance, this fee will follow to the transport.
- If no product has the Usual fee, the primary fee within the Further tax categories segment shall be used.
- If the best tax fee will have to follow, be sure it’s indexed first within the Further tax categories.
As an example, if a buyer buys child garments (assigned a discounted tax elegance) and a ebook (assigned a typical tax elegance). The transport price shall be taxed at the usual fee as a result of there’s a product within the cart with the usual tax fee.
Here’s a sensible instance:
- Product A: Child garments with a discounted tax fee of five%
- Product B: E book with a typical tax fee of 20%
- Delivery Tax: 20% (usual fee implemented as a result of it’s provide within the cart)
- Usual — This feature applies the usual tax fee to the transport price, without reference to the tax charges of the pieces within the cart.
You’ll be able to upload extra categories and make a choice them then again you want within the Further tax categories. Then again, identical to Usual, this selection will follow the brand new fee to the transport price, without reference to the tax charges of the pieces within the cart.
Rounding
This feature determines how tax quantities are rounded all over calculations. You’ll be able to make a choice to spherical taxes on the subtotal or line merchandise ranges.
By means of default, WooCommerce rounds taxes on the line merchandise degree, which means each and every product’s tax is calculated and rounded personally sooner than summing them up. Some tax rules or accounting practices would possibly require this system.
However, you’ll take a look at the field to spherical up tax on the subtotal degree, this means that that the entire tax for the order is calculated first after which rounded.
Further tax categories
This feature permits you to create and arrange other tax classes past the default ones. Within the textual content box, input the names of your new tax categories, one in keeping with line. As an example, you could upload categories like Luxurious items or Eco-friendly merchandise.

If you’ve added the names and clicked Save Adjustments, those new tax categories will transform to be had within the Delivery Tax Elegance choice. Subsequent to the prevailing tax categories, you’ll see a tab for the newly created tax.

In step 3, you’ll learn to configure those tax categories.
Show costs within the store
This feature controls whether or not product costs displayed for your retailer’s entrance finish (e.g., product listings, product pages) come with or exclude tax. You have got two possible choices:
- Together with tax — Costs proven to consumers are ultimate, with tax already integrated, simplifying the buying groceries enjoy. As an example, a product indexed at $100 will seem as $100, together with a ten% tax.
- Apart from tax — Costs proven are base costs with out tax, which is added all over checkout. As an example, a product indexed at $100 may have a ten% tax added at checkout, totaling $110.
Show costs all over cart and checkout
This atmosphere determines how costs are exhibited to consumers of their buying groceries carts and all over checkout. Like the store show settings, you’ll display costs, together with or with the exception of tax.
- Together with tax — Costs within the cart and at checkout already come with tax, making sure transparency and fighting surprises. As an example, if a product priced at $100 features a 10% tax, the cart will display $100 with a breakdown of $90.91 as the bottom value and $9.09 because the tax.
- Apart from tax — Costs within the cart and at checkout to begin with exclude tax, which is added as a separate line merchandise. As an example, a product priced at $100 with the exception of tax will display an extra $10 tax at checkout, totaling $110.
For those who in the past opted to input costs unique of tax, it’s logical to make a choice the similar choice right here. In a similar way, should you entered costs inclusive of tax, you will have to make a choice the Together with tax choice.
Actually, if those settings aren’t constant, you’ll be warned of conceivable rounding mistakes.

Value show suffix
This article string seems after the cost of your merchandise, serving to consumers perceive whether or not the cost proven contains or excludes tax. You’ll be able to use {price_including_tax} or {price_excluding_tax} relying for your desire.
As an example, should you set the suffix to (incl. tax) and the product value is $50, together with tax, the displayed value shall be “$50 (incl. tax)”. For those who use {price_excluding_tax} and set the suffix to ({price_excluding_tax} excl. tax), it’ll show as “$50 ($45 excl. tax)” if the bottom value sooner than a ten% tax is $45. This displays each the cost with tax integrated and the cost with out tax.

Show tax totals
In the end, you’ll need to make a choice whether or not to show tax totals as a unmarried quantity at checkout or as an itemized record. To stay issues easy for patrons, it’s possible you’ll make a choice As a unmarried overall, which is usual in lots of e-commerce shops. Then again, it can be higher to itemize taxes in case your retailer contains merchandise offered at other tax charges.
That’s it! We’ve lined all of the tax choices to be had in WooCommerce. If you’re glad together with your settings, click on the Save adjustments button on the backside of the web page.
Step 3: Arrange your tax charges
Now that you simply’ve configured your tax choices, it’s time to arrange your tax charges. You’ll want to observe this procedure for each and every tax fee your retailer makes use of.
This segment explains the best way to arrange usual tax charges, the usage of a U.S.-based retailer for example. To get began, navigate to the Tax tab in WooCommerce > Settings. Subsequent, click on on one of the crucial tax fee tabs (Usual, Lowered Price, 0 Price) relying on the kind of tax fee you need to arrange.

So as to add a brand new fee, Click on the Insert row button and fill within the fields.

- Nation code — Input the two-letter nation code (e.g., US for the US).
- State code — Input the two-letter state code (e.g., CA for California).
- Postcode/ZIP — Specify the postal codes for the tax fee (go away clean to use to all).
- Town — Specify the towns for the tax fee (go away clean to use to all).
- Price % — Input the tax fee proportion (e.g., 8.25 for 8.25% and 20.000 for 20%).
- Tax identify — Title the tax (e.g., VAT).
- Precedence — Set the concern for the tax fee (1 is the best precedence).
- Compound — Take a look at this field if this tax is compounded (calculated on best of different taxes).
- Delivery — Take a look at this field if this tax applies to transport prices.
After filling in the main points, click on the Save adjustments button on the backside of the web page. Right here’s what the tax fee for California in the US would possibly appear to be.

In the meantime, the United Kingdom has a normal usual tax of 20%, and that is what it might appear to be should you added it.

While you configured your tax choices, you had to make a choice whether or not taxes can be calculated in accordance with the client’s transport or billing deal with or for your retailer’s location. If you select to base taxes for your retailer’s location, it’s possible you’ll most effective want to specify one usual tax fee on your location.
Then again, if taxes are calculated in accordance with each and every buyer’s location, it’s possible you’ll want to input tax charges for various areas. As an example, should you cater to U.S. consumers and taxes are calculated in accordance with their addresses, you’ll most likely want to arrange a tax fee for each and every state. This can also be time-consuming, but it surely guarantees accuracy.
To simplify this procedure, you’ll use the WooCommerce tax extension that mechanically applies the right kind tax charges in accordance with nation, town, and different attributes.

You’ll be able to additionally use different extensions, equivalent to TaxJar and Avalara AvaTax. Those equipment can prevent important effort and time.
Assume you’ve those fee values in a CSV record. You’ll be able to import them via clicking the Import CSV button.

You’ll be able to additionally export CSV. This fashion, you’ll have a backup reproduction of your whole tax main points. If you wish to use the similar tax charges on any other web page, you’ll import the CSV record as an alternative of getting into all of the knowledge manually.
Step 4: Practice tax charges for your merchandise
After putting in place your tax charges, the next move is to use those charges for your merchandise. This guarantees that the right kind tax quantity is calculated at checkout in accordance with the product sort and the client’s location.
In your WordPress dashboard, pass to Merchandise > All Merchandise and click on at the product you need to edit, or click on on Upload New so as to add a brand new product.
Within the Product knowledge segment, click on the Normal tab and find the Tax standing and Tax elegance fields.

The drop-down menu for Tax standing offers you 3 choices: None, Taxable, and Delivery most effective. The Delivery most effective choice manner most effective the price of transport shall be taxed.
You will have to make a choice a tax elegance if you choose Taxable or Delivery most effective.
As an example, should you promote a ebook this is zero-rated for VAT in the United Kingdom, choose the 0 Price elegance. Additionally, choose the Usual elegance for the standard taxable merchandise like clothes, which is matter to the usual VAT fee of 20%.
Making use of tax charges in bulk
When you have many merchandise, you’ll follow tax charges in bulk to save lots of time. Choose the goods you need to edit via checking the containers subsequent to them. Subsequent, click on on Bulk Movements and choose Edit, then click on Practice.
Within the bulk editor, you’ll set the Tax standing and Tax elegance for all decided on merchandise without delay.

In the end, Click on the Replace button to use the adjustments to all decided on merchandise.
One closing piece of data: WooCommerce additionally gives detailed tax experiences, which you’ll get right of entry to via navigating to WooCommerce > Experiences > Taxes. This segment permits you to view tax knowledge taken care of via code or 12 months.

For those who lately arrange your retailer or enabled taxes, you could now not see any knowledge. Then again, realizing the place to search out those experiences is very important, as they’ll be worthwhile when submitting your tax returns.
Abstract
Putting in gross sales tax for your WooCommerce retailer would possibly appear daunting, however with WooCommerce, you’ll configure your tax charges and calculations in only a few clicks.
I am hoping this information has helped you place up gross sales tax on your on-line retailer. Something you will have to additionally learn about WooCommerce is that it will probably now and again decelerate WordPress websites, particularly for massive shops with a whole lot of merchandise. Thankfully, with Kinsta as your website hosting supplier on your WooCommerce retailer, you received’t want to fear about this.
For those who’re making an allowance for converting your present host, we offer limitless unfastened migrations from all hosts (our migration workforce will handle the whole lot for you).
The publish Easy methods to arrange gross sales tax for your WooCommerce website online seemed first on Kinsta®.
WP Hosting