In these days’s fast paced virtual panorama, having a well-organized and visually interesting documentation or weblog web site is very important for grabbing your target market’s consideration and maintaining them engaged. However how are you able to accomplish that with out spending never-ending hours on internet construction?
This newsletter explains the best way to create and customise a quick documentation and weblog web site utilizing VuePress, a minimalistic but robust Static Web page Generator (SSG).

What Is VuePress?
VuePress is an open-source framework that makes a speciality of producing static web sites, basically geared against documentation and running a blog. It was once created through Evan You, the genius at the back of Vue.js, and it embodies the philosophy of simplicity and straightforwardness of use that Vue.js is understood for.
Why Use VuePress?
Listed below are some compelling the reason why VuePress may well be the very best selection for you.
- Markdown simplicity: VuePress simplifies content material advent with Markdown, making it simple to write down and construction content material with out complicated formatting.
- Vue.js integration: VuePress seamlessly integrates Vue.js, enabling interactive and dynamic internet parts for an enticing person revel in.
- Efficiency and customization: VuePress gives superb efficiency with quick-loading static web sites and in depth customization choices to check your taste and desires.
Getting Began With VuePress
Prior to diving into VuePress, be sure to have Node.js or Yarn Vintage put in for your pc. There are two techniques to get began with VuePress, you both use the create-vuepress-site generator, which is able to assist scaffold the fundamental VuePress web site construction for you, or use handbook set up.
For this newsletter, let’s use the handbook set up means.
- Create a brand new listing and alter it:
mkdir vuepress-starter && cd vuepress-starter- Initialize along with your most popular bundle supervisor. For this newsletter, let’s use Yarn:
yarn init- Set up VuePress on your mission as a developer dependency:
yarn upload -D vuepress- Create a medical doctors folder to carry all of your code after which create a README.md report, which serves because the index report of your mission very similar to index.html:
mkdir medical doctors && echo '# Hi VuePress' > medical doctors/README.md- Open your mission in a code editor and upload the next scripts for your bundle.json report so you’ll serve and construct your web site:
"scripts": {
    "dev": "vuepress dev medical doctors",
    "construct": "vuepress construct medical doctors"
  },
You’ll now serve your web site through operating the yarn dev command. VuePress will get started your construction server at http://localhost:8080.
You could have now created a documentation web site. You are going to realize that VuePress gives a blank, minimalist default theme out of the field. Then again, it’s extremely customizable, supplying you with the ingenious freedom to craft a singular feel and appear to your web site.
Growing Documentation Pages
VuePress follows an easy listing construction for organizing documentation. Within your mission folder, you’ll to find the medical doctors listing we created, the place you’ll create Markdown (.md) information to your documentation pages.
For instance, you’ll create information like getting-started.md, utilization.md, and troubleshooting.md. Those information robotically grow to be routes that may be accessed whilst you navigate to http://localhost:8080/getting-started, http://localhost:8080/utilization and http://localhost:8080/troubleshooting.
To beef up the group of your documentation, you’ll create devoted folders for comparable documentation pages. As an example, you’ll create a folder referred to as information and prepare it with particular guides like using-kinsta-stsh.md. Whilst you make use of this construction, the content material in using-kinsta-stsh.md turns into available by the use of a URL like http://localhost:8080/information/using-kinsta-stsh.
You’ll additionally create a README.md or index.md report on the root degree of the information folder. This report will function the index web page, permitting customers to navigate to http://localhost:8080/information/ and comfortably get right of entry to the content material with a sidebar you are going to discover ways to configure within the subsequent segment.
On this VuePress pattern repository, you are going to realize that some of these information have been created, and a few markdown content material is added to each and every report. Be happy to create your information for your personal tastes, both from scratch to fit your particular wishes or through drawing inspiration from the content material to be had inside the repository.
Customizing VuePress Look
While you’ve created your documentation web site with content material, you could to find it difficult to navigate, particularly when you’ve got many information to regulate. Then again, VuePress means that you can customise the navigation construction of your web site to make it extra user-friendly and arranged.
To customise your web site’s look and navigation, create a .vuepress folder within the root listing of your mission. This folder will hang configuration information and belongings comparable for your VuePress web site.
Within the .vuepress folder, create a config.js report. You’ll additionally use different report codecs like YAML (.yml), TOML (.toml), or TypeScript (.ts) to your configuration.
On your config.js report, you’ll outline the navigation construction of your web site utilizing the themeConfig object. Right here’s an instance configuration:
module.exports = {
    name: 'Kinsta Vuepress',
    description: 'A VuePress QuickStart for Kinsta',
    themeConfig: {
        nav: [
            {
                text: 'Guide',
                link: '/guide/',
            },
            {
                text: 'Static Site Hosting',
                link: 'https://kinsta.com/static-site-hosting/',
            },
        ],
        sidebar: {
            '/information/': [
                {
                    title: 'Guide',
                    collapsable: false,
                    children: ['', 'using-kinsta-stsh'],
                },
            ],
        },
    },
};
On this instance, we’re configuring the web site’s name and description, defining navigation hyperlinks, and putting in place a sidebar for the /information/ segment.
The nav array specifies navigation hyperlinks on the most sensible of your web site. The sidebar object defines the sidebar construction for particular sections. On this case, it’s configured for the /information/ segment.
You’ll learn extra about navbar configuration within the VuePress documentation.
Styling
VuePress means that you can customise the illusion of your web site thru kinds. You’ll both override the default kinds utilizing some outlined variables or outline your taste. To do both, create a kinds folder within the .vuepress folder
To use easy overrides to the styling of the default preset or outline some variables to make use of later, you’ll create a palette.styl report in .vuepress/kinds. Those are some predefined variables you’ll tweak:
// colours
$accentColor = #5333ED
$textColor = #2c3e50
$borderColor = #eaecef
$codeBgColor = #282c34
$arrowBgColor = #ccc
$badgeTipColor = #42b983
$badgeWarningColor = darken(#ffe564, 35%)
$badgeErrorColor = #DA5961

// structure
$navbarHeight = 3.6rem
$sidebarWidth = 20rem
$contentWidth = 740px
$homePageWidth = 960px

// responsive breakpoints
$MQNarrow = 959px
$MQMobile = 719px
$MQMobileNarrow = 419px
Those variables can be utilized to handle constant styling all over your web site. VuePress additionally supplies a handy method so as to add additional kinds. You’ll create an index.styl report in .vuepress/kinds folder the place you’ll use customary CSS syntax:
.content material {
  font-size 30px
}
Learn extra about styling VuePress within the authentic documentation.
The usage of Parts
VuePress helps using elements to beef up the capability and look of your pages. You’ll create Vue elements and come with them on your Markdown information. Create a
elements folder in .vuepres, after which any *.vue information present in .vuepress/elements are robotically registered as world elements.
As an example, believe growing two elements, HomeOptions.vue and HostingBanner.vue:
.
└─ .vuepress
   └─ elements
      ├─ HomeOptions.vue
      └─ HostingBanner.vue
Inside of those vue.js element information, you’ll upload CSS codes. Let’s upload code to the HomeOptions.vue and HostingBanner.vue elements.
Upload the code beneath to HomeOptions.vue:
Additionally, upload the code beneath to HostingBanner.vue:
Within any Markdown report, you’ll then without delay use the elements (names are inferred from filenames):
Learn extra about elements in VuePress within the documentation.
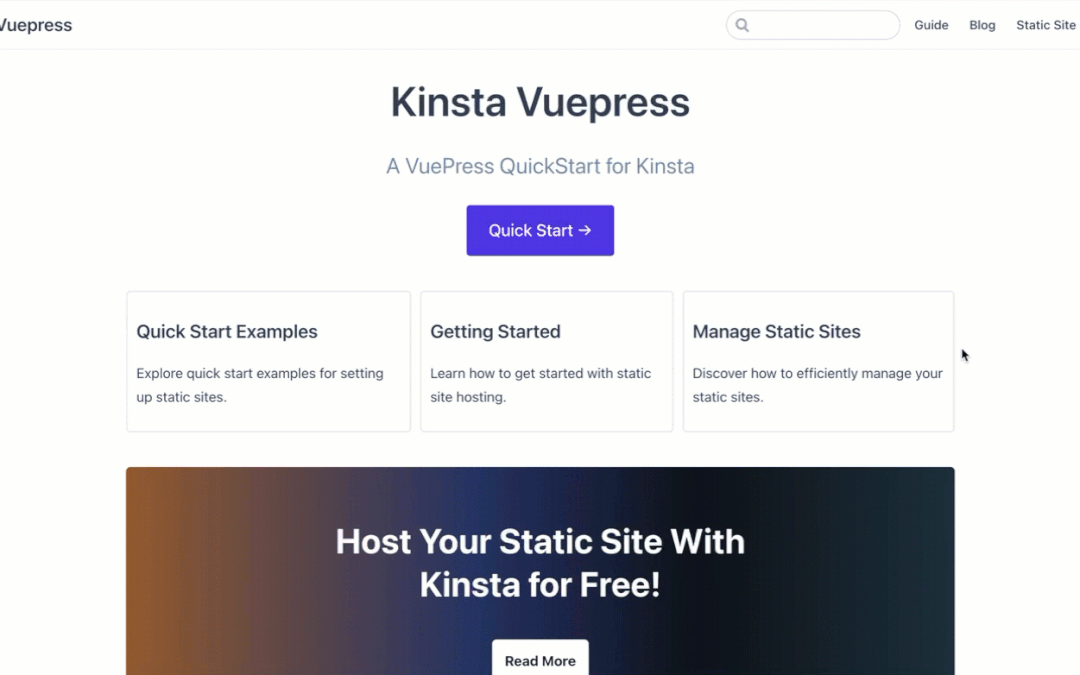
Customise Homepage
In VuePress, the default theme gives a pre-designed homepage structure that you’ll use to create an enticing and informative place to begin to your web site. To use this homepage structure, you wish to have to specify house: true and come with some further metadata within the YAML frontmatter of your root README.md report.
Right here’s an instance of the YAML frontmatter:
---
house: true
heroImage: /hero.png
heroText: Hero Identify
tagline: Hero subtitle
actionText: Get Began →
actionLink: /information/
options:
- name: Simplicity First
  main points: Minimum setup with markdown-centered mission construction is helping you focal point on writing.
- name: Vue-Powered
  main points: Benefit from the dev revel in of Vue + webpack, use Vue elements in markdown, and broaden customized topics with Vue.
- name: Performant
  main points: VuePress generates pre-rendered static HTML for each and every web page, and runs as an SPA as soon as a web page is loaded.
footer: MIT Approved | Copyright © 2018-present Evan You
---
These types of configurations make your documentation homepage seem like this:
It’s value noting that you’ll disable the heroText and tagline or another worth through atmosphere their corresponding fields to null should you want a more practical structure or no longer together with it. Any content material you come with after the YAML frontmatter (i.e., the metadata segment) can be handled as common Markdown and can be rendered following the options segment.
If you wish to have an absolutely customized homepage structure, VuePress additionally helps Customized Layouts. Moreover, you’ll create a rich-text footer through utilizing Markdown Slot Syntax, providing extra flexibility in showing footer content material. Right here’s an instance of the best way to set a rich-text footer:
---
house: true
---

::: slot footer
Made with ❤ through Kinsta. [Static Site Hosting](https://kinsta.com/static-site-hosting/)
:::
On this case, the content material inside the ::: slot footer segment means that you can come with hyperlinks and further knowledge within the footer space of your homepage.
Now that you know the way to accomplish the above customizations, upload the elements created previous to the Homepage and take away some choices so the Homepage seems to be higher:
---
house: true
tagline: A VuePress QuickStart for Kinsta
actionText: Fast Get started →
actionLink: /information/
---
By means of following those VuePress customization tactics, you’ll create a documentation web site that no longer handiest supplies treasured content material but in addition gives a very good person revel in with arranged navigation and interesting styling.
You’ll learn extra about customizing the default theme within the documentation.
Development a Weblog Segment With VuePress
Including a weblog segment for your VuePress web site is a breeze since VuePress means that you can write customized Vue elements that may be inserted into any Markdown information. Let’s create an element that can render the checklist of weblog posts.
Create a BlogIndex.vue report within the elements folder and upload the next code:
:to="put up.trail">{{ put up.frontmatter.name }}
{{ put up.frontmatter.description }}
:to="put up.trail">Learn extra
Within the equipped code snippet, you outline a Vue template that loops thru your weblog posts utilizing v-for, showing the put up name, description, and a “Learn extra” hyperlink for each and every put up.
The script segment exports a Vue element that computes and retrieves the weblog posts. Those posts are filtered in accordance with their trail (beginning with /weblog/) and the absence of a blog_index frontmatter characteristic. They’re then looked after through date in descending order to provide the most recent posts first.
Whilst you create new weblog posts, you’ll want to specify the put up date as a part of the frontmatter knowledge. This may occasionally assist kind the posts in order that the latest posts seem first.
To retailer the weblog posts, create a folder named weblog on the mission’s root. On this folder, upload a README.md report. That is going to be the weblog index, and that is the place you’ll come with the BlogIndex element to checklist all weblog posts.
---
blog_index: true
---

# Weblog

Welcome To Our Weblog
Make sure that so as to add the blog_index frontmatter characteristic, as it’s instrumental in making sure that the weblog index itself isn’t indexed a number of the particular person weblog posts. This characteristic is applied when filtering the posts within the posts computed belongings of the BlogIndex.vue element.
Subsequent, create a weblog folder on the root of your mission that can retailer all weblog posts and create each and every put up. For instance, create a first-post.md report and upload the next markdown content material:
---
name: "My Thrilling VuePress Weblog Adventure"
date: 2023-09-28
description: "Exploring VuePress, a flexible static web site generator, and sharing my studies alongside the best way."
---

# My Thrilling VuePress Weblog Adventure

On this inaugural weblog put up, I embark on an exhilarating adventure with VuePress, an impressive static web site generator that is best possible for growing documentation, blogs, and extra. As I delve into the sector of VuePress, I'm going to be sharing my studies, insights, and recommendations on making probably the most out of this improbable software.
For each and every weblog put up, be sure that you outline very important frontmatter settings, such because the put up name, date, and different related metadata. This meticulous group guarantees your weblog posts are offered cohesively and offers a compelling studying revel in to your target market.
In spite of everything, you’ll upload the weblog navigation for your navbar within the .vuepress/config.js report:
nav: [
            {
                text: 'Guide',
                link: '/guide/',
            },
            { text: 'Blog', link: '/blog/' },
            {
                text: 'Static Site Hosting',
                link: 'https://kinsta.com/static-site-hosting/',
            },
        ],
There may be much more you’ll do with VuePress, comparable to including plugins, utilizing a separate theme, and even growing your personal theme.
Deploy VuePress Static Web page To Kinsta
Kinsta means that you can host as much as 100 static web sites for loose. This can also be executed through pushing your code for your most popular Git supplier (Bitbucket, GitHub, or GitLab) after which deploying it to Kinsta.
Prior to pushing your information to any Git supplier, create a .gitignore report within the root of your mission to specify the information and folders Git must forget about when pushing your code:
# dependencies
/node_modules

# construct listing
./medical doctors/.vuepress/dist
/publicFor this information, we use GitHub. Create a repository on GitHub to push your supply code. As soon as your repo is in a position, observe those steps to deploy your static web site to Kinsta:
- Log in or create an account to view your MyKinsta dashboard.
- Authorize Kinsta along with your Git supplier.
- Click on Static Websites at the left sidebar, then click on Upload web site.
- Make a selection the repository and the department you want to deploy from.
- Assign a singular title for your web site.
- Upload the construct settings within the following layout:
- Construct command:
npm run construct - Node model:
16.20.0 - Submit listing:
./medical doctors/.vuepress/distorpublic
- Construct command:
- In spite of everything, click on Create web site.
And that’s it! You presently have a deployed web site inside a couple of seconds. A hyperlink is supplied to get right of entry to the deployed model of your web site. You’ll later upload your customized area and SSL certificates if you want.
As an alternative choice to Static Web page Internet hosting, you’ll go for deploying your static web site with Kinsta’s Software Internet hosting, which gives better internet hosting flexibility, a much wider vary of advantages, and get right of entry to to extra powerful options. For instance, scalability, custom designed deployment utilizing a Dockerfile, and complete analytics encompassing real-time and historic knowledge.
Abstract
VuePress is a flexible and strong software for growing rapid documentation and weblog websites. With its easy setup, customizable topics, and plugins, you’ll construct an informative and visually interesting platform to your target market.
Get started growing your VuePress web site these days and proportion your wisdom with the sector through internet hosting on our Static Web page Internet hosting without cost!
Have you ever applied VuePress to construct the rest? Be happy to proportion your initiatives and studies with us within the feedback segment beneath.
The put up Create and Customise a Rapid Documentation and Weblog Web page With VuePress gave the impression first on Kinsta®.
WP Hosting