
Charge restricting is important for shielding app or site assets from over the top or unsuitable use. Whether or not a results of malicious human intervention, bot-based assaults, or an lost sight of vulnerability, useful resource misuse can intervene with reliable get admission to for your software and introduce serious vulnerabilities.
This text explores methods to upload price restricting to an API in a Laravel software.
Throttle Your API Visitors in Laravel
Charge restricting is a mechanism designed to mitigate the exploitation of your software’s assets. Whilst it has many makes use of, it’s specifically helpful for public APIs in massive, scalable techniques. It guarantees that every one reliable customers retain honest get admission to to gadget assets.
Charge restricting may be an important for safety, price keep watch over, and general gadget balance. It might assist save you request-based assaults, comparable to dispensed denial-of-service (DDoS) assaults. This assault is dependent upon sending repeated requests to weigh down and disrupt get admission to to an software or site server.
There are a number of strategies for imposing price restricting. You’ll use variables that symbolize the requester to decide who can get admission to your software and the way ceaselessly. Some commonplace variables come with:
- IP Deal with — Enforcing price limits in line with IP addresses lets you prohibit the collection of requests consistent with deal with. This system is particularly really helpful in instances the place customers can get admission to an software with out offering credentials.
- API Key — Restricting get admission to by way of API keys includes offering the requester with pre-generated API keys and setting up price limits on a per-key foundation. With this means, you’ll additionally follow other get admission to ranges to the generated API keys.
- Shopper ID — You’ll additionally pre-generate a Shopper ID {that a} person can embed within the header or frame of API requests. This system permits you to set per-ID get admission to ranges to verify no consumer can monopolize gadget assets.
Laravel Middleware
Middleware supplies a handy mechanism for analyzing and filtering HTTP requests coming into an software. Necessarily, it’s a layer of code between the appliance and its underlying infrastructure to allow communique amongst its assets.
How To Enforce Charge Limits
This instructional makes use of an present mini library API at the Laravel 10 framework to exhibit the use of Laravel Throttle. The pattern beginning venture accommodates the fundamental create, learn, replace, and delete (CRUD) implementations had to organize books in a set and two further routes to exhibit some rate-limiting ideas.
Must haves
The academic assumes you might be aware of the fundamentals of API building in Laravel. Make certain that you might have the next:
- PHP 8.2, Composer, and Laravel put in and configured to your native system
- An lively Kinsta account
- An account on GitHub, GitLab, or Bitbucket to push your code
You additionally use MyKinsta to arrange and deploy this API. You’ll practice at the side of the supplied venture template and preview the general consequence from the whole supply code.
Laravel Software Set Up
- To start, clone the venture template.
- Then, create a .env document within the venture’s root listing and duplicate the contents of .env.instance into it.
- Subsequent, whole the setup the use of the next instructions to put in the appliance dependencies and generate the app key.
composer set up
php artisan key:generate
If this command does now not robotically upload the app key for your .env document, run php artisan key:generate --show, replica the generated key, and paste it into your .env document as the price for APP_KEY.
- As soon as the dependencies set up and app key technology are whole, get started the appliance the use of the next command:
php artisan serveThis command begins the appliance and makes it available by way of the browser at https://127.0.0.1:8000.
- Consult with the URL to substantiate that the Laravel welcome web page populates:

Database Configurations
Let’s configure and arrange the appliance database in MyKinsta.
- Navigate for your MyKinsta account dashboard and click on the Upload carrier button:

- At the Upload carrier record, click on Database and configure the parameters to start out your database example:

This instructional makes use of MariaDB, however you’ll make a choice any of the Laravel-supported database choices that Kinsta supplies.
- While you’ve entered your database main points, click on the Proceed button to finalize the method.
Databases provisioned on Kinsta have interior and exterior connection parameters. You can use interior connection parameters for programs hosted inside of the similar Kinsta account and exterior parameters for exterior connections. Due to this fact, use Kinsta’s exterior database credentials in your software.
- Reproduction and replace the app database’s .env credentials with the exterior credentials proven within the screenshot beneath:

DB_CONNECTION=mysql
DB_HOST=your_host_name
DB_PORT=your_port
DB_DATABASE=your_database_info
DB_USERNAME=your_username
DB_PASSWORD=your_password- After filling within the database credentials, check the relationship via making use of database migration the use of the command beneath:
php artisan migrateIf the whole lot purposes correctly, you must see a reaction very similar to that proven beneath.

- Subsequent, use the next command to record the appliance routes and notice the routes already applied.
php artisan path:recordYou must now see the to be had API endpoints:

- Get started the appliance and ensure that the whole lot nonetheless works fantastic. You’ll check those endpoints by way of the terminal the use of a device like Postman or CURL.
How To Charge Restrict in a Laravel Software
A number of rate-limiting ways are to be had for Laravel programs. You’ll block a suite of IP addresses or put in force duration-based request limits in line with a person’s IP deal with or user_id. Subsequent, you follow every of those strategies.
- Set up the Laravel Throttle bundle the use of the next command:
composer require "graham-campbell/throttle:^10.0"- You’ll additionally make further adjustments to the Laravel Throttle configurations via publishing the
dealer configurationsdocument:
php artisan dealer:put up --provider="GrahamCampbellThrottleThrottleServiceProvider"How To Block IP Addresses
One rate-limiting method lets you block requests from a specified set of IP addresses.
- To start, create the essential middleware:
php artisan make:middleware RestrictMiddleware- Subsequent, open the created app/Http/Middleware/RestrictMiddleware.php middleware document and change the code within the
deal withserve as with the snippet beneath. Be sure you uploaduse App;to the record of imports on the best of the document.
$restrictedIps = ['127.0.0.1', '102.129.158.0'];
if(in_array($request->ip(), $restrictedIps)){
  App::abort(403, 'Request forbidden');
}
go back $subsequent($request);- Within the app/Http/Kernel.php document, create an alias for this middleware app via updating the
middlewareAliasesarray as follows:safe $middlewareAliases = [ . . . 'custom.restrict' => AppHttpMiddlewareRestrictMiddleware::class, ];- Then, follow this middleware to the
/restricted-routewithin the routes/api.php document as follows and check:
Path::middleware(['custom.restrict'])->staff(serve as () {
  Path::get('/restricted-route', [BookController::class, 'getBooks']);
});
When running as it should be, this middleware blocks all requests from the IPs within the
$restrictedIpsarray:127.0.0.1and102.129.158.0. Requests from those IPs go back a 403 Forbidden reaction, as proven beneath: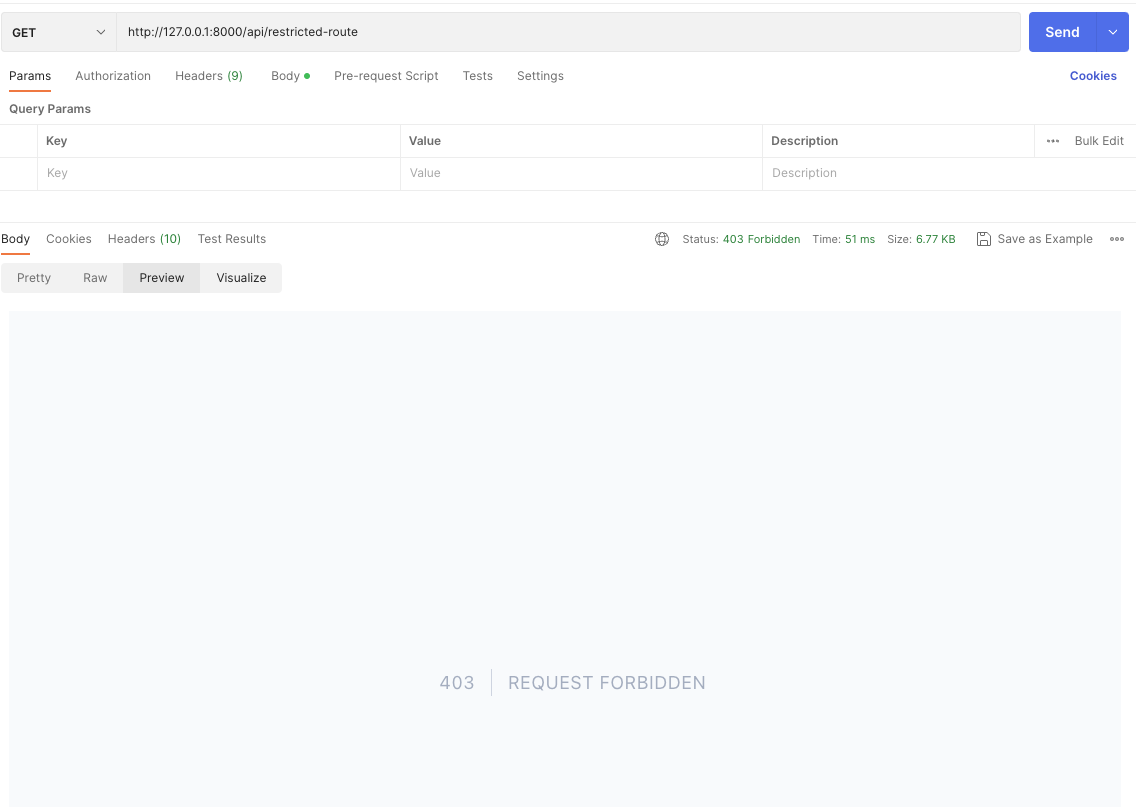
A 403 Forbidden reaction for the /restricted-route GET endpoint on Postman How To Throttle Requests via IP Deal with
Subsequent, you price prohibit requests the use of the person’s IP deal with.
- Practice the Throttle middleware to the
/e-bookendpoint’sGETandPATCHroutes in routes/api.php:
Path::middleware(['throttle:minute'])->staff(serve as () { Path::get('/e-book', [BookController::class, 'getBooks']); }); Path::middleware(['throttle:5,1'])->staff(serve as () { Path::patch('/e-book', [BookController::class, 'updateBook']); });- You should additionally replace the
configureRateLimitingserve as within the app/Suppliers/RouteServiceProvider document with the middleware you added to the above routes.
…
RateLimiter::for('minute', serve as (Request $request) {
  go back Restrict::perMinute(5)->via($request->ip());
});
This configuration limits requests to the
/e-book GETendpoint to five consistent with minute, as proven beneath.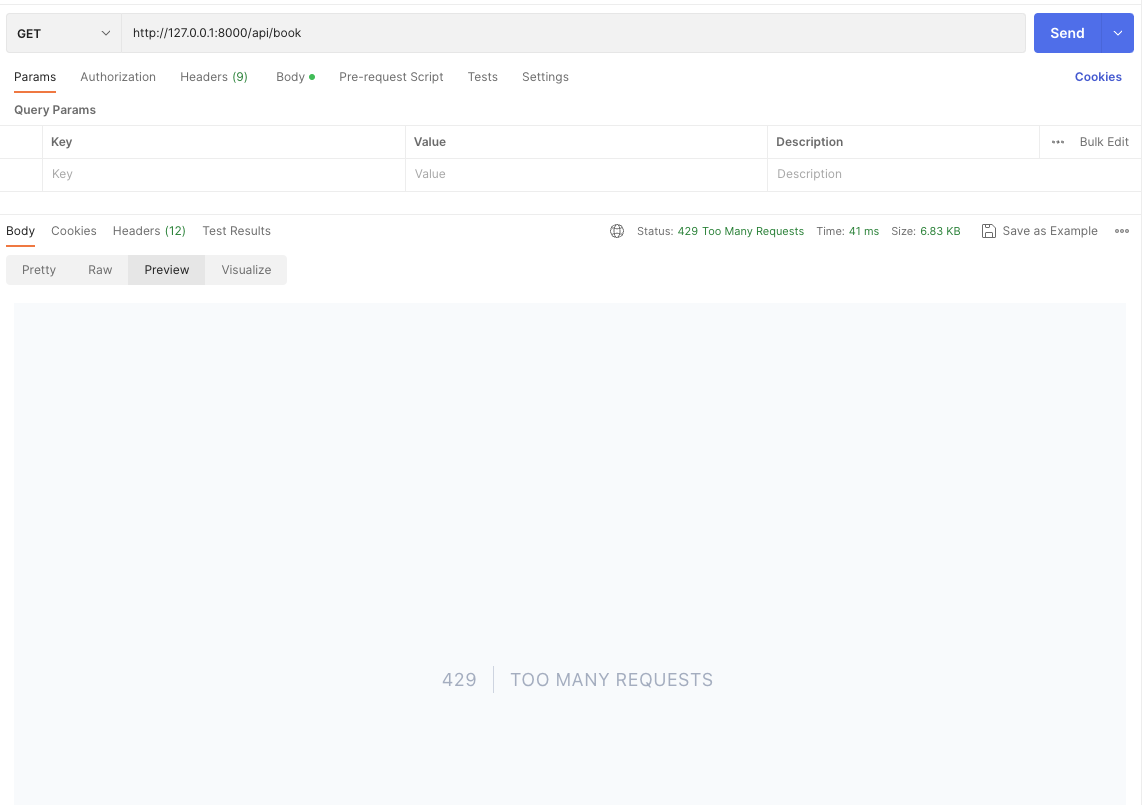
A “429 Too Many Requests” reaction for the /e-book GET endpoint on Postman. How To Throttle In response to Consumer ID and Classes
- To price prohibit the use of
user_idandconsultationparameters, replace theconfigureRateLimitingserve as within the app/Suppliers/RouteServiceProvider document with the next further limiters and variables:
... RateLimiter::for('person', serve as (Request $request) { go back Restrict::perMinute(10)->via($request->person()?->identity ?: $request->ip()); }); RateLimiter::for('consultation', serve as (Request $request) { go back Restrict::perMinute(15)->via($request->consultation()->get('key') ?: $request->ip()); });- In the end, follow this code to the
/e-book/{identity} GETand/e-book POSTroutes within theroutes/api.phpdocument:
Path::middleware(['throttle:user'])->staff(serve as () {
  Path::get('/e-book/{identity}', [BookController::class, 'getBook']);
});
Path::middleware(['throttle:session'])->staff(serve as () {
  Path::submit('/e-book', [BookController::class, 'createBook']);
});
This code limits requests the use of
user_idandconsultation, respectively.Further Strategies in Throttle
Laravel Throttle options a number of further strategies for better keep watch over over your rate-limiting implementation. Those strategies come with:
strive— Hits the endpoint, increments the hit depend, and returns a boolean indicating whether or not the configured hit prohibit has been exceeded.hit— Hits the Throttle, increments the hit depend, and returns$thisto allow any other (non-compulsory) manner name.transparent— Resets the Throttle depend to 0 and returns$thisso you’ll make any other manner name if desired.depend— Returns the whole collection of hits to the Throttle.take a look at— Returns a boolean indicating whether or not the Throttle hit prohibit has been exceeded.
- To discover price restricting the use of those strategies, create a middleware app referred to as CustomMiddleware the use of the command beneath:
php artisan make:middleware CustomMiddleware- Then, upload the next import recordsdata to the newly created middleware document in app/Http/Middleware/CustomMiddleware.php:
use GrahamCampbellThrottleFacadesThrottle; use App;- Subsequent, change the content material of the
deal withmanner with the next code snippet:
$throttler = Throttle::get($request, 5, 1); Throttle::strive($request); if(!$throttler->take a look at()){ App::abort(429, 'Too many requests'); } go back $subsequent($request);- Within the app/Http/Kernel.php document, create an alias for this middleware app via updating the
middlewareAliasesarray as follows.
safe $middlewareAliases = [ . . . 'custom.throttle' => AppHttpMiddlewareCustomMiddleware::class, ];- Then, follow this middleware to the
/custom-routewithin the routes/api.php document:
Path::middleware(['custom.throttle'])->staff(serve as () {
  Path::get('/custom-route', [BookController::class, 'getBooks']);
});
The tradition middleware simply applied assessments if the throttle prohibit has been exceeded the use of the
take a look atHow To Deploy the Software to the Kinsta Server
Now that you simply’ve explored methods to enforce price restricting in a Laravel software, deploy the app to the Kinsta server to make it available globally.
- Get started via pushing the up to date code to GitHub, GitLab, or Bitbucket.
- Out of your Kinsta dashboard, click on the Upload carrier button and choose Software from the record. Hyperlink your Git account for your Kinsta account and choose the right kind repository to deploy.
- Below Fundamental main points, identify the appliance and make a choice your most popular information heart. Additionally, be sure to added the essential software setting variables. Those correspond to the variables provide for your native .env document: the
APP_KEYand the database configuration variables.
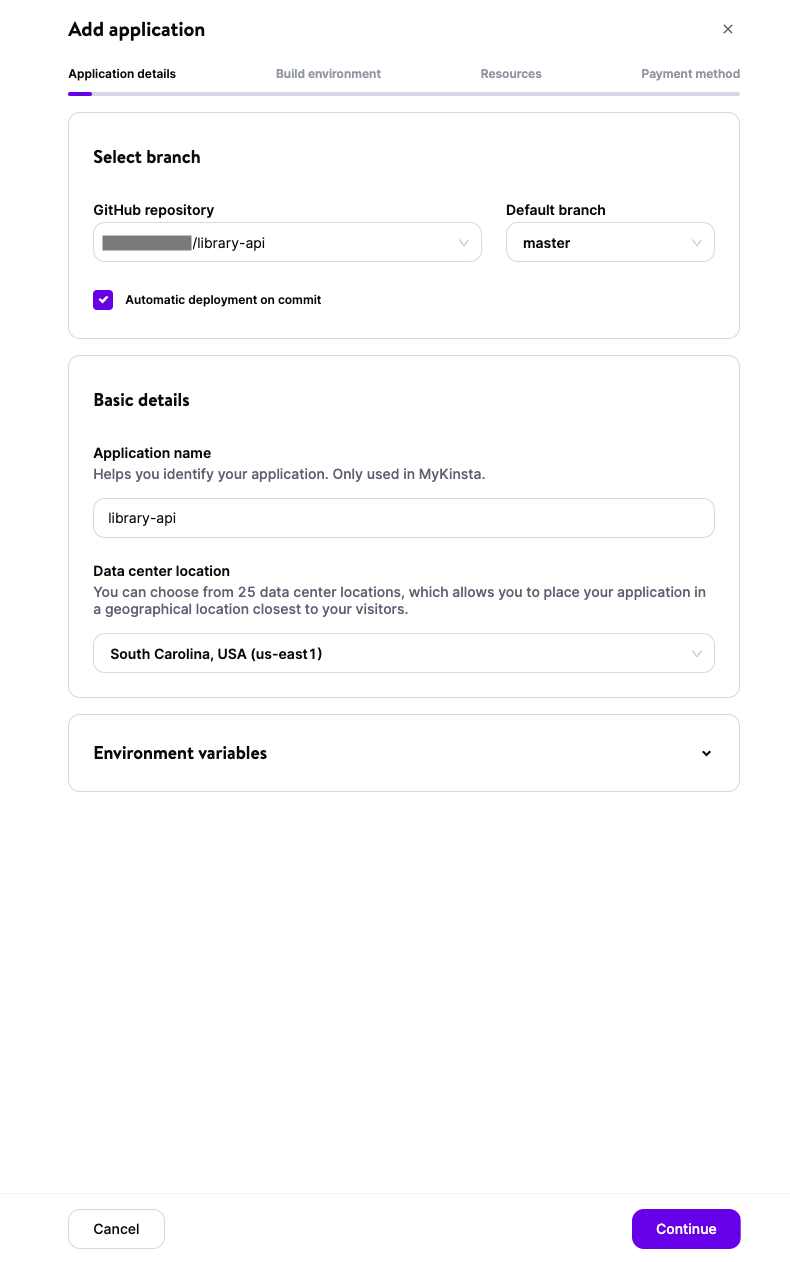
Software main points on MyKinsta. - Click on the Proceed button to choose the construct setting variables. You'll go away the default values, as Kinsta auto-fills the essential parameters.
- At the Processes tab, you'll go away the default values or input a reputation in your procedure. You'll additionally choose the pod and example sizes in this tab.
- In the end, the Cost tab shows a abstract of your alternatives. Upload your most popular cost technique to finalize the method.
- As soon as whole, click on the Packages tab to view a listing of deployed programs.
- Click on the appliance identify to view its deployment main points, as proven beneath. You'll use the appliance’s URL to get admission to it.
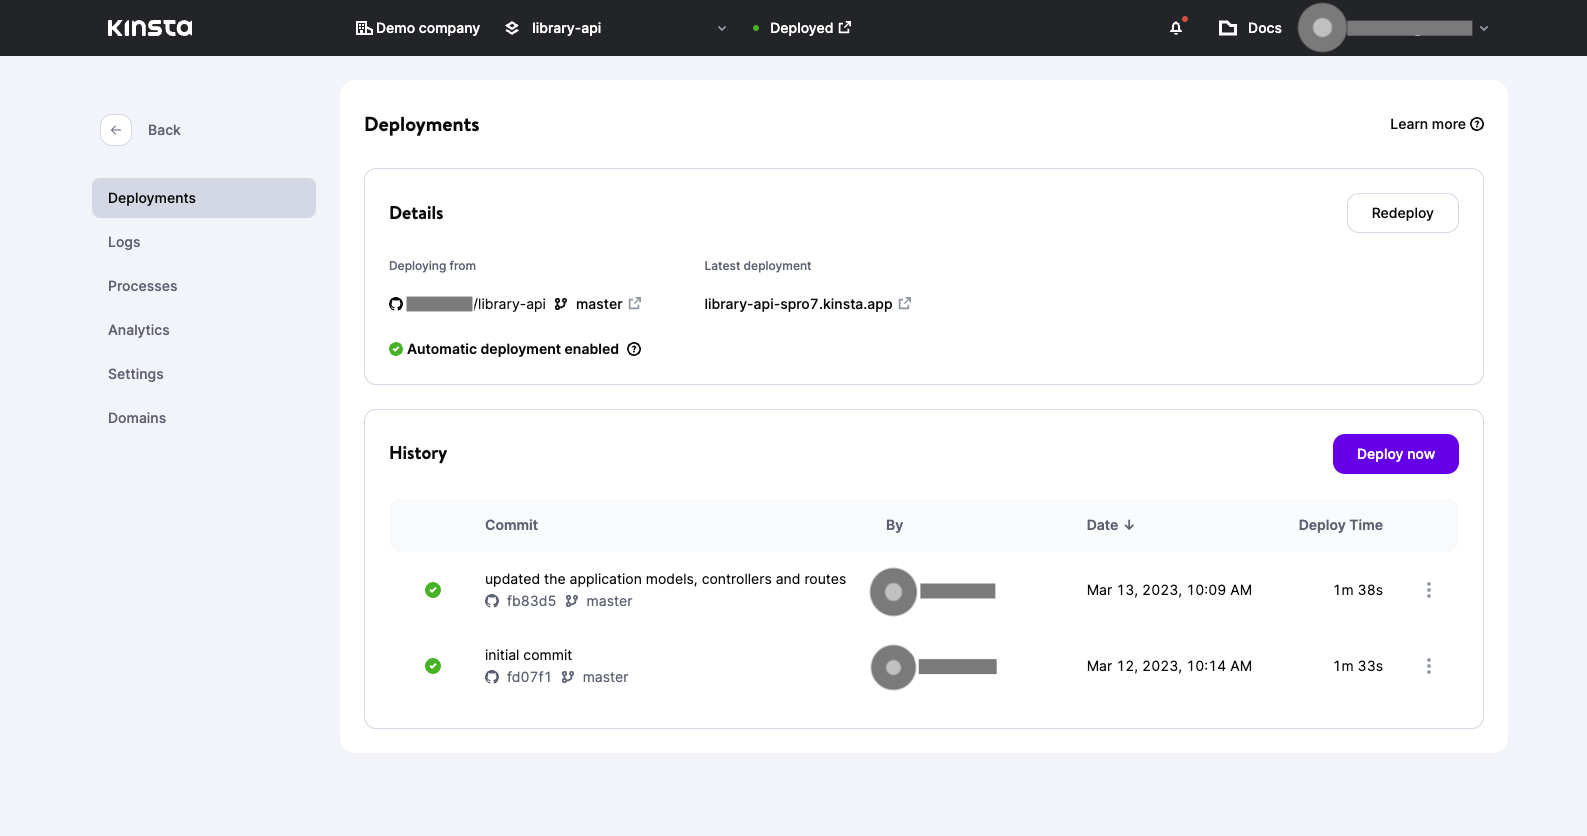
Deployment main points on MyKinsta dashboard. How To Check the Software
- To check the appliance in the neighborhood, use the
php artisan servecommand.
This command makes your software browser available at
http://localhost:8000. You'll check the API endpoints to which you applied price restricting from right here via making repeated calls to cause the speed prohibit capability.The Kinsta server shows an Get admission to Forbidden reaction since you haven’t added configuration main points that direct Kinsta on methods to serve the appliance. Upload those main points now.
- Create a
.htaccessdocument for your app’s root listing and upload the next code to the document:
RewriteEngine On RewriteRule ^(.*)$ public/\ [L] - Push those adjustments to GitHub and Kinsta auto-deploys to enact the trade.
- Now, open the appliance the use of the supplied URL and be sure to see the Laravel welcome web page.
You'll now check the API endpoints to which you applied price restricting the use of Postman via making repeated calls till you’ve reached the configured prohibit. You obtain a 429 Too Many Requests reaction after exceeding the prohibit.
Abstract
Integrating rate-limiting functionalities right into a Laravel API is helping keep watch over the speed at which customers devour an software’s assets. Charge restricting lets you supply a competent person revel in with out below and over-spending. It additionally guarantees the appliance’s underlying infrastructure stays useful and environment friendly.
You'll additionally take a look at the Kinsta weblog to be informed extra about different thrilling ideas on Laravel and different internet applied sciences. The reasonably priced and seamless website hosting products and services are extremely advisable in your software and crew’s wishes.
- Then, follow this middleware to the


The submit How To Upload Charge Restricting to an API in a Laravel Software seemed first on Kinsta®.
WP Hosting