
In step with a up to date survey, 28 % of small companies don’t have a site. Moreover, many corporations take months, even years, to get their websites up and operating. As a industry proprietor, you already know that point is cash.
Due to this fact, in relation to growing your site, you don’t wish to waste any time environment it up. Due to Native, you’ll be able to create and submit a WordPress site comfortably. In only a few clicks, you’ll be able to have a gorgeous and responsive site that showcases your services to the arena.
On this put up, we’ll take a more in-depth have a look at Native as a internet construction instrument. Then, we’ll display you learn how to use it to get your site up and operating. Let’s get began!
An Creation to Native by means of Flywheel
Native by means of Flywheel is a neighborhood construction setting designed for WordPress customers:

It allows you to create WordPress websites in your laptop, with out the desire for a reside server. Which means you’ll be able to paintings in your website online offline, and make adjustments with out affecting the general public model of your website online.
Native has some nice options, together with automated set up, one-click admin, and MagicSync. Automated set up implies that you don’t want to manually arrange WordPress each and every time you wish to have to create a brand new website online. Moreover, the one-click admin function permits you to briefly create a WordPress administrator account so you’ll be able to get started running in your website online straight away.
In the meantime, MagicSync allows you to robotically sync your native website online with a reside server. Which means you’ll be able to make adjustments on your native website online after which push them reside with only a few clicks.
The way to Get Your Web page Up and Working Temporarily With Native (In 5 Steps)
As we’ve observed, you’ll be able to create a website online with Native and check your content material earlier than making your adjustments reside. This manner, you’ll be able to be sure that the whole thing is operating because it must earlier than launching your small business website online.
Let’s have a look at learn how to get your website online up and operating in simply 5 simple steps.
Step 1: Set up Native and Create a New Web page
First, you’ll want to obtain Native in your laptop. This system will ask you to make a choice an running gadget:

Then it’s going to run the installer. When triggered, make a selection a location for the set up:

As soon as the set up is whole, you’ll be able to release the instrument and create a loose account:

Whenever you’ve arrange a Native account, you’ll be taken to the dashboard:

Right here, you’ll be capable of get admission to any websites that you simply arrange. To get began, click on at the Create a New Web page button.
Step 2: Configure the Settings of Your Native Web page
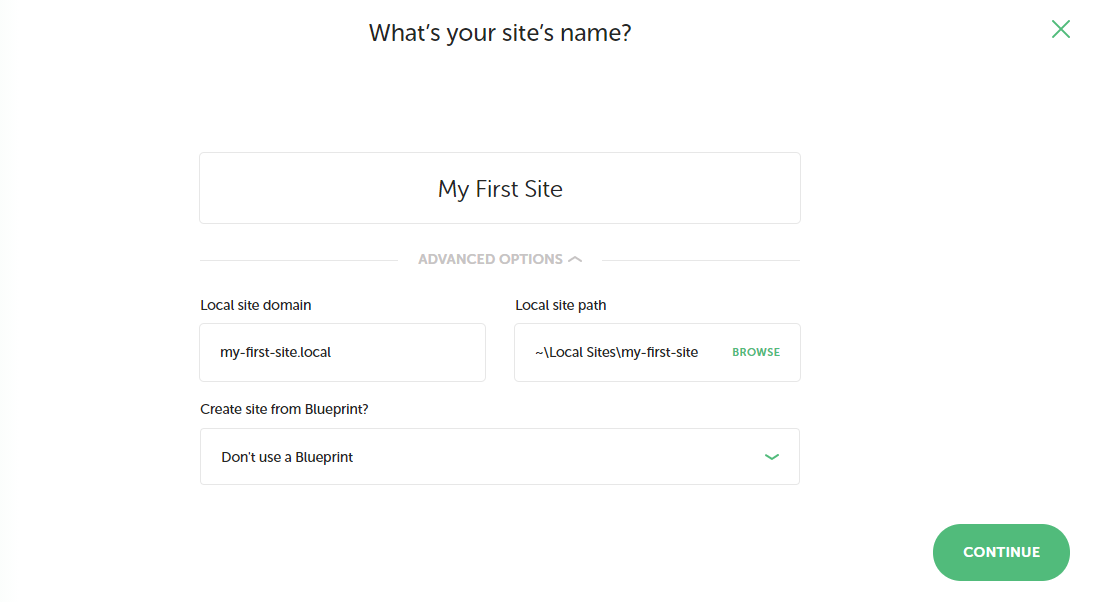
Subsequent, you’ll want to configure the settings of your native website online. First, you’ll wish to give it a reputation:

Should you click on at the Complex Choices hyperlink, you’ll be able to regulate your area and website online trail:
Should you navigate to the Web page Data segment, you’ll be able to specify the URL on your website online, and make a selection whether or not or to not use HTTPS. Below Database Settings, you’ll want to make a choice a reputation on your database, in addition to a username and password.
Within the WordPress Settings segment, you’ll be able to input the username and password on your admin account. Should you depart those fields clean, Native will generate random login main points for you. Whilst you’re in a position, click on on Proceed.
The next move is to arrange your construction setting. Native provides two choices: Most well-liked or Customized:

We suggest going with the primary choice should you’re a newbie. If you select Customized, you’ll be able to additional customise your setting by means of opting for a PHP model, internet server, and extra.
Step 3: Set Up WordPress
After opting for your setting, you’ll be triggered to hook up with WordPress. This will also be performed by means of merely getting into your WordPress login main points, which you created within the earlier step:

Then, click on at the Upload Web page button and look ahead to Native to generate your website online. This may occasionally take a couple of mins.
As soon as your website online has been created, you’ll be taken to the Native Websites segment on your dashboard:

Right here, you’ll be able to view your website online’s main points. To get admission to your WordPress website online, merely click on at the Open Web page button.
Step 4: Customise Your WordPress Web page
Now that you’ve got WordPress put in, you’ll be able to configure your website online’s settings and personal tastes within the dashboard:

Should you navigate to Settings, you’ll be able to trade your website online’s name, write a tagline, and extra:

But even so putting in your website online’s personal tastes, you’ll be able to additionally customise its look. To try this, merely click on at the Look tab and make a selection a WordPress theme:

Whenever you’ve selected a theme, you’ll be able to get started including plugins. Those equipment upload additional options on your website online, equivalent to touch bureaucracy and social media buttons. Merely click on at the Plugins tab, then make a selection Upload New and seek for the instrument you wish to have to put in:

Whenever you’ve discovered a plugin you wish to have to make use of, you’ll be capable of set up and turn on it. You’ll then navigate on your plugin’s web page within the dashboard to configure its settings.
Step 5: Submit Your Web page
Some of the best possible issues about Native is that it makes it really easy to push your website online reside. Actually, it may be up and operating with only a few clicks.
First, alternatively, you’ll want to acquire internet internet hosting. You’ll to find quite a lot of internet hosting plans for WordPress websites at suppliers like WP Engine and Flywheel.
Upon getting your internet hosting looked after out, log into your Native dashboard and navigate to the Attach web page:

Then click on at the Connect with a Platform button, and make a selection both WP Engine or Flywheel, relying on which internet hosting plan you bought. You’ll then log into your internet hosting account to submit your website online.
That’s it – your website online is now reside! Any further, you’ll be able to check any adjustments on your content material on Native earlier than publishing them on your public website online.
Conclusion
Native by means of Flywheel is a construction instrument that allows you to create WordPress websites in the community. It provides an intuitive person interface and a variety of options that will help you organize your content material extra successfully.
On this put up, we confirmed you learn how to create a website online with Native and submit it in simply 5 simple steps:
- Set up Native and create a brand new website online.
- Configure the settings of your native website online.
- Arrange WordPress.
- Customise your WordPress website online.
- Submit your website online.
Do you will have any questions on putting in a site with Native? Tell us within the feedback segment beneath!
The put up The way to Get Your Web page Up and Working Temporarily With Native (In 5 Steps) gave the impression first on Torque.
WordPress Agency